Resources

Preventing Water Penetration in Below-Grade Concrete Masonry Walls

INTRODUCTION

Concrete masonry has traditionally been the material of choice for foundation wall construction. State-of-the-art waterproofing, dampproofing, and drainage systems applied to concrete masonry provide excellent protection from water penetration, ensuring protection for building contents and comfort for occupants.

Protecting below-grade walls from water entry involves installing a barrier to water and water vapor. Below grade moisture tends to migrate from the damp soil to the drier area inside the basement. An impervious barrier on the exterior wall surface can prevent moisture entry. The barrier is part of a comprehensive system to prevent water penetration, which includes proper wall construction and the installation of drains, gutters, and proper grading.

WATERPROOFING AND DAMPPROOFING

Building codes (refs. 1, 2) typically require that basement walls be dampproofed for conditions where hydrostatic pressure will not occur, and waterproofed where hydrostatic pressures may exist. Dampproofing is appropriate where groundwater drainage is good, through granular backfill into a subsoil drainage system.

Hydrostatic pressure may exist due to a high water table or due to poorly draining backfill, such as heavy clay soils. Materials used for waterproofing are generally elastic, allowing them to span small cracks and accommodate minor movements.

When choosing a system, consideration should be given to the degree of resistance to hydrostatic head of water, absorption characteristics, elasticity, stability in moist soil, resistance to mildew and algae, and impact, puncture and abrasion resistance.

WATERPROOF AND DAMPPROOF SYSTEMS

Waterproof and dampproof systems must be continuous to prevent water penetration. Similarly, the barrier is typically carried above the finished grade level to prevent water entry between the barrier and the foundation wall. Cracks exceeding ¼ in. (6 mm) should be repaired before applying a waterproof or dampproof barrier. Repair of hairline cracks is typically not required, as most barriers will either fill or span small openings. In addition, most waterproofing and dampproofing systems should be applied to clean, dry walls. In all cases, manufacturer’s directions should be carefully followed for proper installation.

Particular attention should be paid to wall penetrations and to re-entrant corners at garages, porches, and fireplaces. Because differential movement often occurs at these intersections, stretchable membranes are often used to span any potential cracks. Alternately, the main wall in some cases can be coated prior to constructing the cross wall provided that structural adequacy is maintained.

Coatings are sprayed, trowelled, or brushed onto below-grade walls, providing a continuous barrier to water entry. Coatings should be applied to clean, structurally sound walls. Walls should be brushed or washed to remove dirt, oil, efflorescence, or other materials which may reduce the bond between the coating and the wall.

Sheet membranes and panels are less dependent on workmanship and surface preparation than coatings. Many membrane systems are better able to remain intact in the event of settlement or other foundation wall movement. Seams, terminations, and penetrations must be properly sealed.

Prescriptive Systems

Both the International Building Code (IBC) (ref. 1) and the International Residential Code (IRC) (ref. 2) include prescriptive methods for waterproofing and dampproofing. Except where a damproofing material is approved for direct application to the masonry, masonry walls are required to have not less than in. (9.5 mm) portland cement parging applied to the exterior of the wall before applying damproofing. The following materials are specified in the IBC as acceptable waterproofing and dampproofing materials:

  • two-ply hot-mopped felts;
  • 6 mil (0.006 in.; 0.152 mm) or greater polyvinyl chloride;
  • 40 mil (0.040 in.; 1.02 mm) polymer-modified asphalt;
  • 6 mil (0.006 in.; 0.152 mm) polyethylene; or
  • other approved methods or materials capable of bridging nonstructural cracks.

In addition, the IRC includes the following materials for concrete and masonry foundation waterproofing:

  • 55 pound (25 kg) roll roofing;
  • 60 mil (1.5 mm) flexible polymer cement;
  • in. (3 mm) cement-based, fiber-reinforced, waterproofing coating; or
  • 60 mil (1.5 mm) solvent-free liquid-applied synthetic rubber.

Both the IBC and IRC list the following materials as acceptable for dampproofing only (note—any of the waterproofing materials are acceptable for dampproofing):

  • bituminous material;
  • 3 lb/yd² (16 N/m²) of acrylic modified cement;
  • in. (3.2 mm) coat of surface-bonding mortar complying with ASTM C887 (ref. 3); or
  • other approved methods or materials.

The following discusses details of some of the prescriptive code methods for waterproofing and dampproofing.

Rubberized Asphalt Systems

A wide variety of rubberized and other polymer-modified asphalt waterproofing systems are available. Most of these are applied as sheet membranes, although some are available as liquid coatings. These systems provide a continuous barrier to water with the ability to elastically span small holes or cracks.

Rubberized asphalt sheet membranes are applied over a primer, which is used to increase adhesion of the sheet. The membrane is adhesive on one side and protected by a polyethylene film on the other. Adjacent pieces of membrane must be lapped, and the top and bottom edges sealed with mastic to provide continuous protection from water entry. After the membrane is placed on the wall, the surface is rolled with sufficient pressure to ensure adequate adhesion.

Rubberized asphalt is also available in a form that can be melted at the jobsite, then spread to completely cover foundation walls. Liquid coatings can be applied by airless spray, roller, or brush. Both the liquid-applied and sheets are covered with a protection board, which protects from construction traffic and during backfilling.

Cementitious Coating Systems

Cement-based coatings are typically trowelled onto concrete masonry walls or brushed on using a coarse-fibered brush. The coatings sufficiently fill block pores, small cracks, and irregularities. Some cementitious coatings are modified with various polymers to increase elasticity and water penetration resistance.

Elastomeric Systems

Elastomeric materials are acrylic-based products which provide a flexible barrier to water penetration for below grade walls. Elastomerics are available as liquid coatings and as sheet membranes. The sheets are attached with adhesive, and may be reinforced with fabric to further increase tensile strength and resistance to tears and punctures. Liquid coatings can be applied by airless spray, roller, or brush.

Other Waterproofing and Dampproofing Systems

The systems listed above (and within the building codes) are only some of the materials and systems available; several others are discussed below. See Basement Manual—Design & Construction Using Concrete Masonry (ref. 4) for more detailed information.

Parging and Bituminous Coating Systems

Where drainage is good, a dampproof coating of parging with a permanent bituminous coating has proven to be satisfactory. A portland cement and sand mix (1:3.5 by volume), or Type M or S mortar may be used for the parge coat. The parge coat should be beveled at the top to form a wash, and thickened at the bottom to form a cove between the wall base and top of footing, as shown in Figure 1.

To further increase water penetration resistance, a bituminous coating is applied over the parging. Coal tar or asphalt based bitumens are available in solvent for hot application, or in emulsions for application at ambient temperatures. These coatings can be sprayed, brushed, or trowelled onto the finish coat of parging.

Bentonite Panel Systems

Bentonite is a mineral that swells to many times its original size when wet. Waterproofing panels incorporate dry bentonite encased in kraft paper or fabric. After installation, the bentonite swells up the first time it is exposed to water, expanding between the foundation wall and the backfill, and forming an impervious barrier. The swelling seals small cracks in the foundation wall or punctures in the panels themselves.

To prevent premature hydration bentonite panels must be protected from moisture until they are properly installed and the foundation wall has been backfilled.

Other Systems

There are several systems for which Acceptance Criteria, developed by the ICC Evaluation Service, exist. Cold, liquid-applied, below-grade exterior dampproofing and waterproofing materials should demonstrate compliance with ICC ES AC29 (ref. 5). For rigid, polyethylene, below-grade dampproofing and waterproofing materials, compliance should be shown to ICC-ES AC114 (ref. 6).

Some systems fulfill the requirements of both waterproofing/dampproofing and wall insulation. These systems, however, may not be specified directly in the building code or have an Acceptance Criteria. In these cases, materials should be evaluated both for general waterproofing (or dampproofing) characteristics (such as resistance to hydrostatic pressure, etc.) as well as for criteria specific to the material or system. The Acceptance Criteria listed above can be used as a baseline for a material, although not all requirements may apply to all materials. An engineering evaluation of the product testing results can demonstrate acceptable performance for use as dampproofing or waterproofing.

DRAINAGE

Draining water away from basement walls significantly reduces the pressure the basement wall must resist. This reduces both the potential for cracking and the possibility of water penetration into the basement if there is a failure in the waterproof or dampproof system.

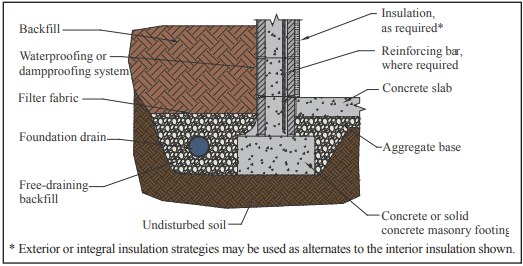
Perforated pipe or drain tiles laid with open joints have proven to be effective at collecting and transporting water away from foundation walls. The invert of drain pipes should be below the top of the floor slab elevation, as shown in Figure 1. The backfill drain should be connected to solid piping to carry the water to natural drainage, a storm sewer, or a sump. For adequate drainage, drains should slope at least in. in 10 ft (10 mm in 3 m).

Drain tile and perforated pipes are typically laid in crushed stone to facilitate drainage. At least 2 in. (51 mm) of washed gravel or free-draining backfill (containing not more than 10% material finer than a No. 4 sieve) should be placed beneath perforated pipes. Drain tiles laid with open joints are more effective when laid on the undisturbed soil where the water begins to accumulate. At least 6 to 12 in. (152 to 305 mm) of the same stone should cover the drain and should extend 12 in. (305 mm) or more beyond the edge of the footing. To prevent migration of fine soils into the drains, filter fabrics are often placed over the gravel.

Drainage pipes may also be placed beneath the slab and connected to a sump. In some cases, pipes are cast in or placed on top of concrete footings at 6 to 8 ft (1.8 to 2.4 m) o.c. to help drain water from the exterior side of the foundation wall.

The backfill material itself also significantly affects water drainage around the wall. The backfill material should be well-draining soil free of large stones, construction debris, organic materials, and frozen earth. Saturated soils, especially saturated clays, should generally not be used for backfill, since wet materials significantly increase the hydrostatic pressure on foundation walls. The top 4 to 8 in. (102 to 203 mm) of backfill should be low permeability soil so rain water is absorbed into the backfill slowly.

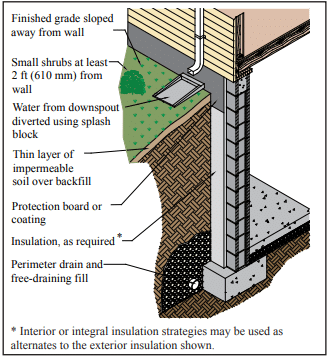
The finished grade should be sloped away from the foundation at least 6 in. within 10 ft (152 mm in 3 m) from the building, as shown in Figure 2. If the ground naturally slopes toward the building, a shallow trench or swale can be installed to direct water runoff away from the building.

Finally, gutters and downspouts should be installed to minimize water accumulation near the foundation. Water exiting downspouts should be directed away from foundation walls using plastic drainage tubing or splash blocks. Roof overhangs, balconies, and porches also shield the soil from direct exposure to rainfall.

CONSTRUCTION

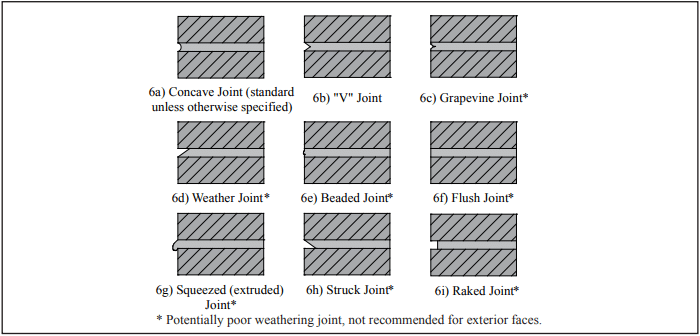
Methods of construction can also impact the watertightness of foundation walls. Properly tooled mortar joints help prevent cracks from forming, and contribute to the watertightness of the finished work. Concave-shaped mortar joints are most effective for resisting water entry. Tooling the mortar compresses the surface to make it more watertight, and also reduces leakage by filling small holes and other imperfections. On the exterior face of the wall, mortar joints may be struck flush if parging will be applied.

The drainage and waterproof or dampproof system should be inspected prior to backfilling to ensure they are properly placed. Any questionable workmanship or materials should be repaired at this point, because repair is difficult and expensive after backfilling.

Backfilling methods are important, since improper backfilling can damage foundation walls or the dampproof or waterproof system. Foundation walls should either be properly braced or should have the first floor in place prior to backfilling so the wall is supported against the soil load.

Final grade should be 6 to 12 in. (152 to 305 mm) below the top of the waterproof or dampproof membrane, and should slope away from the foundation wall. In no case should the backfill be placed higher than the design grade line.

These topics are covered in more detail in ref. 7.

LANDSCAPING

Landscaping directly adjacent to the building impacts the amount of water absorbed by the foundation backfill. Particular care should be taken when automatic sprinklers are installed adjacent to foundation walls. Whenever possible, large-rooting shrubs and trees should be placed 10 to 15 ft (3 to 4.6 m) away from foundation walls. Smaller shrubs should be kept at least 2 to 3 ft (0.6 to 0.9 m) from walls. Ground covers help prevent erosion and can extend to the foundation. These elements are illustrated in Figure 2.

Asphalt and concrete parking lots, sidewalks, building aprons, stoops and driveways prevent direct absorption of water into soil adjacent to the foundation, and should be installed to slope away from the building.

REFERENCES

  1. International Building Code. International Codes Council, 2012.
  2. International Residential Code for One- and Two-Family Dwellings. International Code Council, 2012.
  3. Standard Specification for Packaged, Dry, Combined Materials for Surface Bonding Mortar, ASTM C887-05(2010) . ASTM International, Inc., 2010.
  4. Basement Manual—Design & Construction Using Concrete Masonry, CMU-MAN-002-01, Concrete Masonry & Hardscapes Association, 2001.
  5. Acceptance Criteria for Cold, Liquid-Applied, Below-Grade, Exterior Damproofing and Waterproofing Materials, ICC ES AC29. International Code Council, 2011.
  6. Acceptance Criteria for Rigid, Polyethylene, Below-Grade, Damproofing and Wall Waterproofing Material, ICC-ES AC114. International Code Council, 2011.
  7. Concrete Masonry Basement Wall Construction, TEK 03-11, Concrete Masonry & Hardscapes Association, 2001.


Design for Dry Single-Wythe Concrete Masonry Walls

INTRODUCTION

Single-wythe concrete masonry walls are cost competitive because they provide structural form as well as an attractive and durable architectural facade. However, because they do not have a continuous drainage cavity (as do cavity and veneered walls), they require special attention to moisture penetration.

The major objective in designing dry concrete masonry walls is to keep water from entering or penetrating the wall. In addition to precipitation, moisture can find its way into masonry walls from a number of different sources (see Figure 1). Dry concrete masonry walls are obtained when the design and construction addresses the movement of water into, through, and out of the wall. This includes detailing and protecting building elements including parapets, roofs, all wall penetrations (utility and fire protective openings, fenestration, doors, etc.), movement joints, sills and other features to resist water penetration at these locations. Annotated Design and Construction Details for Concrete Masonry (ref. 1) contains comprehensive details for reinforced and unreinforced concrete masonry walls. Further, condensation and air leakage must be controlled. See the Condensation Control section on page 7.

The primary components of moisture mitigation in concrete masonry walls are flashing and counter flashing, weeps, vents, water repellent admixtures, sealants (including movement joints), post-applied surface treatments, vapor retarders and appropriate crack control measures. For successful mitigation, all of these components should be considered to be used redundantly, however not all will be applicable to all wall systems. For example, flashing and weeps are not necessary in solidly grouted construction, and may not be appropriate in areas of high wind or seismic loading where compromise of masonry shear resistance may occur (see the Wall Drainage section on page 3 for more information). The determination on structural effect must be made by the structural engineer. As another example, the use of integral water repellents for surfaces to receive a stucco finish may not be appropriate. Successful design for moisture mitigation considers each of these components, and provides for redundancy of protection, also known as a “belt and suspenders” approach.

This TEK provides a brief overview of the issues to consider when designing single wythe walls for water penetration resistance. The information presented is not meant to be comprehensive. Where appropriate, references to more detailed sources are provided.

SOURCES OF WATER IN WALLS

Driving Rain

Although concrete masonry units and mortar generally do not allow water to pass through quickly, rain can pass through if driven by a significant force. Cracks caused by building movements, or gaps between masonry and adjoining building elements are common points of water entry. If rain enters wall other than by way of the roof or at element interfaces (such as penetrations and window openings), it often can be traced to the masonry unit-mortar interface.

Capillary Action

Untreated masonry materials (without a compatible integral water repellent and/or post-applied surface treatment) typically take on water through absorption, adsorption and/or capillary forces. The amount of water depends on the characteristics of the masonry and mortar. Integral water repellents greatly reduce the absorption and adsorption characteristics of the units and mortar, but may not be able to prevent all moisture migration if there is a significant head pressure of approximately 2 in. water (51 mm) or more. Post-applied surface treatments reduce moisture penetration of masonry at the treated surface as well, but have little effect on the interior of the units.

Water Vapor

Water as vapor moves through a wall either via air leakage or by diffusion (from higher to lower: relative humidity, pressure and/or temperature). As air cools, it becomes more saturated, and when it reaches the dew point temperature the water vapor will condense into liquid form. See the Condensation Control section on page 7 for more information.

Ground Water

Protecting below-grade walls from water entry involves installing a barrier to water and water vapor. Below grade moisture tends to migrate from the damp soil to the drier area inside the basement. An impervious barrier on the exterior wall surface can prevent moisture entry. The barrier is part of a comprehensive system to prevent water penetration, which includes proper wall construction and the installation of drains, gutters, and proper grading (location of finished grade as well as grade sloping away from the building). Landscaping can also contribute to water ponding adjacent to the foundation wall and/or to insufficient drainage. IBC Section 1805 contains requirements for dampproofing and water proofing foundations. More detailed information for concrete masonry foundation walls can be found in Preventing Water Penetration in Below Grade CM Walls, TEK 19-03B (ref. 2).

DESIGN CONSIDERATIONS

When designing for moisture mitigation in walls, three levels of defense should be considered: surface protection (properly constructed mortar joints, surface water repellents, surface coatings), internal protection (integral water repellents), and drainage/drying (flashing, weeps, vents). The most successful designs often provide redundancy among these three levels. This redundant design approach helps ensure that the wall remains free of moisture problems even if one of the defense mechanisms is breached. Flashing and weeps, for example, provide a backup in case surface coatings are not reapplied as needed or leaks develop around windows or other openings. The following sections discuss the individual mechanisms in more detail.

Physical Characteristics of the Units

Open-textured concrete masonry units possessing large voids tend to be more permeable than closed-textured units. The texture can be affected by aggregate gradation, water content of the concrete mix, amount of cement in the mix, other materials in the mix such as admixtures, and the degree of compaction achieved during molding. These factors can also affect capillary action and vapor diffusion characteristics. Units should be aged at least 21 days if possible before installation to reduce the chance of shrinkage cracks at the mortar-unit interface.

Smooth-faced units facilitate mortar joint tooling, so will generally result in a more water resistant wall, as opposed to fluted units which are more difficult to tool and therefore the most susceptible to leakage. Horizontal effects such as corbels and ledges that may hold water are more prone to water penetration.

Integral Water Repellents

The use of integral water repellents in the manufacture of concrete masonry units can greatly reduce the wall’s absorption characteristics. When using units with an integral water repellent, the same manufacturer’s water repellent for mortar must be incorporated in the field for compatibility and similar reduced capillary action characteristics.

Integral water repellents make masonry materials hydrophobic, significantly decreasing their water absorption and wicking characteristics. While these admixtures can limit the amount of water that can pass through units and mortar, they have little impact on moisture entering through cracks and voids in the wall. In addition, when using an integral water repellent, any water that does penetrate can not exit as easily. Therefore, even with the incorporation of integral water repellents, flashing and weeps, as well as proper detailing of control joints and quality workmanship are still essential. See Water Repellents for Concrete Masonry Walls, TEK 19-01 (ref. 3), and Characteristics of CMU with Integral Water Repellent, TEK 19-07 (ref. 4), for more complete information on integral water repellents for concrete masonry walls.

Post-Applied Surface Treatments

For integrally colored architectural masonry, a clear surface treatment should be post-applied whether or not integral water repellent admixtures are used. Most post-applied coatings and surface treatments are compatible with integral water repellents although this should be verified with the product manufacturers before applying. When using standard units for single-wythe walls, application of a clear treatment, portland cement plaster (stucco), paint, or opaque elastomeric coating improves the water resistance of the wall. Coatings containing elastomerics have the advantage of being able to bridge small gaps and TEK 19-02B 3 CONCRETE MASONRY & HARDSCAPES ASSOCIATION masonryandhardscapes.org cracks. See Water Repellents for Concrete Masonry Walls, TEK 19-01 (ref. 3) for more detailed information.

Wall Drainage

In areas with high seismic loads, masonry walls tend to be heavily reinforced and it is often more economical to fully grout the masonry. In fully grouted masonry, flashing is not necessary. In these cases, the wall is designed as a barrier wall, rather than as a drainage wall.

When flashing is used, the importance of proper detailing cannot be over-emphasized. Traditionally, through-wall flashing has been used to direct water away from the inside wall face and toward weep holes for drainage. Figure 2 shows one example of flashing that spans completely across the width of the wall. In this example, the termination angle prevents any water that collects on the flashing from penetrating to the interior, and the weeps and drip edge drain water to the exterior.

Where it is necessary to retain some shear and flexural resistance capabilities, there are several options. One is to terminate the flashing within the inside face shell of the wall, as shown in Figure 3. In reinforced walls, some shear is provided through doweling action of the reinforcement, and by design the reinforcement takes all tension (refs. 5, 6). Proper grouting effectively seals around where the vertical reinforcement penetrates the flashing. The absence of reinforcement to provide doweling in plain masonry may be more of a concern, but loads tend to be relatively low in these applications. If structural adequacy is in doubt, a short reinforcing bar through the flashing with cells grouted directly above and below can be provided as shown in Figure 3c.

A better option to maintain shear at the level of the flashing is to use a product that maintains some bond in both face shells, such as that shown in Figure 4.

Ensuring that a buildup of mortar droppings does not clog the cells or weep holes is critical. Traditionally, a cavity filter consisting of washed pea stone or filter paper immediately above the flashing was provided to facilitate drainage, as shown in Figure 3. This should be accompanied by a means of intercepting or dispersing mortar droppings, as an accumulation can be sufficient to completely fill and block a cell at the bottom. As an alternative, mortar interception or isolation devices that provide pathways for the water to migrate through the layer of mortar droppings, or filling the cells with loose fill insulation a few courses at a time as the wall is laid up, can disperse the droppings enough to prevent clogging. Examples of polyester mesh drainage mats are shown in Figures 4 and 5. Another alternative is to leave out facing block at regular intervals just above the flashing until the wall is built to serve as cleanouts. The units left out can be mortared in later. See Flashing Strategies for Concrete Masonry Walls, TEK 19-04A and Flashing Details for Concrete Masonry Walls, TEK 19-05A, (refs. 7, 8) for an in-depth discussion and additional details regarding flashing.  

In addition to conventional flashing systems, proprietary flashing systems are available that direct the water away from the inside face of the wall to weep holes without compromising the bond at mortar joints in the face shells. See Figure 4 for one example. These are not intended to be comprehensive, but rather to provide examples of some types of available systems. Specialty units that facilitate drainage are also available from some manufacturers.

Solid grouted single-wythe walls do not require flashing because they are not as susceptible to moisture penetration, since voids and cavities where moisture can collect are absent. However, fully cured units and adequate crack control measures are especially important to minimize cracks. In some regions of the country, the bottom of the wall is recessed about 1 in. (25 mm) below the floor level to ensure drainage to the exterior.

Crack Control

Because cracks provide an entry point for rainwater and moist air, crack control provisions are very important in producing dry walls. There are various sources of potential wall cracking. A detailed list, as well as an overview of crack control strategies, can be found in Crack Control Strategies for Concrete Masonry Construction, CMU-TEC-009-23 (ref. 9).

Control joints and/or horizontal reinforcement should be located and detailed on the plans to alleviate cracking due to thermal and shrinkage movements of the building. Specifying a quality sealant for the control joints and proper installation is a must to maintain the weather-tightness of the joint. Joint Sealants for Concrete Masonry Walls, TEK 19-06A (ref. 10) contains more comprehensive information on this topic. See Crack Control Strategies for Concrete Masonry Construction, CMU-TEC-009-23 (ref. 11) for detailed information on control joint placement and construction.

Mortar and Mortar Joints

The type of mortar and type of mortar joint can also impact a wall’s watertightness. A good rule of thumb is to select the lowest strength mortar required for structural and durability considerations. Lower strength mortars exhibit better workability and can yield a better weather-resistant seal at the mortar/unit interface. See Mortars for Concrete Masonry, TEK 09-01A (ref. 12), for a more complete discussion.

Unless otherwise specified, mortar joints should be tooled to a concave profile when the mortar is thumbprint hard (refs. 5, 13), as shown in Figure 6. For walls exposed to weather, concave joints improve water penetration resistance by directing water away from the wall surface. In addition, because of the shape of the tool, the mortar is compacted against the concrete masonry unit to seal the joint. V-shaped joints result in sharper shadow lines than concave joints. Raked, flush, struck, beaded, grapevine, squeezed or extruded joints are not recommended in exposed exterior walls as they do not compact the mortar and/or they create ledges that intercept water running down the face of the wall.

Head and bed joints should be the full thickness of the face shells for optimum water resistance. Head joints are particularly vulnerable to inadequate thickness (see Figure 7).

Condensation Control

Condensation is a potential moisture source in building assemblies. Because condensation potential varies with environmental conditions, seasonal climate changes, the construction assembly, building type and building usage, condensation control strategies vary as well. For a full discussion, see Condensation Control in Concrete Masonry Walls, TEK 06-17B, and Control of Air Leakage in Concrete Masonry Walls, TEK 06-14A (refs. 14, 15).

Note that the location and vapor permeability of insulation can influence the condensation potential of a wall. The following references provide more detailed information. Insulating Concrete Masonry Walls, TEK 06-11A (ref. 16), discusses various insulation strategies and the advantages and disadvantages of each. R-Values and U-Values for Single Wythe Concrete Masonry Walls, TEK 06-02C, and Thermal Catalog of Concrete Masonry Assemblies (refs. 17, 18) provide calculated thermal values of various walls and insulation types. Details for Half-High Concrete Masonry Units, TEK 05-15 (ref. 19), contains comprehensive details of various single wythe walls.

Cleaning

Concrete masonry cleaning methods can generally be divided into four categories: hand cleaning, water cleaning, abrasive cleaning and chemical cleaning. In general, the least aggressive method that will adequately clean the wall should be used, as overzealous cleaning can damage the water repellent characteristics of the wall. Keeping the masonry wall clean as the construction progresses using a brush and water minimizes cleaning efforts after the mortar has hardened. See Cleaning Concrete Masonry, TEK 08-04A (ref. 20) for more detailed information.

SPECIFICATIONS

Well-worded specifications are essential to ensure the design details are properly constructed. Items to address in the contract documents in addition to those previously mentioned include:

  1. All work to be in accordance with the International Building Code and Specification for Masonry Structures (refs. 5, 13).
  2. Require a qualified mason by documentation of experience with similar type projects.
  3. Require sample panels to assure an understanding of the level of workmanship expected and to be used as a standard of reference until the project is completed.
  4. Proper storage of all masonry materials (including sand) at the job site to protect from contaminants such as dirt, rain and snow.
  5. The tops of unfinished walls shall be covered at the end of each work day. The cover should extend 2 ft (610 mm) down each side of the masonry and be held securely in place.

REFERENCES

  1. Annotated Design and Construction Details for Concrete Masonry, TR 90. National Concrete Masonry Association, 2002.
  2. Preventing Water Penetration in Below-Grade CM Walls, TEK 19-03B, Concrete Masonry & Hardscapes Association, 2012.
  3. Water Repellents for Concrete Masonry Walls, TEK 19-01, Concrete Masonry & Hardscapes Association, 2006.
  4. Characteristics of CMU with Integral Water Repellent, TEK 19-07, Concrete Masonry & Hardscapes Association, 2008.
  5. International Building Code. International Code Council, 2012.
  6. Building Code Requirements for Masonry Structures, TMS 402-11/ACI 530-11/ASCE 5-11, reported by the Masonry Standards Joint Committee, 2011.
  7. Flashing Strategies for Concrete Masonry Walls, TEK 1904A, Concrete Masonry & Hardscapes Association, 2008.
  8. Flashing Details for Concrete Masonry Walls, TEK 19-05A, Concrete Masonry & Hardscapes Association, 2008.
  9. Crack Control Strategies for Concrete Masonry Construction, CMU-TEC-009-23, Concrete Masonry & Hardscapes Association, 2023.
  10. Joint Sealants for Concrete Masonry Walls, TEK 19-06A, Concrete Masonry & Hardscapes Association, 2014.
  11. Crack Control Strategies for Concrete Masonry Construction, CMU-TEC-009-23, Concrete Masonry & Hardscapes Association, 2023.
  12. Mortars for Concrete Masonry, TEK 09-01A, Concrete Masonry & Hardscapes Association, 2004.
  13. Specification for Masonry Structures, TMS 602-11/ACI 530.1-11/ASCE 6-11, reported by the Masonry Standards Joint Committee, 2011.
  14. Condensation Control in Concrete Masonry Walls, TEK 06-17B, Concrete Masonry & Hardscapes Association, 2011.
  15. Control of Air Leakage in Concrete Masonry Walls, TEK 06-14A, Concrete Masonry & Hardscapes Association, 2011.
  16. Insulating Concrete Masonry Walls, TEK 06-11A, Concrete Masonry & Hardscapes Association, 2010.
  17. R-Values and U-Values for Single Wythe Concrete Masonry Walls, TEK 06-2C, Concrete Masonry & Hardscapes Association, 2012.
  18. Thermal Catalog of Concrete Masonry Assemblies, CMU-MAN-004-12, Concrete Masonry & Hardscapes Association, 2012.
  19. Details for Half-High Concrete Masonry Units, TEK 05-15, Concrete Masonry & Hardscapes Association, 2010.
  20. Cleaning Concrete Masonry, TEK 08-04A, Concrete Masonry & Hardscapes Association, 2005.


Water Repellents for Concrete Masonry Walls

INTRODUCTION

Water repellents are used on exterior walls to provide resistance to wind-driven rain. In addition, water repellents can also reduce the potential for efflorescence and staining from environmental pollutants, and enhance the color or texture of a wall.

When applied in accordance with manufacturer’s recommendations, water repellents effectively control water penetration. Water repellents are generally recommended for use on single wythe concrete masonry walls exposed to the weather. The choice of water repellent will depend on the surface to be protected, the exposure conditions, and on aesthetics. A wide variety of water repellents is available, offering many choices of color, surface texture, glossiness, and application procedures.

WATER RESISTANCE

Water penetration resistance of concrete masonry walls is dependent on wall design, design for differential movement, workmanship, wall maintenance, and the application of water repellents. This TEK focuses on water repellent products for above grade walls. The other factors are discussed in CMUTEC-009-23, TEKs 19-04A and 19-05A (refs 3, 5, and 4).

The effectiveness of water repellents can be evaluated in several ways. In the laboratory, Standard Test Method for Water Penetration and Leakage Through Masonry, ASTM E 514 (ref. 9), is currently the only standard test method for water penetration. The test simulates 51/2 in. (140 mm) of rain per hour with a 62.5 mph (101 km/h) wind for a duration of 4 hours. This test is often used to evaluate water penetration before and after application of a water repellent, or to judge the relative performance of several water repellent systems.

TYPES OF WATER REPELLENTS

There are two general types of water repellents: surface treatment repellents and integral water repellents. Surface treatment repellents are applied to the weather-exposed side of the wall after the wall is constructed. In addition to water repellency, surface treatment repellents also improve the stain resistance of the wall, by preventing dirt and soot from penetrating the surface, causing deep stains.

When used on new construction, choose water repellents that are able to resist the alkalinity of the fresh mortar. As an alternative, an alkali-resistant fill coat can be applied to the wall first, or the wall can be allowed to weather for about six months until the alkalinity is reduced.

In general, surface treatment repellents should allow for vapor transmission to ensure that interior humidity within the wall and structure can escape. Treatments which are impermeable to water vapor tend to fail by blistering and peeling when moisture builds up behind the exterior surface.

When choosing a surface treatment repellent, manufacturer’s guidelines should be consulted regarding appropriate substrates and applications for a particular product.

Regardless of the type of surface treatment chosen, it should be applied to a sample panel or on an inconspicuous part of the building to determine the appearance, application method, application rate, and compatibility with the masonry surface. Surface treatment repellents will require reapplication after a period of years to ensure continuous water repellency.

Integral water repellents are added to the masonry materials before the wall is constructed. The water repellent admixture is incorporated into the concrete mix at the block plant. This way, each block has water repellent throughout the concrete in the unit. For mortar, the water repellent is added to the mix on the jobsite. It is critical when using integral water repellents that the repellent is incorporated into both the block and the mortar to ensure proper performance of the wall.

The following sections describe in more detail the characteristics of various generic surface treatment repellents and integral water repellents.

SURFACE TREATMENT REPELLENTS

Cementitious coatings:

Coatings such as stucco or surface bonding mortar can be used to increase the water resistance of a wall, as well as to significantly change the texture of the finished wall surface. Consideration should be given to differential movement which may transmit stress into the coating. Further information on stucco is found in TEK 09-03A (ref. 8).

Paints:

Paints are colored opaque coatings, used when color uniformity of the wall is important for aesthetic reasons. Paints are a mixture of pigment, which hides the surface, and resin, which binds the pigment together. The proportion of pigment to resin, and the type of resin will affect the fluidity, gloss, and durability of the paint.

The pigment volume concentration (PVC) compares the amount of pigment in a paint to the amount of binder. As the PVC increases, the paint has more pigment and less binder. High PVC coatings are used where limited penetration is desired, such as for fill coats on porous materials. High PVC paints generally brush on easier, have greater hiding power, and usually cost less than low PVC paints. Low PVC paints are generally more flexible, durable, washable, and are glossier.

Fill Coats:

Fill coats, also called primer-sealers or fillers, are sometimes used to smooth out surface irregularities or fill small voids before application of a finish coat. Common fill coats include latex coatings and portland cement. In addition, acrylic latex or polyvinyl acetate is sometimes combined with portland cement for use as a fill coat. Fill coats should be scrubbed vigorously into the masonry surface using a relatively short stiff fiber brush.

Cement-Based Paints:

Cement-based paints contain portland cement as the binder, which creates a strong bond to the masonry and is not subject to deterioration from alkalis. Cement-based paints effectively fill small voids so that large amounts of water are repelled. Durability is excellent.

Cement-based paints are sold either premixed, or in dry form and mixed with water just before use. They should be applied to a damp surface using a stiff brush, and kept damp for 48 to 72 hours, until the cement cures. If the cement-based paint is modified with latex, however, wet curing is not necessary. White and light colors tend to be the most satisfactory.

Latex Paints:

Latex paints are water-based, with any one of several binder types. They are inherently resistant to alkalis, have good hiding characteristics, and are durable and breathable, making them a good choice for concrete masonry walls. Butadiene-styrene paints and polyvinyl acetate emulsion paint are both categorized as latex paints. Latex paints can be applied to either damp or dry surfaces, and dry quickly, usually within 1 to 1 ½ hours. They are generally inexpensive and easy to apply by brush, roller, or spray.

Alkyd Paints:

Alkyd paints are durable, flexible, have good gloss retention, are low in cost, but have low alkali resistance. They should be sprayed on, since they tend to be difficult to brush apply. They dry quickly once applied.

Clear Surface Treatment Repellents:

Clear treatments are used to add water resistance to a wall without altering the appearance. These treatments are classified by the resin type, such as silicone or acrylic.

Clear treatments can be classified as either films or penetrant repellents. Penetrant repellents are absorbed into the face of the masonry, lining the pores. They adhere by forming a chemical bond with the masonry. Penetrant repellents do not bridge cracks or voids, so these should be repaired prior to applying the treatment. Silanes and siloxanes are penetrant repellents. Films, such as acrylics, form a continuous surface over the masonry, bridging very small cracks and voids. Because of this, films can also reduce the vapor transmission of a concrete masonry wall. Films tend to add a glossier finish to the wall surface, and may intensify the substrate color.

Silicones: Silicones can be further subdivided into silicone resins, silanes, and siloxanes. These treatments change the contact angle between the water and the pores in the face of the masonry, so that the masonry repels water rather than absorbing it. Silicones have been found to reduce the occurrence of efflorescence on concrete masonry walls.

Silicone resins: These are the most widely used silicone-based water repellents for masonry. They can penetrate the surface of masonry very easily, providing excellent water repellency. Silicone resins should be applied to air dry surfaces, and are usually fully dry after 4 to 5 hours.

Silanes: Like silicone resins, silanes have good penetration characteristics. Although volatility of silane has been a concern, the absorption of silane by masonry generally occurs at a much faster rate than evaporation of the silane. Silanes, unlike silicone resins, can be applied to slightly damp surfaces.

Siloxanes: Siloxanes have the benefits of silanes, i.e., good penetration and ability for application on damp surfaces. Siloxanes are effective on a wider variety of surfaces than silanes, and dry relatively quickly. Costs are comparable to silanes, and are slightly higher than silicone resins.

Acrylics: Acrylics form an elastic film over the surface of masonry to provide an effective barrier to water. Acrylics dry quickly and have excellent chalk resistance. Acrylics should be applied to air-dry masonry surfaces. Costs tend to comparable to silicone resins.

OTHER TREATMENTS

Epoxy, Rubber, and Oil-Based Paints:

These paints form impervious moisture barriers on concrete masonry surfaces. This makes for an excellent water barrier, but does not allow the wall to breathe. As such, these paints are generally not considered water repellents. These treatments are better limited to interior walls, since they can blister and peel when used on exterior walls.

Oil-based paints adhere well to masonry, but are not particularly resistant to alkalis, abrasion, or chemicals. Rubber and epoxy paints offer high resistance to chemicals and corrosive gases, and are generally used in industrial applications.

APPLICATION OF SURFACE TREATMENT REPELLENTS

This section contains some general guidelines for application of surface treatments. In all cases, refer to manufacturers’ literature for final recommendations and procedures. Surface treatments should typically be applied to clean, dry walls. Wall surfaces should be cleaned in accordance with manufacturer’s instructions to ensure good adhesion and penetration. The wall should be allowed to dry for 3 to 5 days between cleaning or rain and application of the repellent. All cracks and large voids should be repaired prior to applying the repellent. If caulk is used in the repair, the caulk should be compatible with the surface treatment repellent and fully cured before treatment application.

Weather can have a significant effect on the application and curing of water repellents. It is usually recommended that the repellent be applied when temperatures are expected to remain above 40°F (4 °C) during the two to four days after application. There should be little or no wind during sprayon applications, to avoid an uneven coating and drift of the treatment onto other materials. Adjacent landscaping should be protected during application, and, depending on the surface treatment, it may also be necessary to protect other building materials, such as aluminum or glass.

Most manufacturers recommend applying clear surface treatments using a saturating flood coat, with a 6 to 8 in. (152 to 203 mm) rundown below the contact point of the spray. It is sometimes recommended that a second coat be applied when the first is still wet. Coverage rates vary from 75 to 200 ft²/gallon (1841 to 4908 m²/m³) depending on the surface treatment repellent used and the type and condition of the masonry.

When applying a water repellent over a previously treated wall, ensure that the new treatment is compatible with the old. With some surface treatments, masonry should be uncoated for proper adhesion. In these cases, the old treatment can be allowed to weather off, or, if time does not permit this, a pressurized wash followed by high pressure water rinse can remove previous surface treatments from masonry.

The durability of a coating is a function of the type of coating, the application procedure, the rate of application, the surface preparation, and the exposure conditions. For this reason, it is difficult to predict how the various surface treatment repellents will perform under field conditions.

INTEGRAL WATER REPELLENTS

Integral water repellents are usually polymeric products incorporated into the masonry products prior to construction. Because integral water repellents are evenly distributed throughout the wall, they do not change the finished appearance. In addition, integral water repellents are effective at reducing efflorescence, since water migration throughout the block is reduced.

As stated earlier, it is essential that an integral water repellent admixture be incorporated into the mortar at the jobsite, as well as into the block and any other masonry wall components, such as precast lintels. The same brand of water repellent admixture should be used in the mortar as was used in the block, to ensure compatibility and bond.

Questions often arise regarding the effect of integral water repellents on mortar bond strength, due to the decreased water absorption. Research has shown that bond strength is primarily influenced by the mechanical interlock of mortar to the small voids in the block.

When walls containing integral water repellents are grouted, the grout produces a hydrostatic pressure which forces water into the surrounding masonry unit, allowing proper curing of the grout.

Generally, the use of other admixtures in conjunction with integral water repellents is not recommended. Some other admixtures, especially accelerators, have been shown to reduce the effectiveness of integral water repellents.

Some integral water repellents are soluble when immersed in water for long periods of time. Conditions which allow standing water on any part of the wall should be avoided. For this reason, mortar joints should be tooled, rather than raked. In addition, walls incorporating integral water repellents should not be cleaned with a high-pressure water wash.

REFERENCES

  1. Clark, E. J., Campbell, P. G., and Frohnsdorff, G., Waterproofing Materials for Masonry. National Bureau of Standards Technical Note 883. U. S. Department of Commerce, 1975.
  2. Clear Water Repellents for Above Grade Masonry, Sealant, Waterproofing, and Restoration Institute, 1990.
  3. Crack Control Strategies for Concrete Masonry Construction, CMU-TEC-009-23, Concrete Masonry & Hardscapes Association, 2023.
  4. Flashing Strategies for Concrete Masonry Walls, TEK 1904A, Concrete Masonry & Hardscapes Association, 2008.
  5. Flashing Details for Concrete Masonry Walls, TEK 19-05A, Concrete Masonry & Hardscapes Association, 2008.
  6. Fornoville, L., Water Repellent Treatment of Masonry, Proceedings of the Fourth Canadian Masonry Symposium, University of New Brunswick, Canada, 1986.
  7. McGettigan, E., Application Mechanisms of Silane Waterproofers, Concrete International, October 1990.
  8. Plaster and Stucco For Concrete Masonry, TEK 09-03A. Concrete Masonry & Hardscapes Association, 2002.
  9. Standard Test Method for Water Penetration and Leakage Through Masonry, ASTM E 514-05a. ASTM International, 2005.


Plaster and Stucco for Concrete Masonry

INTRODUCTION

Portland cement-based plaster has many useful applications: as a moisture resistant coating for concrete masonry walls; as an interior wall finish in residential and commercial structures; and as an exterior architectural treatment for buildings of all types.

The terms cement plaster and cement stucco are used interchangeably. They both describe a combination of cement and aggregate mixed with a suitable amount of water to form a plastic mixture that will adhere to a surface and preserve the texture imposed on it.

When freshly mixed, plaster is a pliable, easily workable material. It can be applied either by hand or machine in two or three coats, although two-coat applications are more typical when plaster is applied to newly constructed concrete masonry.

While plaster may be used as an interior or exterior finish for most building materials, some type of metal reinforcement or mechanical keying system is usually required to effectively attach the plaster to the substrate. Concrete masonry, however, provides an excellent base for plaster without the need for reinforcement. Since block is manufactured of the same cementitious material as that in the plaster, the two have a natural affinity.

MATERIALS

Of primary importance to the performance of the finished surface is the selection and use of proper materials. Each must be evaluated on its ability to provide serviceability, durability, and satisfactory appearance. Standard Specification for Application of Portland Cement-Based Plaster, ASTM C 926 (ref. 3) includes specifications for materials for use in plaster

Cement

Cement should comply to one of the following product specifications:

  • Blended hydraulic cement —ASTM C 595 (ref. 4)
    Types IP, IP(M), IS, IS(M), and their air-entrained
    counterparts IP-A, IP(M)-A, IS-A, IS(M)-A
  • Masonry cement—ASTM C 91 (ref. 5) Types M, S, N
  • Portland cement—ASTM C 150 (ref. 6)
    Types I, II, III, and their air-entrained counterparts IA, IIA,
    IIIA
  • Plastic cement—UBC 25-1 (ref. 1)
  • White portland cement—ASTM C 150 (ref. 6) Types I, IA,
    III, IIIA

Aggregates

Aggregates used in plaster should conform to the chemical and physical requirements of ASTM C 897, Standard Specification for Aggregate For Job-Mixed Portland Cement Plasters (ref. 2), except as noted below. Recommendations for gradation of the sand to be used in the base coat are listed in Table 1.

Aggregates used for finish coats need not comply with the gradation requirements of ASTM C 897. Various sizes and shapes can be evaluated with test panels to obtain special textures or finishes. As a starting point, all aggregates for finish-coat plaster should be below a No. 16 sieve and uniformly graded. Uniform gradation produces plaster that is easier to apply. If necessary, larger aggregate may be added to obtain the desired appearance.

MIXTURES

Properly proportioned mixtures can be recognized by their workability, ease of application, adhesiveness to the base, and resistance to sagging.

The combinations of cementitious materials and aggregates shown in Table 2 have proven to provide satisfactory performance. These proportions are recommended for first and second coat applications.

Considerations in selecting the plaster mix include suction of the masonry, its surface irregularities, climate extremes, extent of surface exposure, and method of application. For economy and simplicity, it is better to select the same plaster type for both scratch (first) and brown coat (second coat in a three coat application) applications, adjusting the proportions for the brown coat to allow for a larger aggregate to cement ratio.

The finish coat can be varied in appearance by changing the size and shape of the aggregate, by adding color, by changing the consistency of the finish mix, and by the application method. For the finish coat, a factory prepared mixture may be used or the finish coat may be proportioned and mixed at the jobsite. Job-mixed finish coat plaster will provide a truer color and more pleasing appearance if white portland cement is used in conjunction with a fine-graded, light colored sand. Recommendations for job mixed finish coat proportions are listed in Table 3.

The success of plastering depends on proper batching and mixing of the individual and combined materials. Water is placed in the mixer first, after which half of the sand is added. Next the cement and any admixtures are added. Finally, the balance of the sand is added and mixing is continued until the batch is uniform and of the proper consistency, which usually takes 3 or 4 minutes.

Although batching by shovelfuls remains the most commonly used method in the field, shovelful batching should be checked daily by volume measures to establish both the required number of shovelfuls of each ingredient and the volume of mortar in the mixer when a batch is properly proportioned. Water additions should also be batched using containers of known volume. Proper mixing should result in a uniform blend of all materials.

PLASTER APPLICATION

Open textured concrete masonry units, laid with flush (nontooled) joints, should be specified on walls intended to be plastered. The open texture promotes a good mechanical bond between the plaster and the masonry. New concrete masonry walls should be properly aligned and free from any surface contamination, such as mortar droppings or sand. It is important that the wall be properly cured and carrying almost all of its design dead load before the plaster is applied. Existing masonry walls should be inspected for alignment, and any coatings or surface treatments other than portland cement paint be should removed by sandblasting prior to plastering.

Plaster may be applied by hand or machine in two or three coats in accordance with the thicknesses given in Table 4. Two-coat application is most often used when plaster is applied directly to concrete masonry, and for horizontal (overhead) plaster application.

The scratch coat can be applied either from the bottom to the top of the work area, or from top to bottom. The plaster must be applied with sufficient force to fully adhere it to the masonry. Excessive troweling or movement of the scratch coat must be avoided, because too much action will break the bond between the plaster and masonry. The applied plaster must be brought to the required thickness and the surface made plumb. The thickness is established by the use of screeds and grounds. A rod or straightedge is used to even the surface when the area between the screeds and grounds is filled with plaster. The rod can bear on the screeds or contact the grounds and be moved over the surface, cutting off high spots and showing up the hollow spaces, which must be filled and rodded again.

Scratch-coat plasters are scored or scratched to promote mechanical bond when the brown coat is applied. The scratch coat should be scored in a horizontal direction; shallow scratching is adequate.

Brown-coat plasters are applied, rodded, and floated to even the surface, provide a uniform suction throughout the basecoat plaster, and provide a desirable surface for the finish coat.

The brown coat is applied in sufficient thickness to bring the surface to the proper plane. A few minutes after the plaster has been applied, the surface is rodded to the desired plane. The plaster thickness is properly gaged with plaster screeds or wood slats of proper thickness as the guides. After rodding, the surface is floated to give it the correct surface texture.

Floating of the brown coat is the most important part of plastering. Floating must be done only after the plaster has lost sufficient moisture so that the surface sheen has disappeared but before the plaster has become so rigid that it cannot be moved under the float. This interval is critical, since the degree of consolidation that occurs during floating influences the shrinkage-cracking characteristics of the plaster.

The full thickness of the base coats should be applied as rapidly as the two coats can be put in place. The second coat should be applied as soon as the first coat is sufficiently rigid to resist the pressures of second-coat application without cracking. Under certain conditions this may mean applying both first and second coats in a single day. The short delay, or even no delay, between the first and second coats promotes more intimate contact between them and more complete curing of the base coat. No stoppage of plaster should occur within a panel. The finish coat is applied to a predamped, but still absorptive, base coat to a thickness of about 1/8 in. (3.2 mm). The finish coat is applied from the top down and the whole wall surface must be covered without joinings (laps or interruptions). Table 4 summarizes the recommended nominal plaster coat thicknesses for both two and three coat work.

Differential suction between the masonry units and mortar joints may cause joint patterns to be visible in two coat applications if the first coat is too thin. This may also occur if the walls are plastered while the units contain excessive moisture.

CONTROL JOINTS

Cracks can develop in plaster from a number of causes: drying shrinkage stresses; building movement; foundation settlement; intersecting walls, ceilings, and pilasters; weakened sections in a wall from a reduction in service area or cross section because of fenestration; severe thermal changes; and construction joints.

To prevent such cracking, install control joints in the plaster coat directly over and aligned with any control joints in the base. Normally, cracking will not occur in plaster applied to uncracked masonry bases if the plaster bonds tightly to the base structure. If excessive cracking does occur, the application (particularly floating) procedure may not have provided adequate bond of plaster to concrete masonry. Altering application procedures or mechanically anchoring the plaster to the concrete masonry surface with mesh may be required.

CURING

To obtain the best results from the cementitious materials in cement plaster, moisture must be kept in the plaster for the first few days after application. The base coat should be moist cured until the finish coat is applied. Generally, fogging the surface with water at the start and again at the end of the work day will suffice. If it is hot, dry, and windy, the plaster surface should be moistened and covered with a single sheet of polyethylene plastic, weighted or taped down to prevent water loss through evaporation.

Immediately before finish-coat application, the base coat should be moistened. This moisture absorbed by the base coat and the ambient relative humidity provides total curing of the finish coat plaster (particularly colored finish coats) so that it is not necessary to further moist-cure the finish coat.

MAINTENANCE OF PLASTER

Minimal care will keep plaster attractive for many years.
Washing will keep the surface clean and the color bright.
Washing plaster wall surfaces consists of three steps:

  1. Prewet the wall, saturating it. Start at the bottom and work to the top.
  2. Use a garden hose to direct a high-pressure stream of water against the wall to loosen the dirt. Start at the top and wash the dirt down the wall to the bottom.
  3. Flush remaining dirt off the wall with a follow-up stream.

Prewetting overcomes absorption and prevents dirty wash water from being absorbed and dulling the finish. A jet nozzle on a garden hose will usually clean effectively. Do not hold the nozzle too close to the surface because the high pressure stream of water may erode the surface.

Chipped corners and small spalls can be patched with premixed mortar. The patch area should be wetted before applying plaster. Prepare premixed mortar by adding water and mixing to a doughy consistency, then trowel into the patch area, and finish to match the texture of the surrounding surface.

A fresh, new look can be given to any exterior plaster wall by applying a surface treatment of paint, portland cement paint, or other coating. Portland cement paints are mixed with clean water to a brushable consistency and laid on heavily enough to fill and seal small cracks and holes. The surface should be dampened immediately before application.

REFERENCES

  1. Plastic Cement, Uniform Building Code Standard 25-1, International Conference of Building Officials (ICBO), 1994.
  2. Standard Specification for Aggregate for Job-Mixed Portland Cement-Based Plasters, ASTM C 897-00. American Society for Testing and Materials, 2000.
  3. Standard Specification for Application of Portland Cement Based Plaster, ASTM C 926-98a. American Society for Testing and Materials, 1998.
  4. Standard Specification for Blended Hydraulic Cements, ASTM C 595-02. American Society for Testing and Materials, 2002.
  5. Standard Specification for Masonry Cement, ASTM C 91-
  6. American Society for Testing and Materials, 2001.
  7. Standard Specification for Portland Cement, ASTM C 150-
  8. American Society for Testing and Materials, 2000.

Maintenance of Concrete Masonry Walls

INTRODUCTION

To the new and prospective owner of a building, one of the most attractive features of constructing with concrete masonry is its low cost of maintenance. The characteristic wear and tear that all buildings are subjected to, however, necessitates periodic repair and restoration to preserve and maintain the original integrity and appearance of the structure. Preventive maintenance conserves the value, appearance and integrity of the building.

Since the useful life of a concrete masonry structure can be directly related to the quality of the maintenance, an established and rigorous maintenance program will greatly reduce the chances of major problems or costly repairs. This TEK focuses on typical maintenance issues facing owners of concrete masonry buildings.

DESIGN AND CONSTRUCTION CONSIDERATIONS

Design and construction methods greatly affect the required maintenance needs of a building. Accordingly, maintenance issues should be considered during the design and construction processes. Where possible, accepted industry practices should be followed to avoid cracking and spalling, preclude efflorescence, minimize staining and dirt buildup, and prevent the penetration of water into the structure. While design and construction issues are beyond the scope of this TEK, the reader is advised to refer to other industry guidelines during the design and construction of buildings to address these issues. In addition, several TEK that deal specifically with design and construction issues affecting maintenance of buildings are referred to herein for the benefit of the reader.

CRACK PREVENTION AND REPAIR

Once placed in a structure, concrete masonry units are subject to a variety of forces and stresses which, besides structural loads, include shrinkage stresses due to drying, temperature fluctuations, and carbonation (an irreversible reaction with carbon dioxide in the atmosphere). Although the net resulting shrinkage in a finished structure can vary considerably (for example, temperature movements can vary greatly with exposure and unit color, while drying shrinkage can be expected to be higher for units having a higher cement content), the combined effect of these shrinkage components could be sufficient to cause large tensile cracks in the masonry if proper precautions are not taken. Shrinkage cracking and crack control strategies are covered in more detail in CMU-TEC-009 23 (ref. 1).

The next leading cause of cracking in concrete masonry walls is differential settlement due to uneven support of the foundation. Due to the highly complicated and problematic nature of such cracks, the reader is encouraged to seek the aid of a qualified design professional for recommendation on corrective actions for differential settlement.

Any objectionable crack should be analyzed to determine the cause and any previous corrective measures taken to prevent or accommodate the movement before additional repairs are made. Otherwise cracks may simply form again. Since the necessary corrective action required in crack repair is highly dependent on the cause of the crack and whether the crack is stable (the crack has stopped getting wider), significant attention should be focused on these issues. A simple but fairly effective method of determining if a hairline crack is continuing to propagate or widen is to patch over a small length of the crack with gypsum plaster and monitor the patch regularly for several days. Additionally, a variety of gauges can also be used to routinely monitor crack widths. The benefit associated with implementing crack width and/or deflection measuring gages is that qualitative data is obtained which can be used to determine an appropriate crack repair method.

If it is determined that cracking is present due to the lack of, or inadequate spacing of control joints, it may be necessary to retrofit the structure with control joints. Installation of control joints in an existing structure is completed by first determining the location and spacing of required control joints by an approved method. Next, a vertical joint is saw-cut at the location of a head joint through the mortar and masonry units. The joint should extend completely through the wall and be approximately 3/8-inch (10 mm) wide, or one mortar joint wide. Finally, the newly cut joint should be cleaned, filled with a backer rod and caulked as recommended by the manufacturer. The sealant will prevent water, dirt, or insects from entering the structure. Before retrofitting any building with control joints, consult a qualified design professional.

If the cracking is not extensive, confined primarily to the mortar joints, and relatively stable in width, it can be readily repaired by conventional tuckpointing (also called repointing) methods as detailed in Figure 1. Unless the wall is to be parged or coated, efforts should be made to match the color and texture of the new joints to the old. If the identity of the original mortar materials is unknown, trial batches of different mix designs should be applied in test joints, tooled, and aged for a period of at least one week. Variations in the age of the mortar when the tooling is performed as well as the tooling pressure are suggested as well since both affect color and texture. The best match can then be selected. It should be noted that because of dirt deposits and stains, matching existing mortar color of old buildings may be difficult. Accordingly, cleaning of the masonry may be required prior to applying tuckpointing efforts.

Small cracks that do not pose a structural problem may be susceptible to water penetration due to wind driven rain. A variety of coatings are available that can effectively resist water penetration. Note however that cracks larger than 0.02 in. (0.5 mm) can not usually be sealed with clear water repellents.

A solution for larger, nonstructural cracks is the parging of the exposed surface. A parging material comprised of one part portland cement and 3 parts sand (by volume) passing a No. 30 sieve or a No. 50 sieve (depending on the size of the cracks) is applied to the surface in two layers. The first layer, commonly referred to as a scratch coat, is applied to the surface in approximately ¼-inch (6 mm) thickness. Once the scratch coat (so called since the surface is left rough to ensure good bond to the finish coat) is thumbprint hard, the finish coat also about ¼-inch (6 mm) thickness is applied. Once the finish coat has cured sufficiently so that nearly all the plastic shrinkage has occurred (thumbprint hard), the surface can be worked with a damp sponge to effectively seal the outer surface. More information on parging and portland cement coatings can be found in TEK 09-03A (ref 3). Large non-structural cracks that continue to move (wide shrinkage cracks, for example) can sometimes be filled with sealant which has more flexibility to undergo movement than mortar.

CLEANING

Periodic cleaning of buildings may be needed to remove dirt, stains, efflorescence, graffiti and mold. TEK 08-02A (ref. 4) provides information on removing a wide range of stains and TEK 08-03A (ref. 2) discusses control and removal of efflorescence. As a general recommendation for all cleaning efforts, care should be taken to use a cleaning method that is as non-aggressive as possible so as not to damage the masonry or surrounding materials. The cleaning agent manufacturer’s recommendations should be closely followed since some products can not only damage the building, but can also cause serious injuries to personnel.

Prior to starting cleaning efforts on routine stains such as rusting from nearby metals or efflorescence, the cause of the stain should be identified and remedied if possible so that further cleaning efforts are avoided. Cleaning procedures should be started in small inconspicuous areas to ensure the cleaning method is effective, non damaging, and providing the desired results. Once the effectiveness of the cleaning method is determined it can then be applied to the entire building.

WATER PENETRATION

Traditionally, concrete masonry units have required some form of coating to prevent rainwater from penetrating into the building. Today, integral water repellents can be added into the mixes used to make both concrete masonry units and mortar. The owner is advised however, to assume that the concrete masonry is somewhat porous, unless it is specifically known that the units and mortar contain integral water repellents. Accordingly, reapplication of clear surface applied water repellents, paints and other coatings is a prime maintenance item to ensure the building remains dry. See TEK 19-01 (ref. 5) for more information on water repellents.

Water penetration in a building, however, can stem from numerous other entry points, even if the wall is wet, and appears to be the leaking element. Roofs, parapet caps, flashing, doors, windows, control joints, penetrations for pipes and conduits and other building elements should be inspected routinely to ensure water penetration does not occur at these locations. Sealants around many of these elements should be monitored and replaced when needed.

To prevent water penetration through basement walls, ensure that the ground around the building slopes away from the building. Where the site does slope towards the building, a swale, or shallow trench, should be installed to direct runoff away from the basement. As discussed elsewhere in this TEK, trees, shrubs, and ground cover can shield the soil near a basement from severe rain, and reduce the amount of water absorbed by the soil. Note however, that trees and large shrubs should be kept at least 10 to 15 feet (3 to 4.6 m) away from basement walls so roots do not damage the walls.

To prevent heavy roof runoff near basements, gutters and downspouts are recommended. Downspouts should empty onto splash blocks that direct the water away from the basement. If present, sump pumps and French drains also must be maintained.

Sprinklers and water faucets should also be monitored to assure they are not spraying excessive amounts of water on walls. Crack repair, control joint maintenance and coating reapplication should also be reconsidered to ensure water tightness of the building.

COATINGS

Walls that have been covered with paint, water repellents, waterproofing or other coatings require periodic inspection of the condition of the coatings, and reapplication at some point will be necessary. Because of the wide range of products that can be used on concrete masonry walls, it is important to try to keep records of the coatings applied to the masonry. This will make the selection of appropriate reapplication materials much easier.

The proper selection and application of coatings will improve the performance and service life of the surface. For example, consider the wide range of paints commonly used. Styrenebutadiene latex or polyvinyl acetate latex paints are inexpensive, but are usually suitable for only for interior residential walls. Oilbased and alkyd paints are more expensive and slightly more difficult to apply, but generally are longer lasting. Acrylic latex paints are the most satisfactory for exteriors from the standpoint of length of life and ease of application. Portland cement paints are lower in cost but require more labor and a longer time to cure. They are however, very long-lived. These are the most common choices of paints for masonry walls, although others are useful for special applications.

When both sides of a wall are coated, the permeability of a coating or paint should always be lower on the side of the wall that is exposed to the higher vapor pressures. In warm moist regions, this means that the paint applied to the exterior of a wall should have a lower permeability to vapor than the paint applied to the inside of the same wall. Conversely, in cold dry climates, use a paint on the inside of the wall that is less permeable to water vapor than the paint on the inside of the wall. This will prevent water from passing through the coating or paint and becoming trapped within the wall. Exceptions to this rule include locker rooms, kitchens, enclosed swimming pools, or other sources of high-humidity where the interior almost always has the higher vapor pressure.

Walls should be clean before paint and other coatings are applied and should generally be dry. Some coatings however, such as some water-based water repellents and stucco, may require a damp surface. Manufacturer’s instructions should always be closely followed to ensure the preparation of the surface and application are appropriate so the coatings perform as intended.

On coarse textured exterior walls, it may be desirable to apply a fill coat prior to the first application of paint. Oil base paints and alkyds should not be applied to walls that are less than six months old unless they are first treated with a solution of three percent phosphoric acid and then one to two percent zinc chloride. Paints should not be thinned except in accordance with the manufacturer’s directions, and paints should be applied only when temperatures are within the recommended range.

Because the condition of clear water repellents is difficult to determine, scheduled reapplication is crucial to ensure the coatings shed rain water effectively. There are four general classifications of clear water repellents that are used on masonry walls: silane, siloxane, acrylic, and water based. Where possible, the same, or similar type coating should be used for the reapplication. In some areas, solvent based water repellents are no longer permitted to be used because of local regulations on volatile organic chemicals. Therefore, some products may not be available in all regions. Consult a local design professional or building official for clear coatings that are available locally. Additionally, TEK 19-01 (ref. 5) provides more information on these products.

IVY AND OTHER PLANT GROWTH

Plants in, around, and even on buildings add to the beauty of masonry walls and provide protection for the walls. They reduce temperature fluctuations by keeping the walls cooler in the summer. Trees, shrubs and ivy shield the walls from driving rain, thereby reducing the possibility of water penetration. Despite these and other benefits however, plant growth should be monitored to ensure the building is not damaged.

Roots of trees and shrubs can cause severe damage and sometimes even collapse of basement walls. Owners should accordingly avoid placing large, vigorous growing plants near basement walls. Generally trees and shrubs should be kept 10 to 15 feet (3 to 4.6 m) from basement walls, and smaller shrubs should be placed no closer than 2 to 3 feet (0.6 to .9 m) from the walls. Small plants such as flowers and ground cover can extend to the wall, and assist in preventing erosion and excessive water penetration. Large overhanging trees should also be trimmed back periodically since leaves, twigs and branches can clog drains potentially leading to serious water penetration problems.

Permitting ivy to grow on walls should also be considered carefully. While it can provide benefits, ivy shoots can enter voids in the mortar joints and damage the mortar. Over time the ivy shoots can break up and dislodge mortar and masonry units. Ivy also holds moisture that can contribute to moisture damage. Additionally, ivy is a home for insects, birds, and other animals that can enter the building.

The decision to allow ivy to grow is a balance between beauty and the durability of concrete masonry walls. Even well constructed concrete masonry walls may have their estimated service life shortened. Aesthetic and ecological value of ivy should be considered along the expectation of service life.

CONTROL JOINTS

Control joints are used to relieve horizontal tensile stresses due to shrinkage by reducing restraint and permitting movement to take place. They are placed in concrete masonry walls to prevent cracking. Vertical separations are built into the wall at locations where stress concentrations may occur.

To resist moisture penetration, control joints are filled with backer rods and sealant, or with other approved materials. These materials should be inspected periodically for any damage or foreign debris, and to ensure the sealant has not torn or debonded from the masonry wall. Damaged sealant should be removed and new sealant should be installed. Prior to filling the joint, the edges of the masonry in the joint may need to be cleaned and primed to ensure the sealant will adhere to the masonry.

UNIT DEGRADATION

Spalling and popouts in concrete masonry units are uncommon. However, under certain conditions they can occur, and units can also be damaged from large impacts. Such units should be inspected and repaired in a timely manner. Where the cause of the degradation is not apparent, consideration as to the cause of the defect should be given along with consideration of whether future degradation may occur. Obviously, if future degradation is expected, the cause should be remedied prior to making repairs. Causes of continuing damage include water penetration that may lead to freeze-thaw damage, excessive salts and chemicals from weed killers and fertilizers, and ivy and other plants.

Damaged or cracked units can be patched with mortar materials, depending on aesthetic concerns. Replacing a damaged unit can be accomplished by carefully chiseling or sawing out the broken unit and all the surrounding mortar. Once all the old mortar, dust, and debris are removed, a replacement unit can be installed by buttering the edges of the unit with mortar and placing it in the opening in the wall. The mortar should be tooled to match the original profile once the mortar becomes thumbprint hard. If the unit that requires replacement contains vertical reinforcement or is grouted, only the face shell of the unit may be able to be replaced. In this case it is advisable to spread mortar on the back of the face shell as well to provide bond between the grout as well as to the surrounding masonry units.

THE ROLE OF THE OWNER

Because masonry has earned the reputation as a longlasting and durable material, owners may not factor into their annual budget funds needed for maintenance of masonry walls. While these walls typically need much less attention than other materials, the cost invested by the owner in regular masonry maintenance throughout the life of the structure will pay great dividends in the long run.

OWNER’S MANUAL

A successful maintenance program begins with a good owner’s manual. This manual should identify and describe all of the materials and equipment installed in the building and should outline the maintenance needed for each of these items. The manual also should include updated as-built project drawings and details rather than initial design and bid specifications. The material and equipment descriptions should include the product name, the manufacturer, the expected life cycle, associated material safety issues, and where to turn for more information.

The owner’s representative, typically the architect, should assume responsibility of compiling the owner’s manual. To insure completion of the manual, it should be included as part of the scope of work when the job is put out to bid. Records of inspections and corrective measures conducted should be assembled and kept up by the building maintenance personnel as a supplement to the manual.

Inspection

The owner’s manual should stress the need of periodic condition assessments. Timely identification of problems or even potential problems can greatly reduce the costs associated with corrective measures. While the majority of the inspection can be done by visual assessment of the exterior surface of the masonry, the condition of the interior of the structure can also be useful to determine the performance of the masonry in areas such as water and air penetration resistance.

Building maintenance personnel or other owner’s representatives should perform these inspections at least annually. Masonry or building specialists should be consulted for a more thorough inspection every five years. Table 1 is a list of items made to schedule regular replacement of materials that are known to have a typical effective life that is less than that of the masonry. Examples of these materials and their common performance duration are listed in Table 2.

REFERENCES

  1. Crack Control Strategies for Concrete Masonry Construction, CMU-TEC-009-23, Concrete Masonry & Hardscapes Association, 2023.
  2. Control and Removal of Efflorescence, TEK 08-03A, Concrete Masonry & Hardscapes Association, 2003. Plaster and Stucco for Concrete Masonry, TEK 09-03A, Concrete Masonry & Hardscapes Association, 2002.
  3. Removal of Stains from Concrete Masonry, TEK 08-02A, Concrete Masonry & Hardscapes Association, 2005.
  4. Water Repellents for Concrete Masonry Walls, TEK 19-01, Concrete Masonry & Hardscapes Association, 2006.

Control of Air Leakage in Concrete Masonry Walls

INTRODUCTION

Energy efficiency in buildings has become increasingly important. Whether complying with newer energy codes or gaining recognition for sustainable building practices, reducing the overall energy usage in new and existing buildings continues to be a leading consideration for design teams.

Many methods are employed to increase building energy efficiency. One consideration is reducing air leakage through the building envelope. In addition to the negative impact on a building’s energy efficiency (due to the loss of conditioned air via exfiltration and/or the introduction of unconditioned air via infiltration), air leakage in buildings can also impact moisture control, indoor air quality, acoustics and occupant comfort.

Reduced air leakage is one area where masonry walls excel compared to other wall types when proper design criteria are applied. This TEK reviews available information on masonry wall air leakage, reviews the most recent code criteria, presents concrete masonry wall assemblies that meet this criteria, and provides general guidance on improving the control of air leakage in masonry walls.

AIR LEAKAGE

Air leakage consists of air infiltration from the exterior into the conditioned spaces of buildings and/or exfiltration of conditioned interior air out of buildings. Although under a pressure differential air can pass directly through many materials, air leakage occurs primarily through a myriad of cracks, gaps, improperly designed or constructed joints, utility penetrations, junctions between wall and window and door frames, junctions between wall and roof assemblies, and other avenues.

Historically, air leakage has been the primary source of building ventilation. Because it is uncontrolled and weather-dependent, however, the direct result of air leakage is an increase of energy consumption to maintain space conditioning. Recognition of this increased energy consumption has caused air leakage to be regulated by code for many newer commercial buildings.

Reducing air leakage rates, however, can pose potentially adverse health effects due to stale and polluted air by reducing the air exchanges that dilute contaminants. Mechanical ventilation systems are usually required to satisfy air exchange requirements that have historically been met by uncontrolled air leakage. Although there is an added cost with a designed mechanical ventilation system, it is theoretically offset by the energy savings associated with the reduced air leakage. Heat recovery or energy recovery units (HRV/ERV) can be used to reduce the amount of space conditioning required to condition the fresh air. These systems should be designed carefully, however, as some research shows that the energy consumed by operating the HRV/ERV systems could exceed the cost of conditioning the fresh air (ref. 1).

Studies have shown that air leakage in buildings can be difficult to accurately predict and measure (ref. 2). Prediction and measurement of air leakage rates in walls has been the subject of study by both U.S. and international researchers. U.S. results have focused primarily on the wood stud wall construction with fibrous insulation common to home building. International research has looked at masonry walls as well as wood frame walls, because masonry is the traditional European construction method.

AIR LEAKAGE LOCATIONS

A key issue when addressing air leakage is the significant difference between air leakage at discreet sites, such as at member junctions and at door and window openings where caulking and sealing is at issue, versus the diffuse air leakage that can occur directly through a wall assembly. Chapter 16 of the ASHRAE Fundamentals Handbook (ref. 3) includes the results of residential air leakage studies that show that the largest source of air leakage occurs through wall cracks, joints and utility penetrations. Other major leakage sources include leakage around doors and windows, ceiling penetrations and utility penetrations to the attic, and the HVAC system. The same studies showed that diffusion through walls was less than 1%; i.e., compared to infiltration through holes and other openings, diffusion through walls was not an important flow mechanism in residential buildings. These data are illustrated in Figure 1.

AIR LEAKAGE CRITERIA

To reduce air leakage rates, air barrier systems are sometimes designed and installed as part of the building envelope. Alternatively, the thermal envelope can be designed and detailed to perform as an air barrier system. Current building codes (ref. 4) do not stipulate quantitative requirements for air barriers, but instead require that the exterior envelope be sealed to minimize the infiltration/exfiltration of air through both commercial and residential building envelopes.

The 2012 International Energy Conservation Code (IECC) (ref. 5) and some local jurisdictions, however, have adopted performance requirements for the control of air leakage in commercial buildings. The 2012 IECC provides three levels of compliance, applying to air barrier materials, air barrier assemblies, or the whole building. These commercial air barrier criteria apply only to buildings in Climate Zones 4 through 8. The compliance criteria are (only one of these criteria need to be satisfied):

  • a building material intended to serve as an air barrier must have an air permeance of less than 0.004 cfm/ft2 at a pressure differential of 1.57 lb/ft2 (0.02 L/s-m2 at 75 Pa),
  • an assembly of materials intended to serve as an air barrier, such as a concrete masonry wall assembly, must have an air leakage rate of less than 0.04 cfm/ft2 at a pressure differential of 1.57 lb/ft2 (0.2 L/s-m2 at 75 Pa), or
  • a building must have an air leakage rate of less than 0.4 cfm/ft2 at a pressure differential of 1.57 lb/ft2 (2.0 L/s-m2 at 75 Pa).

Also contained within the code are several “deemed-to-comply” materials and assemblies. The following masonry-related materials and assemblies are included in this list and are therefore considered to comply with the code:

  • fully grouted concrete masonry (although listed as a material, this compliance option is more accurately deemed an assembly),
  • as a material, portland cement/sand parge or gypsum plaster with a minimum thickness of 5 /8 in. (16 mm),
  • as an assembly, portland cement/sand parge, stucco or plaster with a minimum thickness of 1 /2 in. (13 mm), and
  • concrete masonry walls coated with one application of block filler and two applications of a paint or sealer coating.

The last option is justified based on research completed in the early 2000s. More recent research has documented additional options for materials and coatings to allow concrete masonry assemblies to comply with the maximum assembly air leakage requirement of 0.04 cfm/ft2 at a pressure differential of 1.57 lb/ft2 (0.2 L/s-m2 at 75 Pa). Although not included explicitly in the code, these tested assemblies can be approved under IECC Section 102, Alternate Materials, as meeting the intent of the code. The testing is described in the Masonry Wall Assemblies section below, and the results are summarized in the Guidelines section on page 7.

The 2012 IECC also lists the following materials as acceptable air barrier materials (ref. 5). Any one of these can be used in conjunction with concrete masonry construction, as shown in Figures 2 and 3.

  • extruded polystyrene insulation board with a minimum thickness of 1/2 in. (13 mm) with joints sealed,
  • foil-backed polyisocyanurate insulation board with a minimum thickness of 1/2 in. (13 mm) with joints sealed,
  • closed-cell spray foam insulation with a minimum density of 1.5 pcf (2.4 kg/m3) with a minimum thickness of 1 1/2 in. (36 mm),
  • open-cell spray foam insulation with a density between 0.4 and 1.5 pcf (0.6 – 2.4 kg/m3) with a minimum thickness of 4 1/2 in. (114 mm), and
  • gypsum wallboard with a minimum thickness of 1/2 in. (13 mm) with joints sealed.

MASONRY WALL ASSEMBLIES

Multi-Wythe Walls

Multi-wythe concrete masonry assemblies have a variety of options available for compliance with the commercial building air leakage requirements listed above. In addition to the deemed-to-comply options, there are many proprietary air barrier materials and accessories available. Most air barrier materials are some type of coating, which is usually applied to the cavity side of the back up wythe. In addition, some types of spray-applied insulation or rigid insulation (with sealed joints) can be used as an air barrier, as illustrated in Figure 2.

Single Wythe Walls

The available options for single-wythe concrete masonry assemblies are illustrated in Figure 3. Solid grouting is available, as well as coating with a paint, sealer, or block filler. Additionally, exterior wallcoverings and interior wall finishes offer solutions, such as parge coating, stucco, plaster, various insulations and gypsum wallboard. Note that paints, sealers or block fillers are effective when applied to either the interior or exterior surface of the concrete masonry. Hence, when a coating is specified, architectural finishes need not be compromised by the coating.

Concrete Masonry Air Leakage Testing

Research sponsored by CMHA and the NCMA Education and Research Foundation (refs. 6, 7) has documented additional concrete masonry wall assemblies that can meet the air barrier assembly requirements of 0.04 cfm/ft2 at a pressure differential of 1.57 lb/ft2 (0.2 L/s-m2 at 75 Pa). The results are summarized below. See References 6 and 7 for full descriptions of the assemblies and test results.

Commercial-Grade Latex Paint

One project (ref. 6) tested the effects of commercial-grade latex paint on the air leakage rate of concrete masonry wall assemblies. The walls were ungrouted except at the four edges (which were grouted solid to isolate air permeance to a 1 m2 test surface). The research employed a modified ASTM E2178, Standard Test Method for Air Permeance of Building Materials (ref. 8), because there is no standardized test procedure specifically suited for testing concrete masonry assemblies. Three wall sets were built using plain gray concrete masonry units, each with different concrete mix designs, then tested for air leakage.

The wall sections were painted with a typical commercial-grade latex paint (28% solids content by volume), then the air leakage rate was re-measured. The research documented that the air leakage rate decreased as the paint thickness increased: it was determined that the air leakage rate of the wall was inversely proportional to the thickness of the paint applied.

While surface texture was not directly measured in this study, it is believed that the surface texture of smooth-faced concrete masonry units affects the ability of the coating material to develop a continuous coating, which is important for reducing air leakage rates through assemblies.

The results of this research indicate that the air leakage rate of 12-in. (305-mm) concrete masonry walls can be reduced to 0.04 cfm/ft2 or less at a pressure differential of 1.57 lb/ft2 (0.20 L/s-m2 at 75 Pa) by applying between 3.3 and 14.6 mils (0.084 and 0.371 mm) of commercial-grade latex paint for concrete masonry units with a smooth textured surface and a coarse textured surface, respectively.

High-Quality Latex Paint

More recent research (ref. 7) evaluated the effects of four additional coatings: a high-quality latex paint, masonry block filler, water repellent surface coatings, and gypsum wallboard. The concrete masonry units used in this study were also plain gray, medium-weight “utility” type units with a fairly open surface texture (see Figure 4). The use of integral water repellent admixtures was also investigated.

The latex paint used in this project was a high quality retail paint, with a 28% solids content by volume and 47% solids content by weight. To evaluate this paint, a single coat was applied with an average dry film thickness of 1.28 mil (0.033 mm). The paint reduced the air leakage rate by 94%, to a calculated average air leakage rate of 0.011 cfm/ft2 (0.05 L/s-m2), well below the assembly requirement of 0.04 cfm/ft2 (0.2 L/s-m2).

The results indicate that when a high quality latex paint is used, a single coat is all that is necessary to create a continuous coating and provide the required barrier to air flow.

Masonry Block Filler

The block filler evaluated was a water-based masonry primer designed for use on concrete and concrete masonry surfaces. This material is typically used as a base primer coat on concrete and masonry surfaces in preparation for painting. It is a thicker coating material than latex paint, designed to fill pores and surface imperfections in masonry walls. Based on information provided by the manufacturer, this material has a 46% solids content by volume and 55% solids content by weight.

A single coat of block filler was applied with an average dry film thickness of 2.10 mil (0.053 mm). The air leakage rate was reduced by 86% due to the presence of the block filler coating, to 0.011 cfm/ft2 (0.05 L/s-m2). This result is well below the air barrier assembly requirement of 0.04 cfm/ft2 (0.2 L/s-m2).

Gypsum Wallboard

A set of assemblies was also evaluated for air leakage after installing ½ in. (12.7 mm) gypsum wallboard to simulate a single-wythe assembly with a drywall-finished interior.

When the gypsum wallboard was tested by itself, it had an air permeance below the air barrier material requirement of 0.004 cfm/ft2 (0.02 L/s-m2). When the concrete masonry assembly was tested with wallboard attached, it was evident that the performance of the assembly was dominated by the air permeance of the wallboard, as very little air leakage was measured, and the results were below the 0.004 cfm/ft2 (0.02 L/s-m2) requirement for an air barrier material.

Water-Repellent Surface Coatings

Because many single-wythe concrete masonry assemblies use some type of water repellent surface coating, these coatings may be an efficient way to reduce air leakage rates. Both a silane/siloxane and an acrylic microemulsion water repellent coating were evaluated.

While both water repellent coatings reduced the air leakage rate of the assemblies, the reduction was not sufficient to comply with the 2012 IECC air barrier assembly requirements for commercial buildings.

Integral Water Repellents

The effect of an integral water repellent in concrete masonry units and masonry mortar was also evaluated. Integral water repellents in concrete masonry units can improve the compaction of the unit, leading to a slightly tighter concrete matrix and, in some cases, a more uniform surface texture.

The tested set of concrete masonry assemblies contained an integral water repellent admixture at an appropriate dosage to produce water repellent characteristics.

Compared to the assemblies without an integral water repellent, the addition of integral water repellent decreased the air leakage rate by 28% on average. This decrease is likely due to a slightly tighter pore structure resulting from the use of the integral water repellent. The decrease in leakage rate, however, was not sufficient to reduce the assembly air leakage rate to levels that comply with the 2012 IECC.

CONCRETE MASONRY COMPARED TO FRAME CONSTRUCTION

Typical masonry construction does not include some of the leakage sites common in frame walls. Masonry walls do not have sole plates (sills), because the wall is a continuous assembly from the footing up. The top of a masonry wall is typically a tie-beam or bond beam. Trusses or rafters are set to a plate attached to the top course of masonry. Quality caulking and sealing are important at the ceiling finish edge. Sealing is also required at attic access ways, as well as around any wall penetrations.

Commercial Buildings

Measured air leakage rates from existing commercial buildings constructed during or after 1980 have been compiled (ref. 9). From this data, 84% of the masonry buildings included had measured whole-building air leakage rates of less than 2 cfm/ft2 at a pressure differential of 1.57 lb/ft2 (10 L/s-m2at 75 Pa). In comparison, only 30% of frame-walled buildings had measured whole building air leakage rates of less than 2 cfm/ft2 at a pressure differential of 1.57 lb/ft2 (10 L/s-m2 at 75 Pa) (it should be noted that none of these buildings were constructed to meet an air tightness standard). The reported leakage rates were normalized by the above grade area of the building envelope. The data were compiled from various references, and represent a range of climates and building types, making it difficult to draw definite conclusions. The results do indicate, however, that existing masonry buildings tend to have much lower air leakage rates than existing frame-walled buildings.

Residential Buildings

The air leakage rates of masonry walls have also been researched widely in Europe by such groups as the Air Ventilation and Infiltration Center in England (ref. 10). Results from detailed air leakage work performed in Finland show that concrete masonry and lightweight concrete (panelized) walled homes had much lower air leakage rates than wood frame structures (ref. 11). Figure 5 illustrates these differences, comparing older wood frame houses averaging 7.3 air changes per hour (ACH) at 50 Pa to more modern site-built wood frame houses averaging 8.5 ACH, with a very wide range of values. Prefabricated wood element (panelized) houses were better at 6.0 ACH. Both concrete masonry and lightweight concrete houses, however, had roughly one-half the air change rate of the average panelized wood frame homes.

Proper sealing of components into masonry rough openings may be more important than reducing air leakage through masonry assemblies. Dr. Hiroshi Yoshino of Japan’s Tohoku University investigated Japanese housing air leakage (ref. 12) in a broad comparison with data from other nations. He ranked data points from his own research and other investigators into air tightness categories. He observed that some concrete multi-family housing was so air tight that indoor air quality and condensation problems resulted, and ventilation was required. Concrete masonry houses of “air-tight” construction ranked among the best in Japan for air tightness. Several of the other Japanese reports he cited also showed concrete and concrete masonry houses to have lower air leakage rates than typical Japanese frame houses.

Belgian researchers used a sequential technique in masonry homes to examine incremental air leakage measures (ref. 14). Figure 6 shows the progression of air change rates at 50 Pa from “normal construction,” which evidently assumes no air leakage reduction measures, to a masonry wall with all windows, doors and penetrations sealed and weather stripped. Sealing just these items resulted in about 87% less air leakage. The largest improvements are seen after sealing the door and window frames to their respective rough openings, which agrees with the data in ASHRAE (ref. 3). The Belgian findings also agree with a statement in a compendium of European air leakage results which states: “The critical details from the point of view of air-tightness are associated with the (quality of) formation of openings in masonry walls…” (ref. 14).

IMPACTS ON MOISTURE

When an air barrier material is required, its placement can be critical to controlling moisture and hence to wall durability.

First, because air movement can carry a significant amount of moisture into or through a building assembly, and second because the air barrier can act as a vapor retarder. Note that an air barrier is designed to control the movement of air both into and out of the building envelope, whereas a vapor retarder is designed to restrict the diffusion of water vapor through building materials and subsequent condensation. Because a vapor retarder can also inhibit drying, the need for a vapor retarder varies with climate, construction type and building use.

Although the functions of air barriers and vapor retarders differ, in some cases one component can serve both needs. In designs where one material is installed to control both air and water vapor movement, it is important that the material is continuous to provide the required level of air tightness. Where separate airflow and vapor retarders are installed, care must be taken to ensure that the air barrier cannot cause moisture condensation. This can be accomplished through the choice of vapor-permeable materials or through proper placement.

More detailed information on vapor retarders in concrete masonry walls can be found in TEK 06-17B, Condensation Control in Concrete Masonry Walls (ref. 13).

DISCUSSION

Air leakage measurements indicate that properly constructed concrete masonry walls may have better natural resistance to air leakage than typical frame construction. If a further reduction in air leakage rates is required, various options are available. Retrofits for reducing air leakage in concrete masonry construction are straightforward, because fewer dissimilar joints are involved. Also stucco, paints and mastics tend to be less expensive than new sheathing, polymer papers, etc.

GUIDELINES

The following concrete masonry wall assemblies are considered to meet an air leakage of less than 0.04 cfm/ft2 (0.20 L/s-m2) at 75 Pa,
either by prescriptive code requirements or as demonstrated through laboratory testing.

By prescriptive IECC criteria (ref. 5):

  • Fully grouted concrete masonry.
  • Concrete masonry with a portland cement/sand parge, stucco or plaster with a minimum thickness of 1/2 in. (13 mm).
  • Concrete masonry walls coated with one application of block filler and two applications of a paint or sealer coating.
  • By laboratory testing (refs. 6, 8):
  • 12-in. (305-mm) concrete masonry sealed with at least two coats of commercial-grade latex paint.
  • 8-in. (203-mm) concrete masonry coated with a single coat of high quality latex paint.
  • 8-in. (203-mm) concrete masonry coated with a single coat of masonry block filler.

It can be reasonably assumed that compliance would also be achieved by applying these coatings to walls having a larger thickness than those tested.

When coatings such as paint or block filler are called for, they can be applied to either the interior or exterior side of the concrete masonry, so any masonry architectural finishes need not be compromised.

REFERENCES

  1. Sherman, Max H. and Iain S. Walker, LBNL 62341. Energy Impact of Residential Ventilation Norms in the United States, Lawrence Berkeley National Laboratory, 2007.
  2. Carr, D. and J. Keyes, Component Leakage Values and their Relationship to Air Infiltration, Steven Winter Associates, 1984.
  3. 2009 ASHRAE Handbook – Fundamentals. American Society of Heating, Refrigerating and Air-Conditioning Engineers, Inc., 2009.
  4. International Energy Conservation Code. International Code Council, 2006 and 2009.
  5. International Energy Conservation Code. International Code Council, 2012.
  6. Biggs, David T., Air Permeance Testing of Concrete Masonry Wall Assemblies, FR06. National Concrete Masonry Research and Development Laboratory, January 2008.
  7. Assessment of the Effectiveness of Water Repellents and Other Surface Coatings on Reducing the Air Permeance of Single Wythe Concrete Masonry Assemblies, MR36. Concrete Masonry & Hardscapes Association, 2010.
  8. Standard Test Method for Air Permeance of Building Materials, E2178-03. ASTM International, 2003.
  9. Emmerlich S. J., T. McDowell, W. Anis, Investigation of the Impact of Commercial Building Envelope Airtightness on HVAC Energy Use, NISTIR 7238. National Institute of Standards and Technology, 2005.
  10. Air Ventilation and Infiltration Center, Old Bracknell Lane West, Bracknell, Berkshire, RG12 4AH, Great Britain.
  11. Kohonen, R., S. Ahvenainen and P. Saarnio. Review of Air Infiltration Research in Finland, Air Infiltration Review Vol. 6, No. 1, 1984.
  12. Yoshiro, Dr. H. Overview of Air Infiltration in Japan, Air Infiltration Review. Vol. 5 No. 3, May 1984.
  13. Condensation Control in Concrete Masonry Walls, TEK 06-17B, Concrete Masonry & Hardscapes Association, 2011.
  14. Caluwaerts, P. and P. Nusgens. Overview of Research Work in Air Infiltration and Related Areas in Belgium, Air Infiltration Review. Vol. 5 No. 1, 1983.