Resources

Characteristics of Concrete Masonry Units With Integral Water Repellent

INTRODUCTION

A concrete masonry unit’s characteristics are a function of the properties and proportions of the materials used, as well as the manufacturing processes. The unit characteristics do not singularly define the characteristics and performance attributes of a concrete masonry wall, but they certainly play a significant role in influencing those attributes. When used as part of a breathable exterior wall for an inhabited structure, or as a barrier for any conditioned or protected space, concrete masonry is expected to contribute to the water penetration resistance and moisture control of the wall assembly. Current model building codes include provisions intended to ensure that exterior walls provide adequate weather protection for the building (ref. 1).

Design of concrete masonry walls to mitigate or control moisture migration includes many considerations beyond the characteristics of the concrete masonry unit, such as flashing, weeps, workmanship, mortar or grout characteristics, vents, coatings, vapor barriers, air barriers, temperature differences, and accommodation of differential movement, plumbing and roof leaks, as well as other considerations. The potential for condensation, whether at the wall’s interior surface, weather-exposed surface, and/or interior of the wall, should also be considered. Proper design and construction of concrete masonry, considering all of these elements, is critical to the water resistant performance of the wall system. These topics are addressed in References 2 through 7 and in other literature sources.

Mortar joints are especially critical to a wall’s water penetration resistance. Achieving good bond between the mortar and the unit surfaces is essential and is largely influenced by the mortar material itself, tooling procedures, and joint profile as well as by the configuration of the concrete masonry unit. Ribbed units, for example, make it difficult to adequately tool the mortar joints. Reducing mortar’s absorption characteristic is also important for achieving success in moisture control in a concrete masonry wall. This can be achieved using integral water repellent admixtures in the preparation of the mortar.

While all of the aforementioned aspects significantly affect wall performance, this TEK focuses specifically on evaluating the water penetration resistance characteristics of concrete masonry units and their role in contributing to control of moisture in the wall.

THE ROLE OF CONCRETE MASONRY UNITS

The concrete masonry unit’s role and contribution to the concrete masonry wall assembly’s water penetration resistance depends in part on how the units are used in the design. The unit characteristic requirements for contributing to success of the exterior wall may vary depending on the design of the masonry wall in which it is used. For example, the role of concrete masonry units is more critical relative to moisture control when they are part of a weather-exposed surface or exterior wall assembly for a protected and conditioned building than if they are used as an interior wall.

There are three primary forces influencing moisture control of a concrete masonry wall: positive or negative air pressures created by the weather or building ventilation systems, internal moisture absorption and/or adsorption through the matrix of the concrete material, and condensation/evaporation. For the purposes of this discussion, absorption is considered to relate to the cementitious material’s attraction to or affinity for water at the molecular level. Generally speaking, mortar tends to have a much greater affinity for water than does a concrete masonry unit. Adsorption is the affinity of water at the individual surfaces of the cementitious materials. For instance, capillary pressure creates the tendency for water to migrate into a porous object along the surfaces of the interconnected voids, such as a sponge placed in very shallow water. The same tendency may be observed in a mortar joint or an untreated concrete masonry unit due to interconnected voids.

When units are used on a building exterior, it is desirable to limit moisture migration through the first barrier of defense at the wall surface. Wind driven rain can be a significant cause of water breaching a mortar joint, the front face shell of a single wythe wall, or a veneer unit. These weather-induced positive pressures can create a challenge to barrier defenses. As a driving force, they are highest at the surface of the masonry and rapidly diminish a few inches into the mortar joint, the unit, or into the cavity of a drainage wall.

Water repellency characteristics of concrete masonry units can be defined by their contribution to barrier defenses at the surface of the wall (which will help limit the effect of the positive pressure of wind driven rain), by their ability to limit the potential for absorbing and adsorbing moisture through their matrix, and by their contribution to controlling condensation.

PERTINENT UNIT CHARACTERISTICS

Barrier defenses in concrete masonry units can be provided at the surface as well as within the mass of the concrete layer. Surface protection can be enhanced by post-applied breathable materials, external coatings and wall coverings. When coatings are used, the most important characteristic of the unit may be its compatibility with the type of coating used. Some clear sealers and certain paints may not be suitable for a particular concrete masonry unit since some coatings may not be able to bridge open pores or fill all surface irregularities or textures. For example, the proper performance of stucco relies on a rougher and more open unit surface texture of the concrete masonry unit to ensure adequate mechanical bonding.

Beyond the unit’s exterior surface compatibility with the type of breathable post-applied material, coating or wall covering used, if any, an important consideration is the characteristics of the concrete used to produce the unit. The water penetration resistance of concrete is determined by the characteristics of the matrix and its resistance to absorbing moisture. The properties and proportions of the raw materials used to produce the units and the manufacturing procedures employed influence the water penetration resistance of those units. For example, a greater volume of interconnected voids within the unit may provide an easier path for moisture migration. Alternatively, reducing the volume of voids, such as by increasing the unit compaction, may limit moisture movement through the unit. Aggregate type and gradation, cement to aggregate ratio, mix water content, alkalinity, machine compaction, curing processes, and plasticizing and integral water repellent admixtures are some of the parameters that can have an influence on water repellency characteristics.

INTEGRAL WATER REPELLENTS

Integral water repellent admixtures can be used in the mix design of the concrete masonry unit during production to limit a unit’s tendency to absorb moisture through its matrix. Integral water repellent admixtures are usually polymeric products that utilize hydrophobic materials to significantly reduce the absorption characteristics of the concrete. Without these admixtures, even those units with excellent compaction will absorb some moisture through the concrete matrix. Integral water repellents significantly limit absorption by changing the chemistry of the matrix, which may include coating the pores in the concrete with a hydrophobic material that reduces the chemical affinity for water. Thus, concrete masonry units with integral water repellents are positioned to repel water rather than automatically allowing it to migrate through the unit. However, use of integral water repellent admixtures alone does not assure a water-resistant unit. Care must still be taken in production as discussed above to reduce the volume of interconnected voids that will permit moisture migration via other forces, such as wind or gravity.

An advantage of integral water repellent admixtures is that they remain a permanent part of the concrete matrix. Unlike post-applied products, integral water repellent treatments require less maintenance since they are more durable, and they are active throughout the whole concrete matrix and not just at the surface. In addition, integral water repellents can reduce efflorescence by reducing water migration through the concrete masonry (including latent water introduced to the system from grout or mortar).

When integral water repellents are used in concrete masonry units, it is important that the same or a compatible admixture be used in the mortar as well in accordance with manufacturer’s recommendations. Failure to use an integral water repellent admixture in the mortar may compromise the water repellency characteristics of the wall.

EVALUATING UNIT WATER REPELLENCY

The water repellency characteristics of a concrete masonry unit can be evaluated using simplistic field methods or more involved laboratory test methods. Three methods are described briefly below, and in more detail in the referenced published industry test methods (refs. 8, 9, 10).

All of these tests are suitable for evaluating units to be used in wall construction. It is important that field testing, if considered necessary, be conducted prior to wall construction since most of these tests can not be accurately performed on a constructed wall surface. For instance, small amounts of mortar left on the surface of a unit even after cleaning, as well as the cleaning techniques themselves, may alter the surface characteristics of the unit relative to its as-delivered condition. Similarly, water introduced into the system from grout or mortar (water of latency) and in turn absorbed into the unit may change the unit’s characteristics. Before, after, or during construction, accumulated dust or pollution may also alter the surface characteristics. When water repellency characteristics are evaluated prior to unit placement, any unexpected results from field testing can be addressed in a timely manner using the default laboratory test methods described below.

Water Bottle and Water Droplet Tests

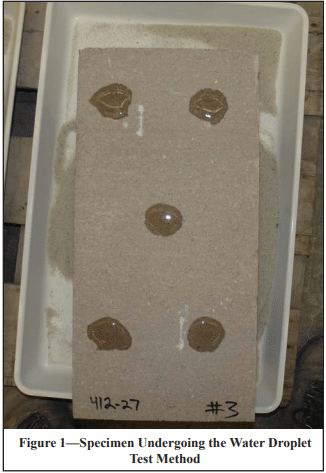
The water bottle and water droplet test methods (ref. 8) can be effective as a first pass evaluations of water repellency. The water droplet method is typically conducted on individual units in a horizontal position as shown in Figure 1 (90 degrees to the “as laid” or construction orientation), but as a variation the water bottle test can also be conducted on units placed in a vertical (“as laid”) orientation. Typically, a concrete masonry unit manufactured with an integral water-repellent admixture will be able to support at least three out of the five water droplets for a period of five minutes or more.

At the immediate surface of the concrete masonry unit, the effectiveness of an integral water repellent may diminish over time due to exposure to elements such as dirt, contaminants and UV light. The water repellency characteristics of the concrete just below the surface, however, remain unchanged and provide continuing protection. Therefore, while the water droplet test is rather reliable for identifying a sufficient level of water repellency, it may not be a good indicator of poor water repellency. In other words, if a unit fails to support a droplet of water, the unit should not be considered inadequate, but rather should be taken to a laboratory for further testing using the spray bar and water uptake methods.

If the unit is already installed in the wall, the water bottle test can be used to evaluate the unit. If water applied to the face of the unit is not absorbed immediately, but rather freely runs down the surface of the unit, it likely has sufficient water repellency. Again, if the water is absorbed at the surface, it can not be assumed that the unit does not have sufficient water resistance. Water can be sprayed on a larger wall surface area to determine if isolated units appear to have significantly higher absorption characteristics, since these may appear to have a darker surface color as a result of absorbed water. However, remember that conclusions based upon any field testing, especially on units installed in construction, are not definitive relative to water repellency determinations.

Spray Bar Test

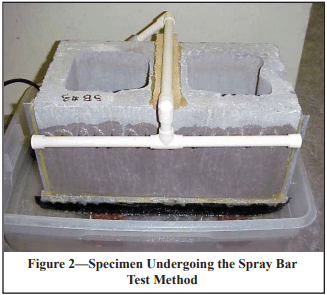
A spray bar test (ref. 9) is a good method to evaluate a unit’s ability to limit absorption as well as verify its effectiveness as a barrier against free moisture migrating through pinholes in the unit face. This laboratory test requires relatively inexpensive equipment and can be conducted in a single day. A spray bar is attached to the unit such that it applies a steady stream of water onto its face (see Figure 2). The inside of a hollow unit is visually inspected to assess if and how moisture has migrated through the front face shell.

Moisture may be present on the interior as dampness that can be seen on the inside surface of the front face shell, on the center or end webs, or even on the interior or exterior surfaces of the back face shell. Moisture may also be observed on the inside of the front face shell from “pinholes.” Pinholes are locations where water has found a path through the face shell to the interior of the unit. Free water will appear as a droplet and may eventually trickle down the inside of the front face shell. A good water repellent unit will limit moisture migration in both forms: dampness and pinholes. If a unit allows an excessive amount of water to migrate through the unit, the type of failure can give an indication of the corrective action that should be taken by the producer. Excessive dampness, for example, may indicate that additional integral water repellent admixture or process adjustment is needed. Excessive pinholes may indicate that an adjustment to the aggregate blend and/or increased compaction may be necessary to reduce the volume of interconnected voids in the unit.
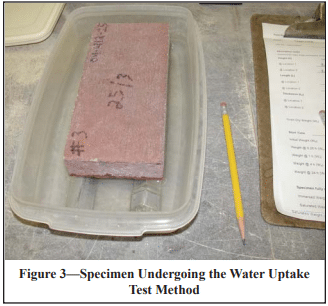
Water Uptake Test

Another good method for evaluating a unit’s resistance to moisture migration is the water uptake test (ref. 10). The test involves placing an oven-dried unit face down (non-split side) in in. (3 mm) of water and measuring the water absorption by means of its weight gain over time.

While the water uptake test may be very good at distinguishing between the levels of resistance to absorption uptake, it will not indicate compaction or other flaws that might result in pinholes. Therefore, it is recommended that the results of this test be used to complement the results of the spray bar test and not used exclusively as a means of evaluation.

REFERENCES

  1. International Building Code, 2003 and 2006 editions. International Code Council, 2003, 2006.
  2. Water Repellents for Concrete Masonry Walls, TEK 19-01, Concrete Masonry & Hardscapes Association, 2006.
  3. Design for Dry Single-Wythe Concrete Masonry Walls, TEK 19-02B, Concrete Masonry & Hardscapes Association, 2012.
  4. Preventing Water Penetration in Below-Grade CM Walls, TEK 19-03B, Concrete Masonry & Hardscapes Association, 2012.
  5. Flashing Strategies for Concrete Masonry Walls, TEK 19-04A, Concrete Masonry & Hardscapes Association, 2008.
  6. Flashing Details for Concrete Masonry Walls, TEK 19-05A, Concrete Masonry & Hardscapes Association, 2008.
  7. Crack Control Strategies for Concrete Masonry Construction, CMU-TEC-009-23, Concrete Masonry & Hardscapes Association, 2023.
  8. Water Droplet Test Method for Concrete Masonry Units, CMHA Method CMU-WR1-07, Concrete Masonry & Hardscapes Association, 2007.
  9. Spray Bar Test Method for Concrete Masonry Units, CMHA Method CMU-WR2-07, Concrete Masonry & Hardscapes Association, 2007.
  10. Water Uptake Test Method for Concrete Masonry Units, CMHA Method CMU-WR3-07, Concrete Masonry & Hardscapes Association, 2007.
  11. Standard Specification for Loadbearing Concrete Masonry Units, ASTM C 90-06. ASTM International, 2006.
  12. Standard Specification for Concrete Facing Brick, ASTM C 1634-06. ASTM International, 2006.

NCMA and the companies disseminating this technical information disclaim any and all responsibility and liability for the accuracy and the application of the information contained in this publication.

Aesthetic Design With Concrete Masonry

INTRODUCTION

One aspect of concrete masonry that has kept it at the forefront of building materials is its ability to incorporate and reflect a broad spectrum of existing architectural styles, as well as providing the designer with the ability to develop and present unique aesthetic affects and techniques. When skillfully designed, simple materials can provide unparalleled aesthetic enhancement. Inventive patterns, color choices (unit and mortar), unit sizes, and surface finishes (split face and standard) can be used in various concrete masonry bond patterns to evoke a sense of strength, modernity, tradition, or even whimsy.

Within the confines of meeting applicable building codes and specifications, concrete masonry’s modular sizes and range of colors, textures and patterns provide ample opportunity to demonstrate a design technique or overcome design challenges. In addition to the architectural finish, concrete masonry can provide the wall’s structure, fire resistance, acoustic insulation, and energy envelope.

This TEK addresses the proper application of architectural enhancements in concrete masonry wall systems. Where appropriate, related TEK and other documents are referenced to provide further information and detail.

Communication With Clients

Common dilemmas faced by designers are a client’s changing expectations and responses to the project’s changing appearance over time and under varying conditions. As discussed below, there are some basic requirements relative to aesthetics, but these are far from comprehensive. It is important to realize that code requirements primarily govern structural performance, not aesthetics. For example, code required construction tolerances are designed to ensure that masonry units are placed such that the completed wall can act structurally as an integrated unit.

These requirements assume an understanding of the techniques unique to the nature of masonry. The design and construction team should establish and consistently support ground rules affecting aesthetic interpretations of a project. It is also important for the client to realize the aesthetic standard that the project is based on, and that unusually high aesthetic standards can be more costly. In addition, certain high-profile areas, such as a building entrance, may require a custom level of quality, commensurate with an additional cost for the defined area. Several state and local masonry associations have developed guidelines for defining aesthetic requirements, and these can be a good resource for clarifying a project’s aesthetic standards.

Sample panels are a good means to communicate the minimum contract-based aesthetic standard to all parties. The sample panel is typically constructed prior to the project, and in some cases a portion of the work can serve as the sample panel. The sample panel remains in place or at least available until the finished work has been accepted, since it serves as a comparison for the finished work. The sample panel should contain the full acceptable range of unit and mortar color, as well as the minimum expected level of workmanship. Cleaning procedures, as well as application of any coatings or sealants, should also be demonstrated on the sample panel. See TEK 08-04A, Cleaning Concrete Masonry, (ref. 1) for more information on cleaning.

CONSIDERATIONS FOR CHOOSING CONCRETE MASONRY UNITS

Architectural Concrete Masonry Units

One of the most significant architectural benefits of designing with concrete masonry is its versatility—the finished appearance of a concrete masonry wall can be varied with the unit size and shape, color of units and mortar, bond pattern, and surface finish of the units. The term “architectural concrete masonry units” typically is used to describe units displaying any one of several surface finishes that affect the color or texture of the unit, allowing the structural wall and finished surface to be installed in a single step. CMU-TEC-001-23, Concrete Masonry Unit Shapes, Sizes, Properties, and Specifications, (ref. 2) provides an overview of some of the more common architectural units, although local manufacturers should be consulted for final unit selection.

Architectural concrete masonry units are used for interior and exterior walls, partitions, terrace walls and other enclosures. Some units are available with the same treatment or pattern on both faces, to serve as both exterior and interior wall finish material, increasing both the economic and aesthetic advantages. Architectural units comply with the same performance-based quality standards as conventional concrete masonry, such as Standard Specification for Loadbearing Concrete Masonry Units, ASTM C90 (ref. 3). See Aesthetics in ASTM C90 (page 4) for more information.

Concrete Masonry Unit Color

Being produced from natural aggregates, concrete masonry has natural color variations from unit to unit. When a more monotone appearance is desired, there are various techniques that may be specified to increase the color uniformity in concrete masonry. Perhaps the best method is to specify the use of mineral pigments in the concrete mix, which are available in a wide range of colors. Pigments provide an integral color throughout the unit and minimize variations in color and texture found naturally in aggregate and sand deposits. Using several colors of integrally-colored concrete masonry units in the same wall is an effective technique for producing other visual impacts, such as two-tone banding or complementary color palates (see Figure 1).

Other methods are also used to improve color uniformity. One method is to specify the use of a post-applied stain, paint or coating on the units. With a paint or coating, the resulting film minimizes the texture of the masonry surface as well as the visual impact of the mortar joints. Paints and coatings for concrete masonry should be compatible with the masonry, and should in general allow for water vapor transmission. TEK 19-01, Water Repellents for Concrete Masonry Walls, (ref. 4) contains information on the applicability of different types of paints and coatings for concrete masonry walls.

A more laborious method to improve color uniformity is to arrange with the masonry contractor for a pre-sorting of on-site supplied block during certain stages of construction.

Interaction With Sunlight

Because it is produced from natural materials, concrete masonry walls often interact with changing sunlight in much the same way that natural stone does, appearing to change color as the light hits the wall at different angles. Figure 2 shows how even a conventional gray concrete masonry wall can interact with sunlight to present a range of color. This same attribute can be used to advantage with electric lighting, as well as on interior walls.

Fluted concrete masonry units provide a rich texture and tend to enhance the sound attenuating properties of concrete masonry.

The vertical flutes also provide an interesting interplay of light and shadow, which can be much more dramatic than smoothfaced units.

MORTAR JOINTS

While mortar generally comprises less than ten percent of a typical concrete masonry wall surface area, it can have a significant impact on the overall aesthetics of the completed structure. Mortar joint finishing, profiles and color can all impact the overall wall aesthetics. See also Concrete Masonry Handbook for Architects, Engineers, Builders (ref. 5) for information on mortar joints.

Mortar Joint Tooling

Tooling refers to finishing the mortar joints with a profiled tool that shapes and compacts the surface of the joint and provides a sharper, cleaner appearance for the wall. The surface shape of the tool determines the joint’s profile (discussed in more detail in the following section). Tooling mortar joints also helps seal the outer surface of the joint to the adjacent masonry unit, improving the joint’s weather resistance. For this reason, tooled joints that compact the mortar and do not create ledges to hold water are recommended for construction that will be exposed to weather.

Mortar joints should be tooled when the mortar is thumbprint hard (a clear thumbprint can be pressed into the mortar without leaving cement paste on the thumb). Tooling the joints before they reach this stage results in lighter colored joints, because more cement paste is brought to the surface of the joints. Joints tooled too early can also subsequently shrink away slightly from the adjacent concrete masonry unit. Tooling at the proper time allows this initial shrinkage to occur, then restores contact between the mortar and the unit producing a more weatherresistant joint. Conversely, later tooling can produce a darker joint. A consistent time of tooling will minimize variations in the final mortar color.

For the cleanest result, horizontal mortar joints should be tooled before vertical joints. For white and light-colored mortar, Plexiglas jointers can be used to avoid staining the joints during tooling. After all joints are tooled, any mortar burrs on the wall should be trimmed off with a trowel or other tool (a tool such as a plastic loop is easier to use on a split face wall than a trowel, for example). As a final step the joints are dressed using a brush, a piece of burlap, or similar material.

Mortar Joint Profiles

Traditional mortar joint profiles are illustrated in Figure 3. For walls not exposed to weather, the joint profile selection can be based on aesthetics and economics (as some joint profiles are more labor intensive to produce). For exterior exposures, however, the mortar joint profile can impact the wall’s weather resistance, as discussed above.

Unless otherwise specified, mortar joints should be tooled to a concave profile when the mortar is thumbprint hard (refs. 6, 7). For walls exposed to weather, concave joints (Figure 3a) improve water penetration resistance by directing water away from the wall surface. In addition, because of the shape of the tool, the mortar is compacted against the concrete masonry unit to seal the joint. V-shaped joints (Figure 3b) result in sharper shadow lines than concave joints.

Grapevine and weather joints (Figures 3c, 3d) provide a water shedding profile, but do not result in the same surface compaction as concave or V-shaped joints. Both are used in interior walls to provide strong horizontal lines.

Beaded joints (Figure 3e) are formed by tooling the extruded mortar into a protruding bead shape. Care must be taken to obtain a straight line with the bead. Although technically a tooled joint, the beaded tooler does not produce the same mortar surface compaction as a concave or V-shaped tool. In addition, the protruding bead can allow water, ice or snow to collect. Therefore, beaded joints are not recommended for weather-exposed construction.

Flush joints (Figure 3f) are typically specified when a wall will be plastered. Excess mortar is simply struck off the face of the wall with the trowel, then dressed with a brush or other tool.

Squeezed or extruded joints (Figure 3g) are made using excess mortar that is squeezed out as units are laid. They may be specified for interior walls.

Struck joints (Figure 3h) provide a strong horizontal line, similar to weather joints, however because the shape provides a ledge for rain, ice or snow, they are not recommended for walls that will be exposed to weather. Raked joints (Figure 3i) provide a dramatic contrast between the units and mortar joints. They are formed using a joint raker, which removes the mortar to a maximum depth of 1/2 in. (13 mm). With raked joints, small imperfections on unit edges can be more noticeable, because the mortar is not compacted against the unit (the compaction tends to fill in small surface irregularities along the unit edge). The resulting joint is not weather-resistant, and may not leave enough mortar cover over horizontal joint reinforcement (joint reinforcement is required to have 5/8 in. (16 mm) mortar cover in walls exposed to weather or earth (refs. 6, 7)). A better option for exterior surfaces is to specify an integrally colored mortar to provide the visual contrast.

Mortar Joint Color

Choosing a specific mortar color allows additional creativity by specifying integral color to either provide a visual contrast or to match the unit color, as shown in Figure 4. Note that using a mortar color that matches the surrounding units minimizes the effects of minor mortar staining; i.e., with a contrasting mortar color, greater care should be used to remove mortar droppings and splatters from the masonry units.

Because foreign material in mortar sand can affect the mortar quality, as well as appearance, ASTM C144, Standard Specification for Aggregate for Masonry Mortar (ref. 8), limits deleterious substances in aggregates for masonry mortars. Sand can also affect mortar color: sands from different natural sources may have different hues. Therefore, all of the sand for a particular project should come from the same source. Silica sand, which is more expensive than typical masonry sand, is often specified for white mortar. Consistent batching and mixing procedures also help produce uniform mortar color from batch to batch. See TEK 03-08A, Concrete Masonry Construction (ref. 9), for further information.

Using a consistent amount of mix water is important to maintain color uniformity for all mortars and especially when using integrally colored mortar. Changing the amount of water can significantly change the resulting mortar color intensity. For this reason there are special methods and equipment, such as shading materials and equipment from direct sunlight, the use of cooled water, and the use of damp, loose sand piles to reduce excessive retempering. Mortar that is too stiff or older than 2 1/2 hours after initial mixing is to be discarded.

EXPECTATIONS FOR UNITS AND CONSTRUCTION

Aesthetics in ASTM C90

ASTM C90 provides minimum requirements for concrete masonry units that assure properties necessary for quality performance. The specification includes requirements for materials, as well as dimensional and physical requirements such as minimum compressive strength, maximum water absorption, maximum dimensional tolerances, and maximum linear drying shrinkage. It also includes finish and appearance criteria for concrete masonry units.

It should be noted that the requirements in ASTM C90 are intended to address the performance of the masonry units when installed, not the aesthetics of the units nor of the constructed masonry. The time for product inspection is before placement. As such, the finish and appearance criteria, for example, prohibits defects that would impair the strength or permanence of the construction, but permit minor cracks or chips incidental to usual manufacturing, shipping and handling methods.

Qualities that are not included in C90 include color, surface texture, surface features such as scores or flutes, density choice, water repellency, fire resistance rating, thermal properties and acoustic properties. If required, these properties must be addressed in project contract documents. ASTM C90 does, however, include acceptance criteria for unit color and surface texture: namely, that the finished unit surfaces that will be exposed in the final structure conform to an approved sample of at least four units. The sample should represent the range of color and texture permitted on the job. As a practical matter, color and texture should be expected to vary somewhat due to the nature of the material.

The ASTM C90 specification is described in more detail in CMU-TEC 001-23, (ref. 2).

Considerations for Integrally Colored Smooth-Faced Units

Integrally-colored concrete masonry units are available in a wide variety of colors and shades. The mineral oxide pigments are evenly dispersed throughout the concrete mix, producing a low-maintenance enhancement that lasts the life of the structure.

During unit manufacture, the integrally-colored concrete mix is placed into a steel mold, which is stripped off while the concrete is still plastic. This stripping of the mold draws moisture and coloring pigment to the unit surface, which impacts the surface appearance. On split-faced or ground-faced units, this surface is either ground away or not exposed (in the case of split-faced units). Because the formed surface is the final exposed surface on smooth-faced units, however, these units will have a wider color variation than is seen with split-faced or ground-faced units. Understanding this color variation will help avoid possible disappointment that the finished wall does not have the color uniformity of a painted or stained wall.

Construction Tolerances

The International Building Code and Specification for Masonry Structures (refs. 6, 7) contain site tolerances for masonry construction which allow for deviations in the construction. The permissible tolerances are intended to ensure that misalignment of units or structural elements does not impede the structural performance of the wall. Although the tolerances are not intended for the purpose of producing an aesthetically pleasing wall, these tolerances are generally adequate for most aesthetic applications as well. If tighter tolerances are desired, they must be specified in the project documents.

As an example, unless otherwise specified, the actual location of a masonry element is required to be within a certain tolerance of where the element is shown on the construction drawings: + 1/2 in. in 20 ft, + 3/4 in. max (+ 13 mm in 6.2 m, + 19 mm max). More precise placement dimensions can be specified, typically at a higher cost.

Tolerances apply to: plumb, alignment, levelness and dimensions of constructed masonry elements, location of elements, levelness of bed joints, mortar joint thickness, and width of collar joints, grout spaces and cavities. A full discussion of code-required masonry construction tolerances is presented in TEK 03-08A, Concrete Masonry Construction (ref 9).

MODULAR COORDINATION

Concrete masonry structures can be constructed using virtually any layout dimension. However, for maximum construction efficiency, economy, and aesthetic benefit, concrete masonry elements should be designed and constructed with modular coordination in mind. Modular coordination is the practice of laying out and dimensioning structures to standard lengths and heights to accommodate modularly-sized building materials.

Standard concrete masonry modules are typically 8 in. (203 mm) vertically and horizontally, but may also include 4-in. (102 mm) modules for some applications. These modules provide the best overall design flexibility and coordination with other building products such as windows and doors. Designing a concrete masonry building to a 4- or 8-in. (102- or 203-mm) module will minimize the number of units that need to be cut, providing a more harmonious looking masonry structure. TEK 05-12, Modular Layout of Concrete Masonry (ref. 10) provides details of modular wall layouts and openings.

CONTROL JOINTS

Control joints, a type of movement joint, are one method used to relieve horizontal tensile stresses due to shrinkage of concrete products and materials. They are essentially vertical planes of weakness built into the wall to reduce restraint and permit longitudinal movement due to anticipated shrinkage. When control joints are required, concrete masonry requires only vertical control joints. When materials with different movement properties are used in the same wythe (such as clay masonry and concrete masonry), this movement difference needs to be accommodated, and may require horizontal movement joints as well (see the Banding section, below). Recommendations for band in a split-faced wall (see Figure 5); with different unit sizes, such as the use of a 4-in. (102-mm) high band in a wall of 8-in. (203-mm) units; or with a combination of these techniques. Combining masonry units of different size, color and finish provides a virtually limitless palette.

The use of concrete masonry bands in clay brick veneer has also become very popular. The architectural effect is very pleasing; however, proper detailing must be provided to accommodate the different movement properties of the two materials to prevent racking. The detail shown in Figure 6 has demonstrated good performance in many areas of the United States and is the preferred detail, as it is economical and maintenance free. Horizontal joint reinforcement is placed in the mortar joints above and below the band, as well as in the band itself if it is more than two courses high. In addition, lateral support (wall ties) are provided within 12 in. (305 mm) of the top and bottom of the band and the band itself must contain at least one row of ties. Some designers prefer placing joint reinforcement in every bed joint of the concrete masonry band. In this case, a tie which accommodates both the tie and reinforcement in the same joint (such as seismic clips) should be used. Another, but less recommended, option is to use horizontal slip planes between clay masonry and the concrete masonry band (see TEK 05-02A, Clay and Concrete Masonry Banding Details, Reference 12).

The maximum spacing of expansion joints in the clay masonry wall should be reduced to no more than 20 ft (6.1 m) when concrete masonry banding is used. When the clay masonry expansion joint spacing exceeds 20 ft (6.1 m), an additional control joint should be placed near mid-panel in the concrete masonry band, although the joint reinforcement should not be cut in this location. At locations control joint spacing, locations and construction details can be found in CMU-TEC-009-23, Crack Control Strategies for Concrete Masonry Construction (ref. 11).

Aesthetically, control joints typically appear as continuous vertical lines in the field of the masonry walls, and perhaps at other areas of stress concentration, such as adjacent to openings, at changes in wall height, etc. Several strategies can be used to make control joints less noticeable. Perhaps the simplest approach is to align the control joint with another architectural feature, such as a pilaster or recess in the wall. In this case, the vertical shadow line provided by the architectural feature provides an inconspicuous control joint location.

BANDING

Concrete masonry banding is successfully used in many architectural applications. Banding can be accomplished with different colors of block; with different textures, for example a smooth-faced of expansion joints in the clay masonry, joints should be continued through the concrete masonry band and the joint reinforcement cut at these locations. TEK 05-02A provides a fuller discussion and additional details for combining these two materials, including details for incorporating clay masonry bands into concrete masonry walls.

LIGHTING DESIGN CONSIDERATIONS FOR CONCRETE MASONRY WALLS

Masonry has historically been associated with diffuse illumination located on or recessed into ceilings, as step (walkway) fixtures located below the waist, or generally placed at a distance from the masonry wall assembly. Diffuse lighting does not concentrate a focused beam but rather spreads the light to provide soft illumination. Although this is sometimes accomplished using an array of many individual light sources at a distance, it is more typically accomplished with fixtures and devices made for this purpose. When wall-mounted light sources are necessary, there are specialized fixtures adapted for masonry that internally refract, reflect, deflect, partially block, diffuse, and/or shade light from directly impinging on the wall surface. Often, the fixture includes additional light diffusers facing away from the wall surface to assist in softly lighting the adjacent area. No noticeable shadows are cast onto the wall, because the shadow is intentionally located away from the wall surface, thus masonry aesthetics are enhanced with a lower lighting intensity and more graceful illumination. These concepts are illustrated in Figure 7.

Non-diffuse light shining onto a concrete masonry wall from a surface mounted light fixture or sconce can sometimes cast unwanted long shadows, giving the erroneous visual appearance of unacceptably poor materials or workmanship (see Figure 7). With non-diffuse light, glossy surface treatments and coatings could also inadvertently magnify this problem. Well-designed diffuse light can eliminate such concerns.

Certain concrete masonry units, such as ground face (also called honed or burnished), can be highly reflective. Figure 8 shows a residential project using a custom-fabricated white ground face block. The designer used a complementary balance of several lighting fixtures with what might have otherwise been a challenging masonry reflective finish. The harmonious use of interior lighting combined with exterior overhead (recessed trim) and step lighting is an effective way of solving this challenge.

REFERENCES

  1. Cleaning Concrete Masonry, TEK 08-04A. Concrete Masonry & Hardscapes Association, 2005.
  2. Concrete Masonry Unit Shapes, Sizes, Properties, and Specifications, CMU-TEC-001-23, Concrete Masonry &
    Hardscapes Association, 2023.
  3. Standard Specification for Loadbearing Concrete Masonry Units, ASTM C90-09. ASTM International, 2009.
  4. Water Repellents for Concrete Masonry Walls, TEK 19-01.
    Concrete Masonry & Hardscapes Association, 2006.
  5. J. A. Farney, Melander, J. M., and Panarese, W. C., Concrete Masonry Handbook for Architects, Engineers, Builders, Sixth Edition, Engineering Bulletin 008. Portland Cement Association, 2008.
  6. International Building Code, International Code Council, 2009.
  7. Specification for Masonry Structures, TMS 602/ACI 530.1/ASCE 6. Reported by the Masonry Standards Joint Committee, 2008.
  8. Standard Specification for Aggregate for Masonry Mortar, ASTM C144-04. ASTM International, 2004.
  9. Concrete Masonry Construction, TEK 03-08A. Concrete Masonry & Hardscapes Association, 2001.
  10. Modular Layout of Concrete Masonry, TEK 05-12. Concrete Masonry & Hardscapes Association, 2008.
  11. Crack Control Strategies for Concrete Masonry Construction, CMU-TEC-009-23, Concrete Masonry & Hardscapes Association, 2023.
  12. Clay and Concrete Masonry Banding Details, TEK 05-02A.
    Concrete Masonry & Hardscapes Association, 2002.

Estimating Concrete Masonry Materials

INTRODUCTION

Estimating the quantity or volume of materials used in a typical masonry project can range from the relatively simple task associated with an unreinforced single wythe garden wall, to the comparatively difficult undertaking of a partially grouted multi-wythe wall coliseum constructed of varying unit sizes, shapes, and configurations.

Large projects, due to their complexity in layout and detailing, often require detailed computer estimating programs or an intimate knowledge of the project to achieve a reasonable estimate of the materials required for construction. However, for smaller projects, or as a general means of obtaining ballpark estimates, the rule of thumb methods described in this TEK provide a practical means of determining the quantity of materials required for a specific masonry construction project.

It should be stressed that the information for estimating materials quantities in this section should be used with caution and checked against rational judgment. Design issues such as non-modular layouts or numerous returns and corners can significantly increase the number of units and the volume of mortar or grout required. Often, material estimating is best left to an experienced professional who has developed a second hand disposition for estimating masonry material requirements.

ESTIMATING CONCRETE MASONRY UNITS

Probably the most straightforward material to estimate for most masonry construction projects is the units themselves. The most direct means of determining the number of concrete masonry units needed for any project is to simply determine the total square footage of each wall and divide by the surface area provided by a single unit specified for the project.

For conventional units having nominal heights of 8 in. (203 mm) and nominal lengths of 16 in. (406 mm), the exposed surface area of a single unit in the wall is 8/9 ft2 (0.083 m 2). Including a 5 percent allowance for waste and breakage, this translates to 119 units per 100 ft2 (9.29 m2) of wall area. (See Table 1 for these and other values.) Because this method of determining the necessary number of concrete masonry units for a given project is independent of the unit width, it can be applied to estimating the number of units required regardless of their width.

When using this estimating method, the area of windows, doors and other wall openings needs to be subtracted from the total wall area to yield the net masonry surface. Similarly, if varying unit configurations, such as pilaster units, corner units or bond beam units are to be incorporated into the project, the number of units used in these applications need to be calculated separately and subtracted from the total number of units required.

ESTIMATING MORTAR MATERIALS

Next to grout, mortar is probably the most commonly misestimated masonry construction material. Variables such as site batching versus pre-bagged mortar, mortar proportions, construction conditions, unit tolerances and work stoppages, combined with numerous other variables can lead to large deviations in the quantity of mortar required for comparable jobs.

As such, masons have developed general rules of thumb for estimating the quantity of mortar required to lay concrete masonry units. These general guidelines are as follows for various mortar types. Note that the following estimates assume the concrete masonry units are laid with face shell mortar bedding; hence, the estimates are independent of the concrete masonry unit width.

Masonry cement mortar
Masonry cement is typically available in bag weights of 70, 75 or 80 lb (31.8, 34.0 and 36.3 kg), although other weights may be available as well. One 70 lb (31.8 kg) bag of masonry cement will generally lay approximately 30 hollow units if face shell bedding is used. For common batching proportions, 1 ton (2,000 lb, 907 kg) of masonry sand is required for every 8 bags of masonry cement. If more than 3 tons (2,721 kg) of sand is used, add 1/2 ton (454 kg) to account for waste. For smaller sand amounts, simply round up to account for waste. This equates to about 240 concrete masonry units per ton of sand.

Preblended mortar
Preblended mortar mixes may contain portland cement and lime, masonry cement or mortar cement, and will always include dried masonry sand. Packaged dry, the mortars typically are available in 60 to 80 lb (27.2 to 36.3 kg) bags or in bulk volumes of 2,000 and 3,000 lb (907 and 1,361 kg).

Portland cement lime mortar
One 94 lb (42.6 kg) bag of portland cement, mixed in proportion with sand and lime to yield a lean Type S or rich Type N mortar, will lay approximately 62 hollow units if face shell bedding is used. This assumes a proportion of one 94 lb (42.6 kg) bag of portland cement to approximately one-half of a 50 lb (22.7 kg) bag hydrated lime to 4 1/4 ft3 (0.12 m3) of sand. For ease of measuring in the field, sand volumes are often correlated to an equivalent number of shovels using a cubic foot (0.03 m3) box, as shown in Figure 1.

ESTIMATING GROUT

The quantity of grout required on a specific job can vary greatly depending upon the specific circumstances of the project. The properties and configuration of the units used in construction can have a huge impact alone. For example, units of low density concrete tend to absorb more water from the mix than comparable units of higher density. Further, the method of delivering grout to a masonry wall (pumping versus bucketing) can introduce different amounts of waste. Although the absolute volume of grout waste seen on a large project may be larger than a comparable small project, smaller projects may experience a larger percentage of grout waste.

Table 3 provides guidance for the required volume of grout necessary to fill the vertical cells of walls of varying thickness. Additional grout may be necessary for horizontally grouting discrete courses of masonry. Note that walls constructed of 4-in. (102-mm) masonry units are not included in Table 3. Due to the small cell size and difficulty inadequately placing and consolidating the grout, it is not recommended to grout conventional 4-in. (102-mm) units.

Tables 4 and 5 contain estimated yields for bagged preblended grouts for vertical and horizontal grouting, respectively.

REFERENCES

  1. Kreh, D. Building With Masonry, Brick, Block and Concrete. The Taunton Press, 1998.
  2. Annotated Design and Construction Details for Concrete Masonry, CMU-MAN-001-03, Concrete Masonry & Hardscapes Association, 2003.

Grouting Concrete Masonry Walls

INTRODUCTION

Grouted concrete masonry construction offers design flexibility through the use of partially or fully grouted walls, whether plain or reinforced. The industry is experiencing fast-paced advances in grouting procedures and materials as building codes allow new opportunities to explore means and methods for constructing grouted masonry walls.

Grout is a mixture of: cementitious material (usually portland cement); aggregate; enough water to cause the mixture to flow readily and without segregation into cores or cavities in the masonry; and sometimes admixtures. Grout is used to give added strength to both reinforced and unreinforced concrete masonry walls by grouting either some or all of the cores. It is also used to fill bond beams and occasionally to fill the collar joint of a multi-wythe wall. Grout may also be added to increase the wall’s fire rating, acoustic effectiveness termite resistance, blast resistance, heat capacity or anchorage capabilities. Grout may also be used to stabilize screen walls and other landscape elements.

In reinforced masonry, grout bonds the masonry units and reinforcing steel so that they act together to resist imposed loads. In partially grouted walls, grout is placed only in wall spaces containing steel reinforcement. When all cores, with or without reinforcement, are grouted, the wall is considered solidly grouted. If vertical reinforcement is spaced close together and/or there are a significant number of bond beams within the wall, it may be faster and more economical to solidly grout the wall.

Specifications for grout, sampling and testing procedures, and information on admixtures are covered in CMHA TEK 09-04A, Grout for Concrete Masonry (ref. 1). This TEK covers methods for laying the units, placing steel reinforcement and grouting.

WALL CONSTRUCTION

Figure 1 shows the basic components of a typical reinforced concrete masonry wall. When walls will be grouted, concrete masonry units must be laid up so that vertical cores are aligned to form an unobstructed, continuous series of vertical spaces within the wall.

Head and bed joints must be filled with mortar for the full thickness of the face shell. If the wall will be partially grouted, those webs adjacent to the cores to be grouted are mortared to confine the grout flow. If the wall will be solidly grouted, the cross webs need not be mortared since the grout flows laterally, filling all spaces. In certain instances, full head joint mortaring should also be considered when solid grouting since it is unlikely that grout will fill the space between head joints that are only mortared the width of the face shell, i.e., when penetration resistance is a concern such as storm shelters and prison walls. In cases such as those, open end or open core units (see Figure 3) should be considered as there is no space between end webs with these types of units.

Care should be taken to prevent excess mortar from extruding into the grout space. Mortar that projects more than ½ in. (13 mm) into the grout space must be removed (ref. 3). This is because large protrusions can restrict the flow of grout, which will tend to bridge at these locations potentially causing incomplete filling of the grout space. To prevent bridging, grout slump is required to be between 8 and 11 in. (203 to 279 mm) (refs. 2, 3) at the time of placement. This slump may be adjusted under certain conditions such as hot or cold weather installation, low absorption units or other project specific conditions. Approval should be obtained before adjusting the slump outside the requirements. Using the grout demonstration panel option in Specification for Masonry Structures (ref. 3) is an excellent way to demonstrate the acceptability of an alternate grout slump. See the Grout Demonstration Panel section of this TEK for further information.

At the footing, mortar bedding under the first course of block to be grouted should permit grout to come into direct contact with the foundation or bearing surface. If foundation dowels are present, they should align with the cores of the masonry units. If a dowel interferes with the placement of the units, it may be bent a maximum of 1 in. (25 mm) horizontally for every 6 in. (152 mm) vertically (see Figure 2). When walls will be solidly grouted, saw cutting or chipping away a portion of the web to better accommodate the dowel may also be acceptable. If there is a substantial dowel alignment problem, the project engineer must be notified.

Vertical reinforcing steel may be placed before the blocks are laid, or after laying is completed. If reinforcement is placed prior to laying block, the use of open-end A or H- shaped units will allow the units to be easily placed around the reinforcing steel (see Figure 3). When reinforcement is placed after wall erection, reinforcing steel positioners or other adequate devices to hold the reinforcement in place are commonly used, but not required. However, it is required that both horizontal and vertical reinforcement be located within tolerances and secured to prevent displacement during grouting (ref. 3). Laps are made at the end of grout pours and any time the bar has to be spliced. The length of lap splices should be shown on the project drawings. On occasion there may be locations in the structure where splices are prohibited. Those locations are to be clearly marked on the drawing.

Reinforcement can be spliced by either contact or noncontact splices. Noncontact lap splices may be spaced as far apart as one-fifth the required length of the lap but not more than 8 in. (203 mm) per Building Code Requirements for Masonry Structures (ref. 4). This provision accommodates construction interference during installation as well as misplaced dowels. Splices are not required to be tied, however tying is often used as a means to hold bars in place.

As the wall is constructed, horizontal reinforcement can be placed in bond beam or lintel units. If the wall will not be solidly grouted, the grout may be confined within the desired grout area either by using solid bottom masonry bond beam units or by placing plastic or metal screening, expanded metal lath or other approved material in the horizontal bed joint before laying the mortar and units being used to construct the bond beam. Roofing felt or materials that break the bond between the masonry units and mortar should not be used for grout stops.

CONCRETE MASONRY UNITS AND REINFORCING BARS

Standard two-core concrete masonry units can be effectively reinforced when lap splices are not long, since the mason must lift the units over any vertical reinforcing bars that extend above the previously installed masonry. The concrete masonry units illustrated in Figure 3 are examples of shapes that have been developed specifically to accommodate reinforcement. Open-ended units allow the units to be placed around reinforcing bars. This eliminates the need to thread units over the top of the reinforcing bar. Horizontal reinforcement in concrete masonry walls can be accommodated either by saw-cutting webs out of a standard unit or by using bond beam units. Bond beam units are manufactured with either reduced webs or with “knock-out” webs, which are removed prior to placement in the wall. Pilaster and column units are used to accommodate a wall- column or wall-pilaster interface, allowing space for vertical reinforcement and ties, if necessary, in the hollow center.

Concrete masonry units should meet applicable ASTM standards and should typically be stored on pallets to prevent excessive dirt and water from contaminating the units. The units may also need to be covered to protect them from rain and snow.

The primary structural reinforcement used in concrete masonry is deformed steel bars. Reinforcing bars must be of the specified diameter, type and grade to assure compliance with the contract documents. See Steel Reinforcement for Concrete Masonry, TEK 12-04D for more information (ref. 6). Shop drawings may be required before installation can begin.

Light rust, mill scale or a combination of both need not be removed from the reinforcement. Mud, oil, heavy rust and other materials which adversely affect bond must be removed however. The dimensions and weights (including heights of deformations) of a cleaned bar cannot be less than those required by the ASTM specification.

GROUT PLACEMENT

To understand grout placement, the difference between a grout lift and a grout pour needs to be understood. A lift is the amount of grout placed in a single continuous operation. A pour is the entire height of masonry to be grouted prior to the construction of additional masonry. A pour may be composed of one lift or a number of successively placed grout lifts, as illustrated in Figure 4.

Historically, only two grout placement procedures have been in general use: (l) where the wall is constructed to pour heights up to 5 ft (1,520 mm) without cleanouts—generally termed “low lift grouting;” and (2) where the wall is constructed to a maximum pour height of 24 ft (7,320 mm) with required cleanouts and lifts are placed in increments of 5 ft (1,520 mm)—generally termed “high lift grouting.” With the advent of the 2002 Specification for Masonry Structures (ref. 5), a third option became available – grout demonstration panels. The 2005 Specification for Masonry Structures (ref. 3) offers an additional option: to increase the grout lift height to 12 ft-8 in. (3,860 mm) under the following conditions:

  1. the masonry has cured for at least 4 hours,
  2. grout slump is maintained between 10 and 11 in. (245 and 279 mm), and
  3. no intermediate reinforced bond beams are placed between the top and the bottom of the pour height.

Through the use of a grout demonstration panel, lift heights in excess of the 12 ft-8 in. (3,860 mm) limitation may be permitted if the results of the demonstration show that the completed grout installation is not adversely affected. Written approval is also required.

These advances permit more efficient installation and construction options for grouted concrete masonry walls (see Figure 4).

Grouting Without Cleanouts—”Low-Lift Grouting”

Grout installation without cleanouts is sometimes called low-lift grouting. While the term is not found in codes or standards, it is common industry language to describe the process of constructing walls in shorter segments, without the requirements for cleanout openings, special concrete block shapes or equipment. The wall is built to scaffold height or to a bond beam course, to a maximum of 5 ft (1,520 mm). Steel reinforcing bars and other embedded items are then placed in the designated locations and the cells are grouted. Although not a code requirement, it is considered good practice (for all lifts except the final) to stop the level of the grout being placed approximately 1 in. (25 mm) below the top bed joint to help provide some mechanical keying action and water penetration resistance. Further, this is needed only when a cold joint is formed between the lifts and only in areas that will be receiving additional grout. Steel reinforcement should project above the top of the pour for sufficient height to provide for the minimum required lap splice, except at the top of the finished wall.

Grout is to be placed within 1 ½ hours from the initial introduction of water and prior to initial set (ref. 3). Care should be taken to minimize grout splatter on reinforcement, on finished masonry unit faces or into cores not immediately being grouted. Small amounts of grout can be placed by hand with buckets. Larger quantities should be placed by grout pumps, grout buckets equipped with chutes or other mechanical means designed to move large volumes of grout without segregation.

Grout must be consolidated either by vibration or puddling immediately after placement to help ensure complete filling of the grout space. Puddling is allowed for grout pours of 12 in. (305 mm) or less. For higher pour heights, mechanical vibration is required and reconsolidation is also required. See the section titled Consolidation and Reconsolidation in this TEK.

Grouting With Cleanouts—”High-Lift Grouting”

Many times it is advantageous to build the masonry wall to full height before grouting rather than building it in 5 ft (1,520 mm) increments as described above. With the installation of cleanouts this can be done. Typically called high-lift grouting within the industry, grouting with cleanouts permits the wall to be laid up to story height or to the maximum pour height shown in Table 1 prior to the installation of reinforcement and grout. (Note that in Table 1, the maximum area of vertical reinforcement does not include the area at lap splices.) High lift grouting offers certain advantages, especially on larger projects. One advantage is that a larger volume of grout can be placed at one time, thereby increasing the overall speed of construction. A second advantage is that high-lift grouting can permit constructing masonry to the full story height before placing vertical reinforcement and grout. Less reinforcement is used for splices and the location of the reinforcement can be easily checked by the inspector prior to grouting. Bracing may be required during construction. See Bracing Concrete Masonry Walls During Construction, TEK 03-04C (ref. 7) for further information.

Cleanout openings must be made in the face shells of the bottom course of units at the location of the grout pour. The openings must be large enough to allow debris to be removed from the space to be grouted. For example, Specification for Masonry Structures (ref. 3) requires a minimum opening dimension of 3 in. (76 mm).

Cleanouts must be located at the bottom of all cores containing dowels or vertical reinforcement and at a maximum of 32 in. (813 mm) on center (horizontal measurement) for solidly grouted walls. Face shells are removed either by cutting or use of special scored units which permit easy removal of part of the face shell for cleanout openings (see Figure 5). When the cleanout opening is to be exposed in the finished wall, it may be desirable to remove the entire face shell of the unit, so that it may be replaced in whole to better conceal the opening. At flashing where reduced thickness units are used as shown in Figure 1, the exterior unit can be left out until after the masonry wall is laid up. Then after cleaning the cell, the unit is mortared in which allowed enough time to gain enough strength to prevent blowout prior to placing the grout.

Proper preparation of the grout space before grouting is very important. After laying masonry units, mortar droppings and projections larger than ½ in. (13 mm) must be removed from the masonry walls, reinforcement and foundation or bearing surface. Debris may be removed using an air hose or by sweeping out through the cleanouts.

The grout spaces should be checked by the inspector for cleanliness and reinforcement position before the cleanouts are closed. Cleanout openings may be sealed by mortaring the original face shell or section of face shell, or by blocking the openings to allow grouting to the finish plane of the wall. Face shell plugs should be adequately braced to resist fluid grout pressure.

It may be advisable to delay grouting until the mortar has been allowed to cure, in order to prevent horizontal movement (blowout) of the wall during grouting. When using the increased grout lift height provided for in Article 3.5 D of Specification for Masonry Structures (ref 3), the masonry is required to cure for a minimum of 4 hours prior to grouting for this reason.

Consolidation and Reconsolidation

An important factor mentioned in both grouting procedures is consolidation. Consolidation eliminates voids, helping to ensure complete grout fill and good bond in the masonry system.

As the water from the grout mixture is absorbed into the masonry, small voids may form and the grout column may settle. Reconsolidation acts to remove these small voids and should generally be done between 3 and 10 minutes after grout placement. The timing depends on the water absorption rate, which varies with such factors as temperature, absorptive properties of the masonry units and the presence of water repellent admixtures in the units. It is important to reconsolidate after the initial absorption has taken place and before the grout loses its plasticity. If conditions permit and grout pours are so timed, consolidation of a lift and reconsolidation of the lift below may be done at the same time by extending the vibrator through the top lift and into the one below. The top lift is reconsolidated after the required waiting period and then filled with grout to replace any void left by settlement.

A mechanical vibrator is normally used for consolidation and reconsolidation—generally low velocity with a ¾ in. to 1 in. (19 to 25 mm) head. This “pencil head” vibrator is activated for a few seconds in each grouted cell. Although not addressed by the code, recent research (ref. 8) has demonstrated adequate consolidation by vibrating the top 8 ft (2,440 mm) of a grout lift, relying on head pressure to consolidate the grout below. The vibrator should be withdrawn slowly enough while on to allow the grout to close up the space that was occupied by the vibrator. When double open- end units are used, one cell is considered to be formed by the two open ends placed together. When grouting between wythes, the vibrator is placed at points spaced 12 to 16 in. (305 to 406 mm) apart. Excess vibration may blow out the face shells or may separate wythes when grouting between wythes and can also cause grout segregation.

GROUT DEMONSTRATION PANEL

Specification for Masonry Structures (ref. 3) contains a provision for “alternate grout placement” procedures when means and methods other than those prescribed in the document are proposed. The most common of these include increases in lift height, reduced or increased grout slumps, minimization of reconsolidation, puddling and innovative consolidation techniques. Grout demonstration panels have been used to allow placement of a significant amount of a relatively new product called self-consolidating grout to be used in many parts of the country with outstanding results. 

Research has demonstrated comparable or superior performance when compared with consolidated and reconsolidated conventional grout in regard to reduction of voids, compressive strength and bond to masonry face shells. Construction and approval of a grout demonstration panel using the proposed grouting procedures, construction techniques and grout space geometry is required. With the advent of self-consolidating grouts and other innovative consolidation techniques, this provision of the Specification has been very useful in demonstrating the effectiveness of alternate grouting procedures to the architect/engineer and building official.

COLD WEATHER PROTECTION

Protection is required when the minimum daily temperature during construction of grouted masonry is o o expected to fall below 40 F (4.4 C). Grouted masonry requires special consideration because of the higher water content and potential disruptive expansion that can occur if that water freezes. Therefore, grouted masonry requires protection for longer periods than ungrouted masonry to allow the water to dissipate. For more detailed information on cold, hot, and wet weather protection, see All-Weather Concrete Masonry Construction, TEK 03-01C (ref. 9).

REFERENCES

  1. Grout for Concrete Masonry, TEK 09-04A. Concrete Masonry & Hardscapes Association, 2005.
  2. Standard Specification for Grout for Masonry, ASTM C 476-02, ASTM International, 2005.
  3. Specification for Masonry Structures, ACI 530.1-05/ ASCE 6-05/TMS 602-05. Reported by the Masonry Standards Joint Committee, 2005.
  4. Building Code Requirements for Masonry Structures, ACI 530-05/ASCE 5-05/TMS 402-05. Reported by the Masonry Standards Joint Committee, 2005.
  5. Specification for Masonry Structures, ACI 530.1-02/ ASCE 6-02/TMS 602-02. Reported by the Masonry Standards Joint Committee, 2002.