Resources

Fire Resistance Ratings of Concrete Masonry Assemblies

INTRODUCTION

Concrete masonry is widely specified for fire walls and fire barriers because concrete masonry is noncombustible, provides durable fire resistance, and is economical to construct. Chapter 7 of the International Building Code (IBC) (ref. 2) governs materials and assemblies used for structural fire resistance and fire-rated separation of adjacent spaces. This TEK is based on the provisions of Code Requirements for Determining Fire Resistance of Concrete and Masonry Construction Assemblies, ACI 216.1/TMS 216 (ref. 1) , which outlines a procedure to calculate the fire resistance ratings of concrete masonry assemblies. The 2014 edition of the ACI 216.1/TMS 216 is referenced in the 2015 IBC for concrete and masonry materials. This TEK is based on both prescriptive details and tables as well as the calculated fire resistance procedure, which is practical, versatile and economical. The calculation procedure allows the designer virtually unlimited flexibility to incorporate the excellent fire-resistive properties of concrete masonry into a design. Included are methods for determining the fire resistance rating of concrete masonry walls, columns, lintels, beams, and concrete masonry fire protection for steel columns. Also included are assemblies composed of concrete masonry and other components, including plaster and gypsum wallboard finishes, and multi-wythe masonry components including clay or shale masonry units.

METHODS OF DETERMINING FIRE RESISTANCE RATINGS

Because full-scale fire testing of representative test specimens is not practical in daily practice due to time and financial constraints, the IBC outlines multiple options for fire rating determination:

  • standardized calculation procedures, such as those in the ACI 216.1/TMS 216 and in Section 722 of the IBC;
  • prescriptive designs such as those in Section 721 of the IBC;
  • engineering analysis based on a comparison with tested assemblies;
  • third party listing services, such as Underwriters Laboratory; and
  • alternative means approved by the building official per Section 104.11 of the IBC.

Of these, the calculation method is an economical and commonly used method of determining concrete masonry fire resistance ratings. The calculations are based on extensive research, which established relationships between the physical properties of materials and the fire resistance rating. The calculation method is fully described in ACI 216.1/TMS 216 and IBC Section 722, and determines fire resistance ratings based on the equivalent thickness of concrete masonry units and the aggregate types used to manufacture the units. Private commercial listing services allow the designer to select a fire rated assembly that has been previously tested, classified and listed in a published directory of fire rated assemblies. The listing service also monitors materials and production to verify that the concrete masonry units are and remain in compliance with appropriate standards, which usually necessitates a premium for units of this type. The system also is somewhat inflexible in that little variation from the original tested wall assembly is allowed, including unit size, shape, mix design, constituent materials, and even the plant of manufacture. More information on listing services for fire ratings is provided in CMU-FAQ 015-23 (ref. 16).

For prescriptive designs, the IBC provides a series of tables that describes requirements of various assemblies to meet the fire resistance ratings specified. The last two options listed above require justification to the building official that the proposed design is at least the equivalent of what is prescribed in the code.

CALCULATED FIRE RESISTANCE RATINGS

Background

The calculated fire resistance method is based on extensive research and testing of concrete masonry walls. Fire testing of wall assemblies is conducted in accordance with Standard Test Methods for Fire Tests of Building Construction and Materials, ASTM E119 (ref. 3), which measures four performance criteria, as follows:

  • resistance to the transmission of heat through the wall assembly;
  • resistance to the passage of hot gases through the wall, sufficient to ignite cotton waste;
  • load-carrying capacity of loadbearing walls; and
  • resistance to the impact, erosion and cooling effects of a hose stream on the assembly after exposure to the standard fire.

The fire resistance rating of concrete masonry is typically governed by the heat transmission criteria. From the standpoint of life safety (particularly for fire fighters) and reuse, this failure mode is certainly preferable to a structural collapse endpoint, characteristic of many other building materials.

The calculated fire resistance rating information presented here is based on the IBC and ACI 216.1/TMS 216 (refs. 1, 2).

Equivalent Thickness

Extensive testing has established a relationship between fire resistance and the equivalent solid thickness of concrete masonry walls, as shown in Table 1. Equivalent thickness is essentially the solid thickness that would be obtained if the volume of concrete contained in a hollow unit were recast without core holes (see Figure 1). The equivalent thickness is determined in accordance with Standard Methods of Sampling and Testing Concrete Masonry Units, ASTM C140 (ref. 4), and is reported on the C140 test report. If the equivalent thickness is unknown, but the percent solid of the unit is, the equivalent thickness of a hollow unit can be determined by multiplying the percent solid by the unit’s actual thickness.

The equivalent thickness of a 100% solid unit or a solid grouted unit is equal to the actual thickness. For partially grouted walls where the unfilled cells are left empty, the equivalent thickness for fire resistance rating purposes is equal to that of an ungrouted unit. For partially grouted walls with filled cells, see the following section. Loadbearing units conforming to ASTM C90 (ref. 5) that are commonly available include 100% solid units, 75% solid units, and hollow units meeting minimum required face shell and web dimensions. Typical equivalent thickness values for these units are listed in Table 2.

Filling Cells with Loose Fill Material

If all cells of hollow unit masonry are filled with an approved material, the equivalent thickness of the assembly is the actual thickness. This also applies to partially grouted concrete masonry walls where all ungrouted cells are filled with an approved material.

Applicable fill materials are: grout, sand, pea gravel, crushed stone, or slag that comply with ASTM C33 (ref. 6); pumice, scoria, expanded shale, expanded clay, expanded slate, expanded slag, expanded fly ash, or cinders that comply with ASTM C331 (ref. 7); perlite meeting the requirements of ASTM C549 (ref. 8); or vermiculite complying with C516 (ref. 9).

Wall Assembly Fire Ratings

The fire resistance rating is determined in accordance with Table 1 utilizing the appropriate aggregate type used in the masonry unit and the equivalent thickness.

Units manufactured with a combination of aggregate types are addressed by footnote C, which may be expressed by the following equation (see also the blended aggregate example, below):

Blended aggregate example:

The required equivalent thickness of an assembly constructed of units made with expanded shale (80% by volume), and calcareous sand (20% by volume), to meet a 3-hour fire resistance rating is determined as follows. From Table 1:

Multi-Wythe Wall Assemblies

The fire resistance rating of multi-wythe walls (Figure 2) is based on the fire resistance of each wythe and the air space between each wythe using the following equation:

For multi-wythe walls of clay and concrete masonry, use the values in Table 3 for the brick wythe in the above equation.

Reinforced Concrete Masonry Columns

Concrete masonry column fire testing evaluates the ability of the column to carry design loads under standard fire test conditions. Based on a compendium of fire tests, the fire resistance rating of reinforced concrete masonry columns is based on the least plan dimension of the column as indicated in Table 4. The minimum required cover over the vertical reinforcement is 2 in. (51 mm).

Concrete Masonry Lintels

Fire testing of concrete masonry beams and lintels evaluates the ability of the member to sustain design loads under standard fire test conditions. This is accomplished by ensuring that the temperature of the tensile reinforcement does not exceed 1,100°F (593°C) during the rating period. The calculated fire resistance rating of concrete masonry lintels is based on the nominal thickness of the lintel and the minimum cover of longitudinal reinforcement (see Table 5). The cover requirements protect the reinforcement from strength degradation due to excessive temperature during the fire exposure period. Cover requirements may be provided by masonry units, grout, or mortar. Note that for 3 and 4 hour requirements, not enough cover is available for 6-in. (152 mm) masonry; however, if a special analysis indicates that the reinforcement is not necessary or not needed, such as when conditions for arching action are present, the cover requirements may be waived. See TEK 17-01D (ref. 11) for lintel design and conditions for arching action.
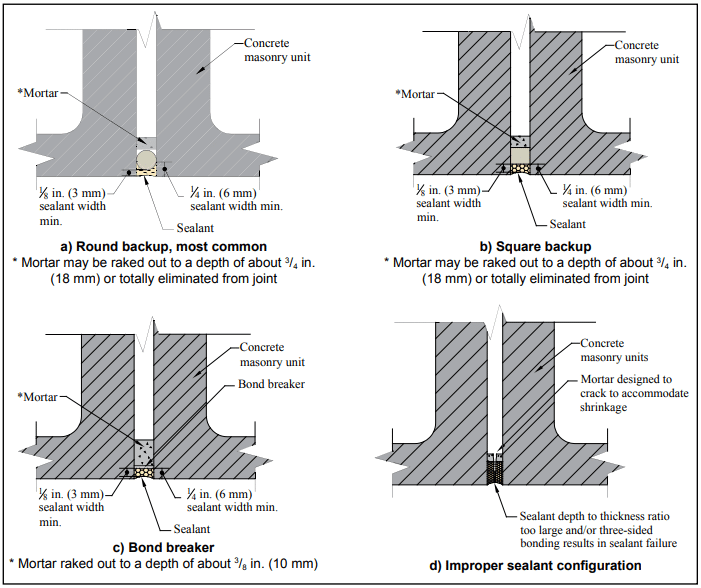
Control Joints

Figure 3 shows control joint details in fire-rated wall assemblies in which openings are not permitted or where openings are required to be protected. Maximum joint width is 1/2 in. (13 mm). Although these details are not directly in the IBC, they are included by reference in ACI 216.1/TMS 216.

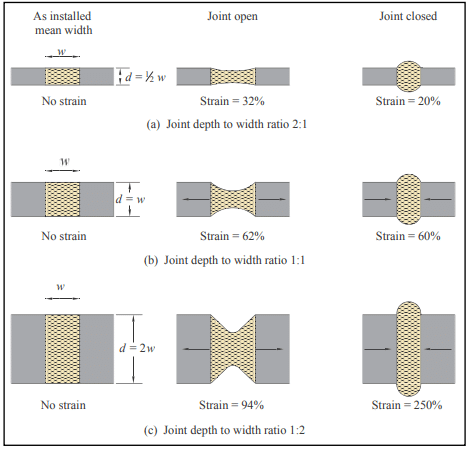
In addition to these prescriptive fire resistance rated control joints, other control joints may be permitted in fire rated masonry walls. For example, the IBC and ACI 216.1/1/TMS 216 include provisions for ceramic fiber joint protection for precast panels, which are similar to concrete masonry walls in that both rely on concrete for fire protection, and both are governed by the ASTM E119 heat transmission criteria (see Figure 4). The first two categories of aggregate types in Table 1 would correspond to the carbonate or siliceous aggregate concrete curve and the last two aggregate categories of Table 1 would correspond to the semi-lightweight or lightweight concrete curve. For example, for an 8-in. (203-mm) limestone aggregate concrete masonry wall with a maximum control joint width of 1/2 in. (13 mm), a 1 in. (25 mm) thickness (measured perpendicular to the face of the wall) of ceramic fiber in the joint can be used in walls with fire resistance ratings up to 3 hours, while a 2 in. (51 mm) thickness can be used in the joints of a 4-hour wall.

Steel Columns Protected by Concrete Masonry

Fire testing of a steel column protected by concrete masonry evaluates the structural integrity of the steel column under fire test conditions, by measuring the temperature rise of the steel. The calculated fire resistance rating of steel columns protected by concrete masonry, as illustrated in Figure 5, is determined by:

Effects of Finish Materials on Fire Resistance Ratings

In many cases, drywall, plaster or stucco finishes are used on concrete masonry walls. While finishes are normally applied for architectural reasons, they can also provide additional fire resistance. The IBC and ACI 216.1/TMS 216 include provisions for calculating the additional fire resistance provided by these finishes.

Note that when finishes are used to achieve the required fire rating, the masonry alone must provide at least one- half of the total required rating and the contribution of the finish on the non-fire-exposed side cannot be more than one-half of the contribution of the masonry alone. This is to assure structural integrity during a fire. The finish material must also be continuous over the entire wall.

Certain finishes deteriorate more rapidly when exposed to fire than when they are on the non-fire side of the wall. Therefore, two separate tables are required. Table 7 applies to finishes on the non fire-exposed side of the wall, and Table 8 applies to finishes on the fire-exposed side. For finishes on the non-fire exposed side of the wall, the finish is converted to an equivalent thickness of concrete masonry by multiplying the finish thickness by the factor given in Table 7. The result, Tef, is then added to the concrete masonry wall equivalent thickness, Te, and used in Table 1 to determine the wall’s fire resistance rating (i.e., the equivalent thickness of concrete masonry assemblies, Tea = Te Tef).

For finishes on the fire-exposed side of the wall, a time (from Table 8) is assigned to the finish. This time is added to the fire resistance rating determined for the base wall and nonfire-exposed side finish, if any. The times listed in Table 8 are essentially the length of time the various finishes will remain intact when exposed to fire (i.e., on the fire-exposed side of the wall).

When calculating the fire resistance rating of a wall with finishes, two calculations are performed, assuming each side of the wall is the fire exposed side. The fire rating of the wall assembly is the lower of the two. Typically, for an exterior wall with a fire separation distance greater than 5 ft (1,524 mm), fire needs be considered on the interior side only

Installation of Finishes

Finishes that contribute to the total fire resistance rating of a wall must meet certain minimum installation requirements. Plaster and stucco are applied in accordance with the provisions of the building code without further modification. Gypsum wallboard and gypsum lath are to be attached to wood or metal furring strips spaced a maximum of 16 in. (406 mm) o.c., and must be installed with the long dimension parallel to the furring members. All horizontal and vertical joints must be supported and finished.

UNCONVENTIONAL AGGREGATES

In recent years, manufacturers of concrete masonry products have been exploring the use of alternative materials in the production of concrete masonry units. Some of these materials have not been evaluated using standardized fire resistance test methods or have been evaluated only to a limited degree. Such unconventional materials, which are typically used as a replacement for conventional aggregates, may not be covered within existing codes and standards due to their novelty or proprietary nature.

While test methods such as ASTM E119 define procedures for evaluating the fire resistance properties of concrete masonry assemblies, including those constructed using unconventional constituent materials, there has historically been no defined procedure for applying the results of ASTM E119 testing to standardized calculation procedures available through ACI 216.1/TMS 216. To provide consistency in applying the results of full scale ASTM E119 testing to established calculation procedures, CMHA has developed CMU-FAQ-013-23 (Ref. 15).

This guideline stipulates that when applying the fire resistance calculation procedure of ACI 216.1/TMS 216 to products manufactured using aggregate types that are not listed in ACI 216.1/TMS 216, at least two full scale ASTM E119 tests must be conducted on assemblies containing the unconventional material. Based on the results of this testing, an expression can be developed in accordance with this industry practice that permits the fire resistance of units produced with such aggregates to be calculated for interpolated values of equivalent thickness and proportion of non listed aggregate.

REFERENCES

  1. Code Requirements for Determining Fire Resistance of Concrete and Masonry Construction Assemblies, ACI 216.1- 14/TMS216-14. American Concrete Institute and The Masonry Society, 2014.
  2. International Building Code 2015. International Code Council, 2015.
  3. Standard Test Methods for Fire Tests of Building Construction and Materials, ASTM E119-16a. ASTM International, Inc., 2016.
  4. Standard Methods for Sampling and Testing Concrete Masonry Units, ASTM C140-16. ASTM International, Inc., 2016.
  5. Standard Specification for Loadbearing Concrete Masonry Units, ASTM C90-16. ASTM International, Inc., 2016.
  6. Standard Specification for Concrete Aggregates, ASTM C33-16e1. ASTM International, Inc., 2016.
  7. Standard Specification for Lightweight Aggregates for Concrete Masonry Units, ASTM C331-14. ASTM International, Inc., 2014.
  8. Standard Specification for Perlite Loose Fill Insulation, ASTM C549-06(2012). ASTM International, Inc., 2012.
  9. Standard Specification for Vermiculite Loose Fill Thermal Insulation, ASTM C516-08(2013)e1. ASTM International, Inc., 2013.
  10. Steel Column Fire Protection, TEK 07-06A. Concrete Masonry & Hardscapes Association, 2009.
  11. ASD of Concrete Masonry Lintels Based on the 2012 IBC/2011 MSJC, TEK 17-01D. Concrete Masonry & Hardscapes Association, 2011.
  12. Standard Specification for Concrete Building Brick, ASTM C55 14a. ASTM International, Inc., 2014.
  13. Standard Specification for Calcium Silicate Brick (SandLime Brick), ASTM C73-14. ASTM International, Inc., 2014.
  14. Standard Specification for Prefaced Concrete and Calcium Silicate Masonry Units, ASTM C744-16. ASTM International, Inc., 2016.
  15. How is the fire resistance of a concrete masonry assembly calculated when using unconventional aggregates?, CMU-FAQ-013-23. Concrete Masonry & Hardscapes Association, 2023.
  16. What is the difference between fire resistance ratings for masonry assemblies obtained through IBC versus a listing service such as UL or FM?, CMU-FAQ-015-23. Concrete Masonry & Hardscapes Association, 2023.

Joint Sealants for Concrete Masonry Walls

INTRODUCTION

Successfully sealing joints, such as control joints and around door jambs and window frames, in concrete masonry walls depends on the overall design and construction of the entire building envelope. Movement joints (also called control joints) are needed in some concrete masonry walls to accommodate drying shrinkage, thermal movements, and movements between different building components. Movement joints, joints around fenestration, doors and penetrations, and isolation joints (joints at dissimilar material interfaces) rely on joint sealants to help preserve the overall weather-tightness of the building envelope. In addition, properly sealed joints may be required to meet a specified fire resistance rating or sound transmission class.

The sealant’s primary role is to deform as the joint moves, maintaining the seal across the joint. Most joint sealants are field-applied (as opposed to preformed). For instance, a raked-out mortar joint or open movement joint may receive sealant from a gun-squeezed cartridge, typically applied over a backup material.

This TEK provides a basic overview of joint sealants, installation guidelines to help ensure longevity, and recommended maintenance procedures, based primarily on ASTM C1193, Standard Guide for Use of Joint Sealants (ref. 1) and ASTM C1472, Standard Guide for Calculating Movement and Other Effects When Establishing Sealant Joint Width (ref. 2). This TEK does not address adhesives.

For optimum performance, the sealant must be properly applied to a well-constructed joint. For example, joints that are too thick relative to the width may cause failure of even the best sealant. Detailed information on control joint design and construction is available in CMU-TEC-009-23 (ref. 3).

JOINT SEALANTS AND RELATED MATERIALS

Control joints in concrete masonry construction are classified as butt-joints, where the sealant is exposed to cyclical tension and compression as the joint expands and contracts. Therefore, control joint sealants should be able to maintain their original shape and properties under these conditions. In addition, joint sealants should be impermeable, deformable to accommodate the joint movement, and be able to adhere to concrete and masonry materials or be used with an appropriate primer. The use of primers has been reported to improve bond as well as watertightness at the joint. Because many factors influence a wall’s water penetration resistance, the reader is referred to TEK 19-02B, Design for Dry Single-Wythe Concrete Masonry Walls (ref. 4) for more complete information.

Some variables to consider when selecting a joint sealant are the sealant’s: joint movement capability (typically reported as two percentages, one for elongation and another for compression), time to set-up/cure, adhesion/bond strength to concrete masonry or other substrates, hardness, tensile strength, durability, expected life in service, ease of installation, primer requirements, application temperature range, paintability, warranty requirements, and sag-resistance. Materials that dry out rapidly and/or do not effectively bond to masonry, such as most oil-based caulks, are generally not recommended for use as concrete masonry joint sealants.

In-service conditions for the particular application must also be considered. For example, for joints that are not exposed to the weather, aesthetic factors such as available colors may be more important than the weather-resistance of the joint. Other applications may require properties such as chemical or fire resistance.

In short, no single sealant will meet the requirements of every application. The following sections briefly describe the most common materials used for concrete masonry joints.

Masonry Joint Sealants

Sealants must comply with ASTM C920-11 Standard Specification for Elastomeric Joint Sealants (ref. 6). Sealants used for concrete masonry joints and at penetrations in concrete masonry walls may be polyurethanes, polysulfides, acrylics, silicones, or even modified blends of each. These sealant materials tend to have:

  • high resistance to aging and weathering,
  • good resistance to low-temperature hardening,
  • moderate resistance to age-related hardening,
  • high resistance to indentation,
  • low shrinkage after installation, and
  • nonstaining properties.

Backup Materials

Backup materials are used to: restrict the sealant depth, support the sealant, facilitate tooling, and help resist indentation and sag. They may also serve as a bond breaker, preventing the sealant from adhering to the back of the joint. Backup materials for concrete masonry joints are commonly flexible foams, which are compressed into the joint using hand tools (see Figures 1a and 1b).

Backup materials for control joints must be compressible to accommodate masonry expansion (joint shrinkage), and must recover when the masonry shrinks (joint expands). Because the backup also needs to maintain contact with both joint faces when the joint expands, it is compressed when initially installed. Closed-cell backups should be sized 1 ¼ to 1  the joint width, so they are compressed 25% to 30% when placed in the joint. Open-cell backups, which are less stiff than closed-cell, should be sized 1 ½ times the joint width, so they are compressed about 50% of their undisturbed width when installed.

Bond Breakers

Bond breakers prevent three-sided adhesion of the sealant (i.e. from adhering to the back of a raked joint or to the backup), allowing the sealant to freely deform in response to building movements (see Figure 1c). Because many backup materials act as bond breakers, a separate bond breaker material is not always required. When it is, polyethylene tape, butyl tape, coated papers and metal foils can be used as well as polyurethane, polyethylene and polyolefin foams. Liquid-applied bond breakers are not recommended because of the likelihood of contaminating the sealant adhesion surface.

Primers

Primers, applied to the joint surfaces prior to sealant installation, are sometimes recommended to improve the sealant’s bond strength. In addition, some primers can tolerate application to damp masonry surfaces.

Check the sealant manufacturer’s recommendations for the particular sealant under consideration to determine whether or not a primer should be used on a masonry substrate. To ensure the primer and sealant will be compatible, use the primer recommended by the sealant manufacturer for the sealant being used.

Primer is applied by brush, roller or spray, and typically must dry or cure before sealant application. The recommended elapsed time between primer application and sealant application varies with type of primer, temperature and humidity.

JOINT SEALANT INSTALLATION

Like most materials, joint sealants should be installed in accordance with manufacturer’s instructions. Elements that are due special consideration, such as sealant depth and surface preparation are discussed in more detail below.

It is typically recommended that joint sealants not be applied during rain or snow, and that the masonry be clean and dry at installation. Installation temperature, i.e., the temperature of the masonry when the sealant is applied, may also be a consideration in some cases. Sealants installed at very low temperatures undergo compression as the wall warms up to the mean temperature, while a sealant installed at a high temperature is placed in tension at the mean temperature. For these reasons, it is desirable to have the installation temperature close to the mean annual temperature, although an in- stallation temperature range of 40° to 90°F (4.4 to 32.2°C) is generally considered acceptable for most applications, unless otherwise specified by the sealant manufacturer (ref. 6). Note that the masonry surface temperature may greatly exceed the ambient air temperature, especially on dark-colored and/or south- and southwest-facing walls in the sun.

Sealant Width and Depth

Sealant shape factor refers to the mean width versus mean depth of the sealant as installed in the joint. This ratio is important because it affects the amount of strain the sealant is exposed to as the joint moves, as well as the amount of sealant required to fill the joint (see Figure 1d). Sealants exposed to less strain can typically be expected to have a longer life, all other factors being equal. As illustrated in Figure 2, wider and shallower sealant profiles generally reduce strain and require less sealant.

In the field, sealant shape factor is controlled by varying the depth of the sealant, because the width of the joint is fixed at that point. The depth of sealant in the joint is typically controlled via the use of a backup material. Sealants that have a higher depth to width ratio tend to stretch more readily with joint movement, whereas with lower ratios the tendency is for the sealant to tear when subjected to movement. In general, for joint widths from ¼ to ½ in. (6 to 13 mm) the joint depth should be no more than the width of the joint. After the sealant is tooled, the minimum thickness of the sealant at the midpoint of the joint opening should not be less the in. (3 mm) and the sealant adhesion dimension no less than ¼ in. (6 mm) (refs. 1, 2). The required thicknesses also should be verified with the sealant manufacturer.

Joint Preparation

For all control joints, mortar should be raked out of the vertical joints on both sides of the panels. The mortar should be raked out at least ¾ in. (19 mm) to allow for a backup material and sealant ( in. (9.5 mm) if no backing is used). This also assures a plane of weakness at the control joint. Mortar in the control joint may also be totally omitted to ensure freedom of movement.

Proper surface preparation prior to sealant installation improves bond between sealant and masonry, and minimizes adhesion failures. Follow the sealant manufacturer’s recommendations regarding cleaning and/or priming the concrete masonry surface prior to applying sealant.

Backup materials must be installed to the proper depth in the joint to control the depth of sealant. Tools for placing backer materials can help ensure correct placement. Any tools used for placement should have a smooth surface adjacent to the backup, to avoid puncturing or otherwise damaging the backup material during placement.

Applying Sealant

Sealants may be either single- or multi-component. Multi-component sealants require thorough mixing, in accordance with the manufacturer’s instructions, to ensure uniform curing and to avoid over-mixing. Once mixed, the sealant has a limited pot life, so batch sizes should be matched to what can be installed within the pot life.

Masonry joint sealants are typically installed using a common caulk gun, with a tip the same size as the width of the joint. The caulk gun should be held at an angle of about 45° to the wall face, and moved slowly and consistently. Filling joints from bottom to top helps avoid trapping air as the sealant is placed.

Immediately after the joint is filled, the sealant should be tooled to a concave shape. Tooling helps ensure intimate contact between the sealant and masonry, consolidates the sealant, provides a concave profile and improves the appearance of the joint. The hour-glass shape shifts peak stresses away from the adhesion surface and to the middle of the sealant joint during joint movement. Most sealant manufacturers recommend dry-tooling for the best results.

MAINTENANCE

Properly maintained joint sealants will help maintain the water penetration resistance of the building envelope. Sealant materials cannot be expected to have the same life as a masonry building. For this reason, the sealant condition should be inspected on a regular basis, perhaps when the facade is cleaned, and repairs made as needed. Manufacturer’s recommendations should be used as a guideline to estimate sealant life. However, sealant life will vary greatly with exposure and the quality of the initial installation.

Because joint sealant adheres better to properly prepared surfaces, the old or deteriorated sealant should be completely removed from the joint and the joint cleaned prior to reapplication. Minor repairs can be made by cutting out the defective area and reapplying sealant of the same type. Sealants can be removed using a sharp knife to sever the sealant from the masonry. Although some manufacturers recommend more aggressive cleaning methods, such as sand-blasting or grinding, care should be taken when using these methods. For more detailed information on sandblasting, see TEK 08-04A, Cleaning Concrete Masonry, (ref. 6).

Once the joint is properly prepared, sealant can be installed as described above for new construction.

REFERENCES

  1. Standard Guide for Use of Joint Sealants, ASTM C1193-13. ASTM International, 2013.
  2. Standard Guide for Calculating Movement and Other Effects When Establishing Sealant Joint Width, ASTM C1472-10. ASTM International, 2010.
  3. Crack Control Strategies for Concrete Masonry Construction, CMU-TEC-009-23, Concrete Masonry & Hardscapes Association, 2023.
  4. Design for Dry Single-Wythe Concrete Masonry Walls, TEK 19-2B, Concrete Masonry & Hardscapes Association, 2012.
  5. Standard Specification for Elastomeric Joint Sealants, ASTM C920-11. ASTM International, 2011.
  6. Cleaning Concrete Masonry, TEK 8-4A. National Concrete Masonry Association, 2005.

Firestopping for Concrete Masonry Walls

INTRODUCTION

Concrete masonry is widely specified for fire walls and fire barriers because it is noncombustible, durable and economical. Although these constructions are ideally continuous, various conditions require joints or penetrations in fire walls and fire and/or smoke barriers, including movement joints, pipe or cable penetrations and electrical wiring and outlets. Regardless of the type of penetrating item, gap or joint, the International Building Code (IBC) (ref. 1) requires that the continuity of the fire-resistant or smoke-resistant assembly be maintained.

A through-penetration firestop system is an assemblage of specific materials or products designed, tested and rated to resist fire spread for a prescribed period of time through openings made in fire resistance-rated walls, floor/ceiling or roof/ceiling assemblies. Firestopping must be installed in accordance with code requirements to maintain fire and life safety.

Choosing an appropriate firestopping system is a key component to a successful installation. The firestop system must be chosen from a building-official-approved listing service. Alternatively, one of the generic listed materials—concrete, mortar or grout—can be used within the limitations of the code.

Various methods are used to maintain continuity where joints, gaps and penetrations exist in fire-resistance-rated masonry construction. For details of control joints for fire-rated concrete masonry construction, refer to the subsequent Joints section and TEK 07-01D, Fire Resistance Ratings of Concrete Masonry Assemblies (ref. 2). Note that materials installed in joints must resist environmental and movement characteristics as specified by the design professional.

MAINTAINING THE CONTINUITY OF THROUGH-PENETRATIONS

The IBC allows several options for extending the fire resistance rating to protect penetrations through fire walls, fire barriers, smoke barrier walls and fire partitions. Section 713.3 of the 2009 IBC (Section 712.3 the 2006 IBC) contains explicit options permitting the use of concrete, mortar or grout to extend the fire rating through the annular space between the penetrating item and the concrete masonry wall provided the following conditions are met (see also Figure 1):

  • the penetrating item(s) must consist of steel, ferrous, or copper pipes, tubes, or conduits;
  • the nominal diameter of the penetrating item(s) cannot exceed 6 in. (152 mm);
  • the opening through the wall cannot exceed 144 in.2 (0.0929 m2); and
  • the concrete, mortar or grout is permitted where it is installed to the full thickness of the wall or the thickness required to maintain the wall’s fire resistance rating (see TEK 07-01D (ref. 2) for concrete thicknesses required to meet various fire resistance ratings). Note that placement around a penetration with masonry usually requires cutting of units. In the case of rectangular penetrations, continuity can be easily maintained by laying units with the uncut web adjacent to the penetrating item and filling the annular space with mortar

In cases where the penetrating item is contained in a sleeve, the annular space includes the space between the penetrating item and the sleeve as well as the space between the sleeve and wall assembly. Although the mason contractor is responsible for mortaring in the sleeve, filling the annular space between the pipe and the sleeve after the pipe is installed is the responsibility of the firestop contractor, piping contractor, or other firm assigned by the prime contractor or building owner/manager.

The design professional is responsible for assigning fire resistance ratings and smoke resistant assemblies, and specifying the test methods for maintaining continuity of the wall, when required. The mason contractor is not responsible for applying firestop material other than mortar, grout or concrete. The mason simply follows the plan sheet for initial construction by laying up the wall around the penetration, or if appropriate, cutting into a constructed wall. When the limitations for using mortar, grout or concrete indicated above are exceeded, then the firestop contractor, piping contractor or other designated party must apply the appropriate firestop.

If one or more of the above conditions for using mortar, grout or concrete are not met, then the firestop system must be tested in accordance with ASTM E814, Standard Test Method for Fire Tests of Penetration Firestop Systems (ref. 3), UL 1479 Fire Tests of Through Penetration Firestops (ref. 4) (with a minimum positive pressure differential of 0.01 in. (2.49 Pa) of water), or an approved assembly tested in accordance with ASTM E119, Standard Test Methods for Fire Tests of Building Construction and Materials (ref. 5) or a building official-approved alternative per Chapter 1 of the IBC.

ASTM E814 and UL 1479 were developed specifically for through penetrations and cover membrane penetrations as well (see next section, Protecting Membrane Penetrations). Both of these test methods use similar time/temperature curves, and result in a flame rating (F) for the firestop system. The F rating indicates the number of hours the firestop system resisted the passage of fire (during the fire exposure test) or water (during the hose stream test), whichever is lower. The F rating must meet or exceed the required fire resistance rating of the assembly being penetrated.

In addition to the F rating, there are also T (temperature) ratings, L (air, simulating smoke) ratings and, if water resistance is required, W ratings. The T rating indicates the length of time (in hours) it took for the firestop system to heat up on the non-fire exposed side of the assembly to the point where it could cause ignition of combustibles on the unexposed side. This is considered to occur when the temperature on the non-fire-exposed side of the firestop system rises to 325o F (162o C) above the ambient temperature.

It should be noted that in order for a firestop system to obtain a T rating, it must first obtain an F rating. F ratings are required for all firestop systems (except when concrete, mortar or grout are used under the conditions described above), whereas T ratings are not always required.

The L rating is used to maintain the continuity of smoke barriers. UL 1479 is currently the only standard that measures the passage of air through the assembly including the penetrating item, at ambient and at 400o F (204o C). The ambient temperature condition simulates cold smoke, while the 400o F (204o C) condition simulates hot smoke, both measured in cubic feet per minute per square foot of opening area. The lowest L rating is <1 cfm/ft2 (0.005 m3 /s-m2 ). For a penetration assembly in a smoke barrier, the 2006 IBC allows air leakage of 5 cfm/ft2 (0.025 m3 /s-m2 ) of penetration opening at 0.3 in. of water (7.47 Pa) for both the ambient and elevated temperature tests.

PROTECTING MEMBRANE PENETRATIONS

Membrane penetrations, addressed in IBC (2009)section 713.4.1.2, are those which penetrate only a portion of the wall assembly, such as the opening for an electrical outlet. The IBC language for protecting membrane penetrations is very similar to that for through penetrations. However, there are specific prescriptive criteria that address electrical boxes no larger than 16 in.2 (0.0103 m2) in fire walls with a fire resistance rating up to two hours. These criteria address the maximum area of openings, the annular space between the wall and the box, and separation or protection of such boxes when installed on opposite sides of the wall (see Figure 2).

DUCTS

Ducts are addressed in IBC (2009) section 716. Non-dampered ducts that penetrate fire rated walls must comply with the requirements for through penetrations, as described above. Dampered ducts and air transfer openings are tested to either UL 555, Standard for Fire Dampers (ref. 6) or UL 555S, Standard for Smoke Dampers (ref. 7), or both for fire/smoke dampers. Fire and smoke dampers must be tested according to the standards listed above; there are no prescriptive damper treatments that are deemed-to-comply with the IBC.

JOINTS

In Section 714 of the 2009 IBC, any joint in or between fire resistance-rated walls, floor, or floor/ceiling assemblies and roofs or roof/ceiling assemblies is required to provide a fire resistance rating at least equal to that of the wall, floor or roof in or between which it is installed.

The void created at the intersection of an exterior curtain wall assembly and the floor or ceiling assembly must be protected in accordance with IBC Section 714.4.

Fire resistant joint systems must be tested in accordance with the requirements of either ASTM E1966, Standard Test Method for Fire Resistive Joint Systems (ref. 8), or UL 2079, Standard for Tests for Fire Resistance of Building Joint Systems (ref. 9). Control joints not exceeding a maximum width of 0.625 in. (15.9 mm) can be installed if tested to ASTM E119 or UL 263, Standard for Fire Tests of Building Construction and Materials (ref. 10).

Joint systems in smoke barriers must be tested in accordance with the requirements of UL 2079 for air leakage. The air leakage rate of the joint must not exceed 5 cfm per lineal foot of joint (0.00775 m3/s-m) at 0.3 in. of water (7.47 Pa) for both the ambient temperature and elevated temperature tests.

Note that treatments to maintain the fire resistance rating of control joints is also included in ACI 216.1-07/TMS-0216, Code Requirements for Determining Fire Resistance of Concrete and Masonry Construction Assemblies (ref. 11) which is adopted by reference in IBC Section 721.1. These options are also addressed in TEK 07-01D.

Details of concrete masonry fire wall connections to roofs and floors are shown in TEK 05-08B, Detailing Concrete Masonry Fire Walls (ref. 12).

FIRESTOP MATERIAL AND SYSTEMS SELECTION CONSIDERATIONS

When extending the continuity of the wall to and through the penetrating item or items, the appropriate firestop system (or mortar, grout, or concrete) must be selected. Systems selection is the key to appropriate firestopping. Without proper systems selection and installation, the continuity of the fire resistance rated assembly can be compromised.

Several considerations other than fire and smoke need to be accounted for in selecting the firestop system, regardless of the firestop material or assembly type. For example, how much movement is expected in the joint assembly? The firestop system must match the expected movement of the joint to be able to maintain the rated fire resistance. Similarly, any expected movement of the penetrating item must be accommodated. Locking a pipe into a penetration could interfere with the plumbing or piping system performance.

When choosing materials, it is important to note that copper is not compatible with the cement in concrete and may be compromised over time by the mortar, grout or concrete, if used.

For joint systems, there are many configurations of products that make up the firestop ‘system.’ The system may consist of a mineral wool or other backing, packing or damming material, and one of various sealant types including silicone elastomerics, latex or silicone intumescents, latex, or spray system. Plastic piping, insulations, cable trays, and cable penetrating items may have systems comprised of wrap strips, plastic pipe devices, intumescent blocks, and many other products.

A “systems concept” is critical to extending the fire resistance rating and smoke resistant properties of the wall, for both joints and penetrations. In addition, control joint materials must be compatible with the firestop systems selected if the two intersect. The same applies to fire damper assemblies. This compatibility should be verified with both manufacturers. Most importantly, elastomeric control joint materials must allow for the depth of the completed firestop system in the joint. For penetrations, joints or perimeter fire containment, the firestopping must be installed to the tested and listed system in order to be reliable.

Information regarding the Installation, Inspection and Management of Firestop Systems is available at http://www.fcia. org and contained in the FCIA Firestop Manual of Practice (ref. 13). The FCIA Firestop Manual of Practice is free to architects working for design firms, building officials and fire marshals. CMHA does not endorse firestop contractor certification.

MAINTAINING THE FIRE RESISTANCE RATING

The International Fire Code (ref. 14) makes it clear in Section 703.1 that the required fire resistance rating of all fire-resistance rated construction be maintained through proper repair, restoration or replacement as needed. In addition, as building services change, there may be new penetrations required through fire resistance rated concrete masonry assemblies. These new penetrations must also be protected to maintain the integrity of the construction.

Although not required by current building codes, information for on site inspection of firestop systems is provided in ASTM E2174, Standard Practice for On-Site Inspection of Installed Fire Stops (ref. 15) and ASTM E2393, Standard Practice for On-Site Inspection of Installed Fire Resistive Joint Systems and Perimeter Fire Barriers (ref. 16).

REFERENCES

  1. International Building Code. International Code Council, 2006 and 2009.
  2. Fire Resistance Ratings of Concrete Masonry Assemblies, TEK 07-01D. Concrete Masonry & Hardscapes Association, 2018.
  3. Standard Test Method for Fire Tests of Penetration Firestop Systems, ASTM E814-10. ASTM International, Inc., 2010.
  4. Fire Tests of Through-Penetration Firestops, UL 1479. Underwriters Laboratories, 2003.
  5. Standard Test Methods for Fire Tests of Building Construction and Materials, ASTM E119-09c. ASTM International, Inc., 2009.
  6. Standard for Fire Dampers, UL 555. Underwriters Laboratories, 2006.
  7. Standard for Smoke Dampers, UL 555S. Underwriters Laboratories, 1999.
  8. Standard Test Method for Fire-Resistive Joint Systems, ASTM E1966-07. ASTM International, Inc., 2007.
  9. Standard for Tests for Fire Resistance of Building Joint Systems, UL 2079. Underwriters Laboratories, 2004.
  10. Standard for Fire Tests of Building Construction and Materials, UL 263. Underwriters Laboratories, 2003.
  11. Code Requirements for Determining Fire Resistance of Concrete and Masonry Construction Assemblies, ACI 216.1-07/TMS-0216 07. American Concrete Institute and The Masonry Society, 2007.
  12. Detailing Concrete Masonry Fire Walls, TEK 05-08B. Concrete Masonry & Hardscapes Association, 2005.
  13. Firestop Industry Manual of Practice. Firestop Contractors International Association, 2009.
  14. International Fire Code. International Code Council, 2006 and 2009.
  15. Standard Practice for On-Site Inspection of Installed Fire Stops, ASTM E2174-09. ASTM International, Inc., 2009.
  16. Standard Practice for On-Site Inspection of Installed Fire Resistive Joint Systems and Perimeter Fire Barriers, ASTM E2393-10. ASTM International, Inc., 2010.

Aesthetic Design With Concrete Masonry

INTRODUCTION

One aspect of concrete masonry that has kept it at the forefront of building materials is its ability to incorporate and reflect a broad spectrum of existing architectural styles, as well as providing the designer with the ability to develop and present unique aesthetic affects and techniques. When skillfully designed, simple materials can provide unparalleled aesthetic enhancement. Inventive patterns, color choices (unit and mortar), unit sizes, and surface finishes (split face and standard) can be used in various concrete masonry bond patterns to evoke a sense of strength, modernity, tradition, or even whimsy.

Within the confines of meeting applicable building codes and specifications, concrete masonry’s modular sizes and range of colors, textures and patterns provide ample opportunity to demonstrate a design technique or overcome design challenges. In addition to the architectural finish, concrete masonry can provide the wall’s structure, fire resistance, acoustic insulation, and energy envelope.

This TEK addresses the proper application of architectural enhancements in concrete masonry wall systems. Where appropriate, related TEK and other documents are referenced to provide further information and detail.

Communication With Clients

Common dilemmas faced by designers are a client’s changing expectations and responses to the project’s changing appearance over time and under varying conditions. As discussed below, there are some basic requirements relative to aesthetics, but these are far from comprehensive. It is important to realize that code requirements primarily govern structural performance, not aesthetics. For example, code required construction tolerances are designed to ensure that masonry units are placed such that the completed wall can act structurally as an integrated unit.

These requirements assume an understanding of the techniques unique to the nature of masonry. The design and construction team should establish and consistently support ground rules affecting aesthetic interpretations of a project. It is also important for the client to realize the aesthetic standard that the project is based on, and that unusually high aesthetic standards can be more costly. In addition, certain high-profile areas, such as a building entrance, may require a custom level of quality, commensurate with an additional cost for the defined area. Several state and local masonry associations have developed guidelines for defining aesthetic requirements, and these can be a good resource for clarifying a project’s aesthetic standards.

Sample panels are a good means to communicate the minimum contract-based aesthetic standard to all parties. The sample panel is typically constructed prior to the project, and in some cases a portion of the work can serve as the sample panel. The sample panel remains in place or at least available until the finished work has been accepted, since it serves as a comparison for the finished work. The sample panel should contain the full acceptable range of unit and mortar color, as well as the minimum expected level of workmanship. Cleaning procedures, as well as application of any coatings or sealants, should also be demonstrated on the sample panel. See TEK 08-04A, Cleaning Concrete Masonry, (ref. 1) for more information on cleaning.

CONSIDERATIONS FOR CHOOSING CONCRETE MASONRY UNITS

Architectural Concrete Masonry Units

One of the most significant architectural benefits of designing with concrete masonry is its versatility—the finished appearance of a concrete masonry wall can be varied with the unit size and shape, color of units and mortar, bond pattern, and surface finish of the units. The term “architectural concrete masonry units” typically is used to describe units displaying any one of several surface finishes that affect the color or texture of the unit, allowing the structural wall and finished surface to be installed in a single step. CMU-TEC-001-23, Concrete Masonry Unit Shapes, Sizes, Properties, and Specifications, (ref. 2) provides an overview of some of the more common architectural units, although local manufacturers should be consulted for final unit selection.

Architectural concrete masonry units are used for interior and exterior walls, partitions, terrace walls and other enclosures. Some units are available with the same treatment or pattern on both faces, to serve as both exterior and interior wall finish material, increasing both the economic and aesthetic advantages. Architectural units comply with the same performance-based quality standards as conventional concrete masonry, such as Standard Specification for Loadbearing Concrete Masonry Units, ASTM C90 (ref. 3). See Aesthetics in ASTM C90 (page 4) for more information.

Concrete Masonry Unit Color

Being produced from natural aggregates, concrete masonry has natural color variations from unit to unit. When a more monotone appearance is desired, there are various techniques that may be specified to increase the color uniformity in concrete masonry. Perhaps the best method is to specify the use of mineral pigments in the concrete mix, which are available in a wide range of colors. Pigments provide an integral color throughout the unit and minimize variations in color and texture found naturally in aggregate and sand deposits. Using several colors of integrally-colored concrete masonry units in the same wall is an effective technique for producing other visual impacts, such as two-tone banding or complementary color palates (see Figure 1).

Other methods are also used to improve color uniformity. One method is to specify the use of a post-applied stain, paint or coating on the units. With a paint or coating, the resulting film minimizes the texture of the masonry surface as well as the visual impact of the mortar joints. Paints and coatings for concrete masonry should be compatible with the masonry, and should in general allow for water vapor transmission. TEK 19-01, Water Repellents for Concrete Masonry Walls, (ref. 4) contains information on the applicability of different types of paints and coatings for concrete masonry walls.

A more laborious method to improve color uniformity is to arrange with the masonry contractor for a pre-sorting of on-site supplied block during certain stages of construction.

Interaction With Sunlight

Because it is produced from natural materials, concrete masonry walls often interact with changing sunlight in much the same way that natural stone does, appearing to change color as the light hits the wall at different angles. Figure 2 shows how even a conventional gray concrete masonry wall can interact with sunlight to present a range of color. This same attribute can be used to advantage with electric lighting, as well as on interior walls.

Fluted concrete masonry units provide a rich texture and tend to enhance the sound attenuating properties of concrete masonry.

The vertical flutes also provide an interesting interplay of light and shadow, which can be much more dramatic than smoothfaced units.

MORTAR JOINTS

While mortar generally comprises less than ten percent of a typical concrete masonry wall surface area, it can have a significant impact on the overall aesthetics of the completed structure. Mortar joint finishing, profiles and color can all impact the overall wall aesthetics. See also Concrete Masonry Handbook for Architects, Engineers, Builders (ref. 5) for information on mortar joints.

Mortar Joint Tooling

Tooling refers to finishing the mortar joints with a profiled tool that shapes and compacts the surface of the joint and provides a sharper, cleaner appearance for the wall. The surface shape of the tool determines the joint’s profile (discussed in more detail in the following section). Tooling mortar joints also helps seal the outer surface of the joint to the adjacent masonry unit, improving the joint’s weather resistance. For this reason, tooled joints that compact the mortar and do not create ledges to hold water are recommended for construction that will be exposed to weather.

Mortar joints should be tooled when the mortar is thumbprint hard (a clear thumbprint can be pressed into the mortar without leaving cement paste on the thumb). Tooling the joints before they reach this stage results in lighter colored joints, because more cement paste is brought to the surface of the joints. Joints tooled too early can also subsequently shrink away slightly from the adjacent concrete masonry unit. Tooling at the proper time allows this initial shrinkage to occur, then restores contact between the mortar and the unit producing a more weatherresistant joint. Conversely, later tooling can produce a darker joint. A consistent time of tooling will minimize variations in the final mortar color.

For the cleanest result, horizontal mortar joints should be tooled before vertical joints. For white and light-colored mortar, Plexiglas jointers can be used to avoid staining the joints during tooling. After all joints are tooled, any mortar burrs on the wall should be trimmed off with a trowel or other tool (a tool such as a plastic loop is easier to use on a split face wall than a trowel, for example). As a final step the joints are dressed using a brush, a piece of burlap, or similar material.

Mortar Joint Profiles

Traditional mortar joint profiles are illustrated in Figure 3. For walls not exposed to weather, the joint profile selection can be based on aesthetics and economics (as some joint profiles are more labor intensive to produce). For exterior exposures, however, the mortar joint profile can impact the wall’s weather resistance, as discussed above.

Unless otherwise specified, mortar joints should be tooled to a concave profile when the mortar is thumbprint hard (refs. 6, 7). For walls exposed to weather, concave joints (Figure 3a) improve water penetration resistance by directing water away from the wall surface. In addition, because of the shape of the tool, the mortar is compacted against the concrete masonry unit to seal the joint. V-shaped joints (Figure 3b) result in sharper shadow lines than concave joints.

Grapevine and weather joints (Figures 3c, 3d) provide a water shedding profile, but do not result in the same surface compaction as concave or V-shaped joints. Both are used in interior walls to provide strong horizontal lines.

Beaded joints (Figure 3e) are formed by tooling the extruded mortar into a protruding bead shape. Care must be taken to obtain a straight line with the bead. Although technically a tooled joint, the beaded tooler does not produce the same mortar surface compaction as a concave or V-shaped tool. In addition, the protruding bead can allow water, ice or snow to collect. Therefore, beaded joints are not recommended for weather-exposed construction.

Flush joints (Figure 3f) are typically specified when a wall will be plastered. Excess mortar is simply struck off the face of the wall with the trowel, then dressed with a brush or other tool.

Squeezed or extruded joints (Figure 3g) are made using excess mortar that is squeezed out as units are laid. They may be specified for interior walls.

Struck joints (Figure 3h) provide a strong horizontal line, similar to weather joints, however because the shape provides a ledge for rain, ice or snow, they are not recommended for walls that will be exposed to weather. Raked joints (Figure 3i) provide a dramatic contrast between the units and mortar joints. They are formed using a joint raker, which removes the mortar to a maximum depth of 1/2 in. (13 mm). With raked joints, small imperfections on unit edges can be more noticeable, because the mortar is not compacted against the unit (the compaction tends to fill in small surface irregularities along the unit edge). The resulting joint is not weather-resistant, and may not leave enough mortar cover over horizontal joint reinforcement (joint reinforcement is required to have 5/8 in. (16 mm) mortar cover in walls exposed to weather or earth (refs. 6, 7)). A better option for exterior surfaces is to specify an integrally colored mortar to provide the visual contrast.

Mortar Joint Color

Choosing a specific mortar color allows additional creativity by specifying integral color to either provide a visual contrast or to match the unit color, as shown in Figure 4. Note that using a mortar color that matches the surrounding units minimizes the effects of minor mortar staining; i.e., with a contrasting mortar color, greater care should be used to remove mortar droppings and splatters from the masonry units.

Because foreign material in mortar sand can affect the mortar quality, as well as appearance, ASTM C144, Standard Specification for Aggregate for Masonry Mortar (ref. 8), limits deleterious substances in aggregates for masonry mortars. Sand can also affect mortar color: sands from different natural sources may have different hues. Therefore, all of the sand for a particular project should come from the same source. Silica sand, which is more expensive than typical masonry sand, is often specified for white mortar. Consistent batching and mixing procedures also help produce uniform mortar color from batch to batch. See TEK 03-08A, Concrete Masonry Construction (ref. 9), for further information.

Using a consistent amount of mix water is important to maintain color uniformity for all mortars and especially when using integrally colored mortar. Changing the amount of water can significantly change the resulting mortar color intensity. For this reason there are special methods and equipment, such as shading materials and equipment from direct sunlight, the use of cooled water, and the use of damp, loose sand piles to reduce excessive retempering. Mortar that is too stiff or older than 2 1/2 hours after initial mixing is to be discarded.

EXPECTATIONS FOR UNITS AND CONSTRUCTION

Aesthetics in ASTM C90

ASTM C90 provides minimum requirements for concrete masonry units that assure properties necessary for quality performance. The specification includes requirements for materials, as well as dimensional and physical requirements such as minimum compressive strength, maximum water absorption, maximum dimensional tolerances, and maximum linear drying shrinkage. It also includes finish and appearance criteria for concrete masonry units.

It should be noted that the requirements in ASTM C90 are intended to address the performance of the masonry units when installed, not the aesthetics of the units nor of the constructed masonry. The time for product inspection is before placement. As such, the finish and appearance criteria, for example, prohibits defects that would impair the strength or permanence of the construction, but permit minor cracks or chips incidental to usual manufacturing, shipping and handling methods.

Qualities that are not included in C90 include color, surface texture, surface features such as scores or flutes, density choice, water repellency, fire resistance rating, thermal properties and acoustic properties. If required, these properties must be addressed in project contract documents. ASTM C90 does, however, include acceptance criteria for unit color and surface texture: namely, that the finished unit surfaces that will be exposed in the final structure conform to an approved sample of at least four units. The sample should represent the range of color and texture permitted on the job. As a practical matter, color and texture should be expected to vary somewhat due to the nature of the material.

The ASTM C90 specification is described in more detail in CMU-TEC 001-23, (ref. 2).

Considerations for Integrally Colored Smooth-Faced Units

Integrally-colored concrete masonry units are available in a wide variety of colors and shades. The mineral oxide pigments are evenly dispersed throughout the concrete mix, producing a low-maintenance enhancement that lasts the life of the structure.

During unit manufacture, the integrally-colored concrete mix is placed into a steel mold, which is stripped off while the concrete is still plastic. This stripping of the mold draws moisture and coloring pigment to the unit surface, which impacts the surface appearance. On split-faced or ground-faced units, this surface is either ground away or not exposed (in the case of split-faced units). Because the formed surface is the final exposed surface on smooth-faced units, however, these units will have a wider color variation than is seen with split-faced or ground-faced units. Understanding this color variation will help avoid possible disappointment that the finished wall does not have the color uniformity of a painted or stained wall.

Construction Tolerances

The International Building Code and Specification for Masonry Structures (refs. 6, 7) contain site tolerances for masonry construction which allow for deviations in the construction. The permissible tolerances are intended to ensure that misalignment of units or structural elements does not impede the structural performance of the wall. Although the tolerances are not intended for the purpose of producing an aesthetically pleasing wall, these tolerances are generally adequate for most aesthetic applications as well. If tighter tolerances are desired, they must be specified in the project documents.

As an example, unless otherwise specified, the actual location of a masonry element is required to be within a certain tolerance of where the element is shown on the construction drawings: + 1/2 in. in 20 ft, + 3/4 in. max (+ 13 mm in 6.2 m, + 19 mm max). More precise placement dimensions can be specified, typically at a higher cost.

Tolerances apply to: plumb, alignment, levelness and dimensions of constructed masonry elements, location of elements, levelness of bed joints, mortar joint thickness, and width of collar joints, grout spaces and cavities. A full discussion of code-required masonry construction tolerances is presented in TEK 03-08A, Concrete Masonry Construction (ref 9).

MODULAR COORDINATION

Concrete masonry structures can be constructed using virtually any layout dimension. However, for maximum construction efficiency, economy, and aesthetic benefit, concrete masonry elements should be designed and constructed with modular coordination in mind. Modular coordination is the practice of laying out and dimensioning structures to standard lengths and heights to accommodate modularly-sized building materials.

Standard concrete masonry modules are typically 8 in. (203 mm) vertically and horizontally, but may also include 4-in. (102 mm) modules for some applications. These modules provide the best overall design flexibility and coordination with other building products such as windows and doors. Designing a concrete masonry building to a 4- or 8-in. (102- or 203-mm) module will minimize the number of units that need to be cut, providing a more harmonious looking masonry structure. TEK 05-12, Modular Layout of Concrete Masonry (ref. 10) provides details of modular wall layouts and openings.

CONTROL JOINTS

Control joints, a type of movement joint, are one method used to relieve horizontal tensile stresses due to shrinkage of concrete products and materials. They are essentially vertical planes of weakness built into the wall to reduce restraint and permit longitudinal movement due to anticipated shrinkage. When control joints are required, concrete masonry requires only vertical control joints. When materials with different movement properties are used in the same wythe (such as clay masonry and concrete masonry), this movement difference needs to be accommodated, and may require horizontal movement joints as well (see the Banding section, below). Recommendations for band in a split-faced wall (see Figure 5); with different unit sizes, such as the use of a 4-in. (102-mm) high band in a wall of 8-in. (203-mm) units; or with a combination of these techniques. Combining masonry units of different size, color and finish provides a virtually limitless palette.

The use of concrete masonry bands in clay brick veneer has also become very popular. The architectural effect is very pleasing; however, proper detailing must be provided to accommodate the different movement properties of the two materials to prevent racking. The detail shown in Figure 6 has demonstrated good performance in many areas of the United States and is the preferred detail, as it is economical and maintenance free. Horizontal joint reinforcement is placed in the mortar joints above and below the band, as well as in the band itself if it is more than two courses high. In addition, lateral support (wall ties) are provided within 12 in. (305 mm) of the top and bottom of the band and the band itself must contain at least one row of ties. Some designers prefer placing joint reinforcement in every bed joint of the concrete masonry band. In this case, a tie which accommodates both the tie and reinforcement in the same joint (such as seismic clips) should be used. Another, but less recommended, option is to use horizontal slip planes between clay masonry and the concrete masonry band (see TEK 05-02A, Clay and Concrete Masonry Banding Details, Reference 12).

The maximum spacing of expansion joints in the clay masonry wall should be reduced to no more than 20 ft (6.1 m) when concrete masonry banding is used. When the clay masonry expansion joint spacing exceeds 20 ft (6.1 m), an additional control joint should be placed near mid-panel in the concrete masonry band, although the joint reinforcement should not be cut in this location. At locations control joint spacing, locations and construction details can be found in CMU-TEC-009-23, Crack Control Strategies for Concrete Masonry Construction (ref. 11).

Aesthetically, control joints typically appear as continuous vertical lines in the field of the masonry walls, and perhaps at other areas of stress concentration, such as adjacent to openings, at changes in wall height, etc. Several strategies can be used to make control joints less noticeable. Perhaps the simplest approach is to align the control joint with another architectural feature, such as a pilaster or recess in the wall. In this case, the vertical shadow line provided by the architectural feature provides an inconspicuous control joint location.

BANDING

Concrete masonry banding is successfully used in many architectural applications. Banding can be accomplished with different colors of block; with different textures, for example a smooth-faced of expansion joints in the clay masonry, joints should be continued through the concrete masonry band and the joint reinforcement cut at these locations. TEK 05-02A provides a fuller discussion and additional details for combining these two materials, including details for incorporating clay masonry bands into concrete masonry walls.

LIGHTING DESIGN CONSIDERATIONS FOR CONCRETE MASONRY WALLS

Masonry has historically been associated with diffuse illumination located on or recessed into ceilings, as step (walkway) fixtures located below the waist, or generally placed at a distance from the masonry wall assembly. Diffuse lighting does not concentrate a focused beam but rather spreads the light to provide soft illumination. Although this is sometimes accomplished using an array of many individual light sources at a distance, it is more typically accomplished with fixtures and devices made for this purpose. When wall-mounted light sources are necessary, there are specialized fixtures adapted for masonry that internally refract, reflect, deflect, partially block, diffuse, and/or shade light from directly impinging on the wall surface. Often, the fixture includes additional light diffusers facing away from the wall surface to assist in softly lighting the adjacent area. No noticeable shadows are cast onto the wall, because the shadow is intentionally located away from the wall surface, thus masonry aesthetics are enhanced with a lower lighting intensity and more graceful illumination. These concepts are illustrated in Figure 7.

Non-diffuse light shining onto a concrete masonry wall from a surface mounted light fixture or sconce can sometimes cast unwanted long shadows, giving the erroneous visual appearance of unacceptably poor materials or workmanship (see Figure 7). With non-diffuse light, glossy surface treatments and coatings could also inadvertently magnify this problem. Well-designed diffuse light can eliminate such concerns.

Certain concrete masonry units, such as ground face (also called honed or burnished), can be highly reflective. Figure 8 shows a residential project using a custom-fabricated white ground face block. The designer used a complementary balance of several lighting fixtures with what might have otherwise been a challenging masonry reflective finish. The harmonious use of interior lighting combined with exterior overhead (recessed trim) and step lighting is an effective way of solving this challenge.

REFERENCES

  1. Cleaning Concrete Masonry, TEK 08-04A. Concrete Masonry & Hardscapes Association, 2005.
  2. Concrete Masonry Unit Shapes, Sizes, Properties, and Specifications, CMU-TEC-001-23, Concrete Masonry &
    Hardscapes Association, 2023.
  3. Standard Specification for Loadbearing Concrete Masonry Units, ASTM C90-09. ASTM International, 2009.
  4. Water Repellents for Concrete Masonry Walls, TEK 19-01.
    Concrete Masonry & Hardscapes Association, 2006.
  5. J. A. Farney, Melander, J. M., and Panarese, W. C., Concrete Masonry Handbook for Architects, Engineers, Builders, Sixth Edition, Engineering Bulletin 008. Portland Cement Association, 2008.
  6. International Building Code, International Code Council, 2009.
  7. Specification for Masonry Structures, TMS 602/ACI 530.1/ASCE 6. Reported by the Masonry Standards Joint Committee, 2008.
  8. Standard Specification for Aggregate for Masonry Mortar, ASTM C144-04. ASTM International, 2004.
  9. Concrete Masonry Construction, TEK 03-08A. Concrete Masonry & Hardscapes Association, 2001.
  10. Modular Layout of Concrete Masonry, TEK 05-12. Concrete Masonry & Hardscapes Association, 2008.
  11. Crack Control Strategies for Concrete Masonry Construction, CMU-TEC-009-23, Concrete Masonry & Hardscapes Association, 2023.
  12. Clay and Concrete Masonry Banding Details, TEK 05-02A.
    Concrete Masonry & Hardscapes Association, 2002.

Clay and Concrete Masonry Banding Details

INTRODUCTION

Masonry is often specified because of its aesthetic versatility. Combining masonry units of different size, color and finish provides a virtually limitless palette. Often, exterior concrete masonry walls incorporate clay brick, or concrete masonry is used in clay brick walls as accent bands. The bands add architectural interest to the wall and can also help hide horizontal elements such as flashing and expansion joints. However, combining these two materials within one wythe of masonry requires special detailing due to their different material properties.

In general, all masonry walls should be designed and detailed to accommodate anticipated movement resulting from volume changes in the masonry materials themselves. For example, vertical control joints and horizontal joint reinforcement can be incorporated into concrete masonry walls to control cracking and still allow horizontal shrinkage of the concrete masonry units to occur without introducing undue stress into the wall. Similarly, clay masonry walls incorporate vertical and horizontal expansion joints to allow the clay to expand without distress. When both clay and concrete masonry units are used in the same masonry wythe, detailing is required to accommodate concrete masonry shrinkage and clay masonry expansion occurring side by side. Concrete masonry is a hydraulic cement product and as such requires water for cement hydration, which hardens the concrete. Therefore, concrete masonry units are relatively wet at the time of manufacture and from that time on tend to shrink as the units dry. Conversely, clay masonry units are very dry subsequent to firing during the manufacturing process and then tend to expand as they pick up moisture from the atmosphere and from mortar as they are laid. Without due consideration of these opposing movements, cracking can result. In veneers, the cracking is primarily an aesthetic issue, as any water that penetrates the veneer through cracks between the two materials drains down the cavity and is directed out of the wall via flashing and weep holes.

BANDING DETAILS

When detailing a wall to accommodate movement, the design goal is to allow the movement to occur (as restraint will cause cracking) while providing appropriate support. The recommendations that follow are based on a record of successful performance in many locations across the United States. These can be adjusted as needed to suit local conditions and/or experience.

In general, several strategies are used to accommodate movement. These include movement joints (control joints in concrete masonry and expansion joints in clay masonry); horizontal joint reinforcement to take tension due to concrete masonry shrinkage and help keep any cracks that occur closed; and sometimes horizontal joints to allow longitudinal movement. In veneers, it is particularly important that the band, as well as the wall panel above and below the band be supported by wall ties. Wall ties should be installed within 12 in. (305 mm) of the top and bottom of the band to help ensure the surrounding masonry is adequately supported.

In addition, using a lower compressive strength mortar helps ensure that if cracks do occur, they occur in the mortar joint rather than through the unit. Type N mortar is often specified for veneers, because it tends to be more flexible than other mortar types.

Concrete Masonry Band in Clay Brick Wall

Figure 1a shows a two-course high concrete masonry band in a clay brick exterior wythe of a cavity wall. With this type of construction, the following practices are employed to minimize the potential for cracking.

Horizontal joint reinforcement is placed in the mortar joints above and below the band to take stress from the differential movement in that plane. For bands higher than two courses, joint reinforcement should also be placed within the band itself at a spacing of 16 in. (406 mm) on center vertically. Ideally, the joint reinforcement and ties should be placed in alternate joints so that one does not interfere with placement of the other. Some designers, however, prefer placing joint reinforcement in every bed joint in the concrete masonry band, particularly if the aspect ratio of the band is high. In this case, a tie which accommodates both tie and wire in the same mortar joint should be used, such as a seismic clip type wall tie.

Although the detail in Figure 1a has demonstrated good performance in many areas of the United States, there are locations where use of bond breaks at the top and bottom of the band is preferred (see Figure 1b) A local masonry industry representative should be contacted for further information on which detail has been more successful in a given location.

Figure 1b shows a slip plane incorporated into the interfaces between the concrete and clay masonry to allow unrestrained longitudinal movement between the two materials. This can be accomplished by placing building paper, polyethylene, flashing or a similar material in the horizontal bed joints above and below the band. When hollow masonry units are used for the band, the slip plane below the band should incorporate flashing, so that any water draining down the cores of the band can be directed out of the wall at that point.

When slip planes are used, joint reinforcement should be incorporated into the concrete masonry band. The exposed mortar joint at the top and bottom of the band should be raked back and sealed with an appropriate sealant to prevent water penetration at these joints. Note that this construction is typically more expensive than the detail shown in Figure 1a.

In addition to joint reinforcement, reduced spacing of expansion joints in the wall is recommended to reduce the potential for cracking. Experience has shown that vertical expansion joints in the clay masonry should extend through the concrete masonry band as well, and be placed at a maximum of 20 ft (6.1 m) along the length of the wall. Although concrete masonry construction typically requires control joints rather than expansion joints, control joints should not be used in the concrete masonry band at the expansion joint locations.

Note that local experience may require reducing the expansion joint spacing to 16 ft (4.9 m). If brick vertical expansion joint spacing does exceed 20 ft (6.1 m), consider placing an additional vertical movement joint through the concrete masonry accent band near mid panel with joint reinforcement continuous through that joint. The continuous joint reinforcement in this location helps keep the clay brick above and below the band from cracking as the concrete masonry shrinks.

Bands only one course high must be detailed to incorporate joint reinforcement and wall ties in the joints above and below the band (see Figure 2).

When concrete masonry banding is used over a wood stud backup, similar provisions apply (see Figure 3). It is imperative that joint reinforcement be used in the concrete masonry band, even if it is not used in the surrounding clay brick masonry.

Clay Brick Band in Concrete Masonry Wall

The recommendations to control differential movement for clay brick masonry bands in concrete masonry are very similar to those for a concrete masonry band in clay brick veneer: joint reinforcement above and below the band and wall ties within the band. Seismic clip type wall ties are recommended, as they provide an adjustable wall tie and joint reinforcement in one assembly.

With this construction, it is imperative that the veneer control joint not contain mortar as it goes through effectiveness. Note that although control joints in structural masonry walls must permit free longitudinal movement while resisting lateral or out-of plane shear loads, veneers are laterally supported by the backup and do not require a shear key.

In single wythe construction as shown in Figure 5, flashing and weep holes are used above the accent band to facilitate removal of any water that may accumulate in the wall. The use of two reduced thickness concrete masonry units allows flashing to be placed within the wall without causing a complete horizontal bond break at the flashing.

In reinforced walls (Figure 5b), flashing and weeps are also used. On the wall interior, rather than using reduced thickness units, a full size unit is cut to fit to allow adequate space for the reinforcement and grout.

Construction of Reinforced Concrete Masonry Diaphragm Walls

INTRODUCTION

Diaphragm walls are composed of two wythes of masonry with a large cavity or void. The wythes are bonded together with masonry ribs or crosswalls in such a way that, structurally, the wythes function compositely—as though the entire thickness is effectively solid.

Figure 1 shows a stone-clad university building with reinforced concrete masonry diaphragm walls, used to recreate the campus’ Gothic architecture. The use of reinforced diaphragm walls allowed support of the tall sidewalls and gable ends.

Figure 2 shows a cross-section of a typical diaphragm wall. The reinforced wythes can be fully or partially grouted. The exterior face can be constructed with a weathering face, like a conventional single wythe wall, or finished with a veneer. The voids can be used for placement of utilities and/or insulation.

This TEK discusses construction considerations for diaphragm walls: TEK 14-24, Design of Reinforced Concrete Masonry Diaphragm Walls, (ref. 1) covers the structural design.

CONSTRUCTION ADVANTAGES

Reinforced diaphragm walls present several construction benefits. These include:

  1. As shown in Figure 1, thick walls can be created efficiently using standard units bonded together. Thicker walls can be used to create taller walls.
  2. The wall can have exposed finished surfaces both inside and out. In addition, those finishes can be different because they are created by two different masonry wythes and can, therefore, feature different unit types/sizes/colors.
  3. The wall construction proceeds very much as conventional single wythe or cavity wall construction.
  4. The exterior wythe can be constructed with a veneer.
  5. The large interior voids allow for easy placement of utilities and/or insulation.

KEY CONSTRUCTION FEATURES

Construction Sequence

The construction sequence for diaphragm walls can vary based upon how the ribs are interconnected with the two wythes. Building Code Requirements for Masonry Structures (ref. 2), referred to as TMS 402, Section 5.1.1.2.5 provides three methods for connecting intersecting walls to allow shear transfer:

  1. At least fifty percent of the masonry units at the interface must interlock. This means the ribs could be constructed in running bond with every other course interlocking with the wythes. Thus, the wythes and the ribs would be constructed concurrently.
  2. Walls must be anchored by steel connectors grouted into the wall and meeting the following requirements: (a) Minimum size: 1/4 in. x 1-1/2 in. x 28 in. (6.4 x 38.1 x 711 mm) including 2-in. (50.8-mm) long, 90-degree bend at each end to form a U or Z-shape. (b) Maximum spacing: 48 in. (1,219 mm). Thus, it is possible to build the ribs separately from the wythes, which provides significant flexibility in construction.
  3. Intersecting reinforced bond beams must be provided at a maximum spacing of 48 in. (1,219 mm) on center. The area of reinforcement in each bond beam must be not less than 0.1 in.2 per ft (211 mm2/m) multiplied by the vertical spacing of the bond beams in feet (meters). Reinforcement must be developed on each side of the intersection.

Again, this provides flexibility in sequencing the wall construction. However, the grouting must be done simultaneously with the wythe construction.

Masonry Bond

TMS 402 Section 5.1.1.2.1 requires that the masonry at intersecting walls be laid in running bond for composite action between wythes to be effective. This requirement controls the entire construction of a diaphragm wall and mandates running bond for both the wythes and the ribs.

Reinforcement

Vertical reinforcement is typically placed in the cells of the wythes as is done in single-wythe construction. Posttensioning can be placed either in the cells of the wythes or within the void itself. If placed within the void and laterally restrained tendons are specified, tendon restraints must be fabricated. TEK 03-14, Post-Tensioned Concrete Masonry Wall Construction (ref. 3) provides a more detailed overview. Depending on the project’s seismic and/or loading requirements, horizontal reinforcement can be placed in either grouted bond beams or in the bed joints of the wythes and ribs. Horizontal bond beams are beneficial in that they can also serve as the interlock between the ribs and wythes, as well as shear reinforcement for the ribs.

Ribs (Crosswalls)

The structural design will determine whether or not the ribs require vertical reinforcement. The interlock with the wythes transfers shear forces across the intersections, and the vertical reinforcement in the wythes acts as the total wall reinforcement.

Wall Grouting

The requirement for full or partial wall grouting is a design decision. Any cells or bond beams with reinforcement must be grouted. The need for additional grouting is determined based on the design requirements. Both low-lift and high-lift grouting techniques are suitable to diaphragm walls. See TEK 03-02A, Grouting Concrete Masonry Walls, (ref. 4) for more detailed information.

Water Management

Strategies for water penetration resistance of conventional masonry walls depend on whether the wall is singlewythe or a cavity wall. Water penetration resistance for the exterior wythe of a diaphragm wall follows the strategies employed for single wythe construction. If the exterior wythe has a veneer and cavity, it is flashed and weeped the same way as a single wythe masonry cavity wall. With no veneer and cavity, the exterior wythe of a diaphragm wall is flashed and weeped the same way as a similarly constructed partially grouted single wythe wall. Flashing and weeps are not necessary if the exterior wythe is solid grouted.

Figure 3 shows a typical wall base detail for a diaphragm wall with an exterior veneer and cavity. The cavity between the exterior diaphragm wythe may contain insulation and an air/moisture barrier, as required. The veneer is anchored to the exterior wythe of the diaphragm wall and is weeped and flashed. TEK 19-05A, Flashing Details for Concrete Masonry Walls, (ref. 6) provides additional details applicable to this construction.

Figure 4 shows a wall base detail applicable to an exterior diaphragm wythe without a cavity and veneer. TEK 19-02B, Design for Dry Single Wythe Concrete Masonry Walls, (ref. 7) provides additional details for single wythe construction.

Openings through diaphragm walls, roof/floor intersections, etc. are also flashed and weeped similar to conventional concrete masonry walls.

Top of the Wall

Diaphragm walls require closure at the top to transfer vertical loads and close off the void. Figure 5 shows one common detail for capping the walls. The cast-in-place capping slab at the top takes the place of what would normally be bond beams in single-wythe walls. For post tensioned walls, the top slab provides a convenient anchorage point for the tendons.

Utilities and Insulation

The voids offer several opportunities not common in masonry walls. They provide chases for duct work and utilities with minimal cutting of the units and allow for additional insulation if desired. Diaphragm walls can be insulated on the exterior, by using a veneer and insulated cavity, or by using an exterior insulation system. They can also be insulated on the interior, using furring, insulation and gypsum wallboard. When insulation is placed in the voids, however, the ribs produce a large thermal bridge, reducing the effectiveness of the insulation. 06-11A, Insulating Concrete Masonry Walls, (ref. 5) provides more detailed information.

Openings

Constructing openings in diaphragm walls is also very similar to single-wythe walls (see Figure 6). The entire void should be spanned/filled at the opening and the exterior wythe flashed above (as appropriate), as shown in Figure 4. Figure 6 Option 1 shows a reinforced concrete slab that has been designed as a header for the opening. Figure 6 Option 2 has lintels to support the wythes over the opening. The void at the headers and sills is infilled with a nonmasonry material, such as exterior gypsum sheathing. The jambs should be infilled with masonry wherever they don’t already align with the ribs. Note that Figure 6 does not show flashing that may be necessary.

Control Joints

Control joints are provided in concrete masonry walls to control cracking primarily from movement due to shrinkage and thermal effects. In diaphragm walls, the ribs will tend to restrict some of that movement, however, because there is currently no research to quantify these effects, current practice is to place control joints at intervals based upon CMU-TEC-009-23, Crack Control Strategies for Concrete Masonry Construction, (ref. 8). TEK 14-24 discusses these criteria and provides an example for determining control joint spacing for a diaphragm wall.

Although the inner wythe will generally be exposed principally to shrinkage with only minor thermal effects, it is common to place control joints in the same locations and to provide similar shrinkage reinforcement in both wythes.

Figure 7 shows two methods of creating control joints in a diaphragm wall. Option 1, with ribs on both sides of the control joint, does a better job keeping water out of the void than Option 2 because a failure of the sealant would allow water to penetrate between the ribs, rather than into the void itself. The control joints in both wythes should be sealed for water protection.

CMU-TEC-009-23 contains additional control joint constructions/details that can also be used on diaphragm walls, including fire-rated joints and control joints that allow shear transfer.

SUMMARY

Diaphragm walls provide several beneficial features and are applicable to a wide variety of projects. Constructing reinforced concrete masonry diaphragm walls uses methods and techniques commonly known to most masons. The added thickness of the wall provides some variations in the overall reinforcement and layout concepts but the techniques are typical for masonry.

REFERENCES

  1. Design of Reinforced Concrete Masonry Diaphragm Walls, TEK 14-24. Concrete Masonry & Hardscapes Association, 2014.
  2. Building Code Requirements for Masonry Structures, TMS 402-16, Reported by The Masonry Society 2016.
  3. Post-Tensioned Concrete Masonry Wall Construction, TEK 03-14. Concrete Masonry & Hardscapes Association, 2002.
  4. Grouting Concrete Masonry Walls, TEK 03-2A. Concrete Masonry & Hardscapes Association, 2005.
  5. Insulating Concrete Masonry Walls, TEK 06-11A. Concrete Masonry & Hardscapes Association, 2010.
  6. Flashing Details for Concrete Masonry Walls, TEK 19-05A.
    Concrete Masonry & Hardscapes Association, 2008.
  7. Design for Dry Single Wythe Concrete Masonry Walls, TEK 19-02B. Concrete Masonry & Hardscapes Association, 2012.
  8. Crack Control Strategies for Concrete Masonry Construction, CMU-TEC-009-23, Concrete Masonry & Hardscapes Association, 2023.