Resources

Concrete Masonry Basement Wall Construction

Introduction

Basements allow a building owner to significantly increase usable living, working, or storage space at a relatively low cost. Old perceptions of basements have proven outdated by stateofthe-art waterproofing, improved drainage systems, and natural lighting features such as window wells. Other potential benefits of basements include room for expansion of usable space, increased resale value, and safe haven during storms.

Historically, plain (unreinforced) concrete masonry walls have been used to effectively resist soil loads. Currently, however, reinforced walls are becoming more popular as a way to use thinner walls to resist large backfill pressures. Regardless of whether the wall is plain or reinforced, successful performance of a basement wall relies on quality construction in accordance with the structural design and the project specifications.

Materials

Concrete Masonry Units: Concrete masonry units should comply with Standard Specification for Loadbearing Concrete Masonry Units, ASTM C 90 (ref. 8). Specific colors and textures may be specified to provide a finished interior to the basement. Drywall can also be installed on furring strips, if desired. A rule of thumb for estimating the number of concrete masonry units to order is 113 units for every 100 ft2 (9.3 m2) of wall area. This estimate assumes the use of 3/8 in. (9.5 mm) mortar joints.

Mortar: Mortar serves several important functions in a concrete masonry wall; it bonds the units together, seals joints against air and moisture penetration, and bonds to joint reinforcement, ties, and anchors so that all components perform as a structural element.

Mortar should comply with Standard Specification for Mortar for Unit Masonry, ASTM C 270 (ref. 9). In addition, most building codes require the use of Type M or S mortar for construction of basement walls (refs. 2, 4, 5, 9, 13), because Type M and S mortars provide higher compressive strengths. Table 1 lists mortar proportions.

Typical concrete masonry construction uses about 8.5 ft3 (0.24 m3) of mortar for every 100 ft2 (9.3 m2) of masonry wall area. This figure assumes 3/8 in. (9.5 mm) thick mortar joints, face shell mortar bedding, and a 10% allowance for waste.

Grout: In reinforced concrete masonry construction, grout is used to bond the reinforcement and the masonry together. Grout should conform to Standard Specification for Grout for Masonry, ASTM C 476 (ref. 10), with the proportions listed in Table 2. As an alternative to complying with the proportion requirements in Table 2, grout can be specified to have a minimum compressive strength of 2000 psi (13.8 MPa) at 28 days. Enough water should be added to the grout so that it will have a slump of 8 to 11 in. (203 to 279 mm). The high slump allows the grout to be fluid enough to flow around reinforcing bars and into small voids. This initially high water-to-cement ratio is reduced significantly as the masonry units absorb excess mix water. Thus, grout gains high strengths despite the initially high waterto-cement ratio.

Construction

Prior to laying the first course of masonry, the top of the footing must be cleaned of mud, dirt, ice or other materials which reduce the bond between the mortar and the footing. This can usually be accomplished using brushes or brooms, although excessive oil or dirt may require sand blasting.

Masons typically lay the corners of a basement first so that alignment is easily maintained. This also allows the mason to plan where cuts are necessary for window openings or to fit the building’s plan.

To make up for surface irregularities in the footing, the first course of masonry is set on a mortar bed joint which can range from 1/4 to 3/4 in. (6.4 to 19 mm) in thickness. This initial bed joint should fully bed the first course of masonry units, although mortar should not excessively protrude into cells that will be grouted.

All other mortar joints should be approximately 3/8 in. (9.5 mm) thick and, except for partially grouted masonry, need only provide face shell bedding for the masonry units. In partially grouted construction, webs adjacent to the grouted cells are mortared to restrict grout from flowing into ungrouted cores. Head joints must be filled solidly for a thickness equal to a face shell thickness of the units.

Tooled concave joints provide the greatest resistance to water penetration. On the exterior face of the wall, mortar joints may be cut flush if parging coats are to be applied.

When joint reinforcement is used, it should be placed directly on the block with mortar placed over the reinforcement in the usual method. A mortar cover of at least 5/8 in. (15.9 mm) should be provided between the exterior face of the wall and the joint reinforcement. A mortar cover of 1/2 in. (12.7 mm) is needed on the interior face of the wall. For added safety against corrosion, hot dipped galvanized joint reinforcement is recommended.

See Figures 1-4 for construction details.

Reinforced Masonry: For reinforced masonry construction, the reinforcing bars must be properly located to be fully functional. In most cases, vertical bars are positioned towards the interior face of basement walls to provide the greatest resistance to soil pressures. Bar positioners at the top and bottom of the wall prevent the bars from moving out of position during grouting. A space of at least 1/2 in. (12.7 mm) for coarse grout and 1/4 in. (6.4 mm) for fine grout should be maintained between the bar and the face shell of the block so that grout can flow completely around the reinforcing bars.

As mix water is absorbed by the units, voids can form in the grout. Accordingly, grout must be puddled or consolidated after placement to eliminate these voids and to increase the bond between the grout and the masonry units. Most codes permit puddling of grout when it is placed in lifts less than about 12 in. (305 mm). Lifts over 12 inches (305 mm) should be mechanically consolidated and then reconsolidated after about 3 to 10 minutes.

Surface Bonding: Another method of constructing concrete masonry walls is to dry stack units (without mortar) and then apply surface bonding mortar to both faces of the wall. The surface bonding mortar contains thousands of small glass fibers. When the mortar is applied properly to the required thickness, these fibers, along with the strength of the mortar itself, help produce walls of comparable strength to conventionally laid plain masonry walls. Surface bonded walls offer the benefits of excellent dampproof coatings on each face of the wall and ease of construction.

Dry-stacked walls should be laid in an initial full mortar bed to level the first course. Level coursing is maintained by using a rubbing stone to smooth small protrusions on the block surfaces and by inserting shims every two to four courses.

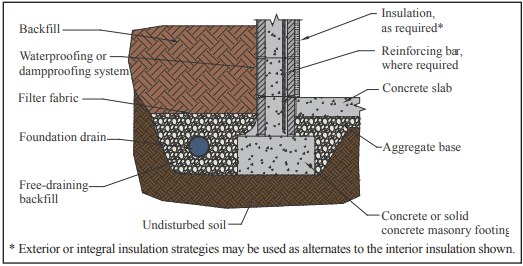
Water Penetration Resistance: Protecting below grade walls from water entry involves installation of a barrier to water and water vapor. An impervious barrier on the exterior wall surface can prevent moisture entry.

The barrier is part of a comprehensive system to prevent water penetration, which includes proper wall construction and the installation of drains, gutters, and proper grading.

Building codes (refs. 2, 4 , 5, 9, 13) typically require that basement walls be dampproofed for conditions where hydrostatic pressure will not occur, and waterproofed where hydrostatic pressures may exist. Dampproofing is appropriate where groundwater drainage is good, for example where granular backfill and a subsoil drainage system are present. Hydrostatic pressure may exist due to a high water table, or due to poorly draining backfill, such as heavy clay soils. Materials used for waterproofing are generally elastic, allowing them to span small cracks and accommodate minor movements.

When choosing a waterproof or dampproof system, consideration should be given to the degree of resistance to hydrostatic head of water, absorption characteristics, elasticity, stability in moist soil, resistance to mildew and algae, impact or puncture resistance, and abrasion resistance. A complete discussion of waterproofing, dampproofing, and drainage systems is included in TEK 19-03A (ref. 6).

All dampproofing and waterproofing systems should be applied to walls that are clean and free from dirt, mud and other materials which may reduce bond between the coating and the concrete masonry wall.

Draining water away from basement walls significantly reduces the pressure the walls must resist and reduces the possibility of water infiltration into the basement if the waterproofing (or dampproofing) system fails. Perforated pipe has historically proven satisfactory when properly installed. When placed on the exterior side of basement walls, perforated pipes are usually laid in crushed stone to facilitate drainage. To prevent migration of fine soil into the drains, filter fabrics are often placed over the gravel.

Drainage pipes can also be placed beneath the slab and connected into a sump. Pipes through the footing or the wall drain water from the exterior side of the basement wall.

The drainage and waterproofing systems should always be inspected prior to backfilling to ensure they are adequately placed. Any questionable workmanship or materials should be repaired at this stage since repairs are difficult and expensive after backfilling.

Backfilling: One of the most crucial aspects of basement construction is how and when to properly backfill. Walls should be properly braced or have the first floor in place prior to backfilling. Otherwise, a wall which is designed to be supported at the top may crack or even fail from the large soil pressures. Figure 5 shows one bracing scheme which has been widely used for residential basement walls. More substantial bracing may be required for high walls or large backfill pressures.

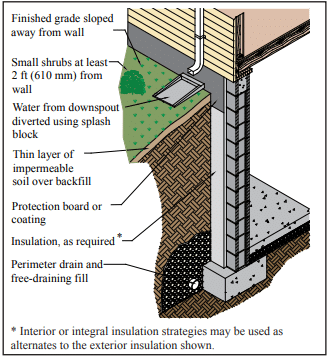
The backfill material should be free-draining soil without large stones, construction debris, organic materials, and frozen earth. Saturated soils, especially saturated clays, should generally not be used as backfill materials since wet materials significantly increase the hydrostatic pressure on the walls.

Backfill materials should be placed in several lifts and each layer should be compacted with small mechanical tampers. Care should be taken when placing the backfill materials to avoid damaging the drainage, waterproofing or exterior insulation systems. Sliding boulders and soil down steep slopes should thus be avoided since the high impact loads generated can damage not only the drainage and waterproofing systems but the wall as well. Likewise, heavy equipment should not be operated within about 3 feet (0.9 m) of any basement wall system.

The top 4 to 8 in. (102 to 203 mm) of backfill materials should be low permeability soil so rain water is absorbed into the backfill slowly. Grade should be sloped away from the basement at least 6 in. (152 mm) within 10 feet (3.1 m) of the building. If the ground naturally slopes toward the building, a shallow swale can be installed to redirect runoff.

Construction Tolerances

Specifications for Masonry Structures (ref. 8) specifies tolerances for concrete masonry construction. These tolerances were developed to avoid structurally impairing a wall because of improper placement.

  1. Dimension of elements in cross section or elevation
    …………………………………….¼ in. (6.4 mm), +½ in. (12.7 mm)
  2. Mortar joint thickness: bed………………………..+⅛ in. (3.2 mm)
    head………………………………..-¼ in (6.4 mm), + in. (9.5 mm)
  3. Elements
    • Variation from level: bed joints……………………………………….
      ±¼ in. (6.4 mm) in 10 ft (3.1 m), ±½ in. (12.7 mm) max
      top surface of bearing walls……………………………………………..
      ±¼ in.(6.4 mm), +⅜ in.(9.5 mm), ±½ in.(12.7mm) max
    • Variation from plumb………….±¼ in. (6.4 mm) 10 ft (3.1 m)
      ………………………………………±⅜ in. (9.5 mm) in 20 ft (6.1 m)
      ……………………………………………±½ in. (12.7 mm) maximum
    • True to a line…………………..±¼ in. (6.4 mm) in 10 ft (3.1 m)
      ………………………………………±⅜ in. (9.5 mm) in 20 ft (6.1 m)
      ……………………………………………±½ in. (12.7 mm) maximum
    • Alignment of columns and bearing walls (bottom versus top)
      ……………………………………………………………..±½ in (12.7 mm)
  4. Location of elements
    • Indicated in plan……………..±½ in (12.7 mm) in 20 ft (6.1 m)
      …………………………………………….±¾ in. (19.1 mm) maximum
    • Indicated in elevation
      ……………………………………….±¼ in. (6.4 mm) in story height
      …………………………………………….±¾ in. (19.1 mm) maximum

Insulation: The thermal performance of a masonry wall depends on its R-value as well as the thermal mass of the wall. Rvalue describes the ability to resist heat flow; higher R-values give better insulating performance. The R-value is determined by the size and type of masonry unit, type and amount of insulation, and finish materials. Depending on the particular site conditions and owner’s preference, insulation may be placed on the outside of block walls, in the cores of hollow units, or on the interior of the walls.

Thermal mass describes the ability of materials like concrete masonry to store heat. Masonry walls remain warm or cool long after the heat or air-conditioning has shut off, keeping the interior comfortable. Thermal mass is most effective when insulation is placed on the exterior or in the cores of the block, where the masonry is in direct contact with the interior conditioned air.

Exterior insulated masonry walls typically use rigid board insulation adhered to the soil side of the wall. The insulation requires a protective finish where it is exposed above grade to maintain durability, integrity, and effectiveness.

Concrete masonry cores may be insulated with molded polystyrene inserts, expanded perlite or vermiculite granular fills, or foamed-in-place insulation. Inserts may be placed in the cores of conventional masonry units, or they may be used in block specifically designed to provide higher R-values.

Interior insulation typically consists of insulation installed between furring strips, finished with gypsum wall board or panelling. The insulation may be fibrous batt, rigid board, or fibrous blown-in insulation.

Design Features

Interior Finishes: Split faced, scored, burnished, and fluted block give owners and designers added options to standard block surfaces. Colored units can be used in the entire wall or in sections to achieve specific patterns.

Although construction with staggered vertical mortar joints (running bond) is standard for basement construction, the appearance of continuous vertical mortar joints (stacked bond pattern) can be achieved by using of scored units or reinforced masonry construction.

Natural Lighting: Because of the modular nature of concrete masonry, windows and window wells of a variety of shapes and sizes can be easily accommodated, giving basements warm, natural lighting. For additional protection and privacy, glass blocks can be incorporated in lieu of traditional glass windows.

References

  1. Basement Manual-Design and Construction Using Concrete Masonry, CMU-MAN-002-01, Concrete Masonry & Hardscapes Association, 2001.
  2. BOCA National Building Code. Country Club Hills, IL: Building Officials and Code Administrators International, Inc. (BOCA), 1999.
  3. Building Code Requirements for Masonry Structures, ACI 530-02/ASCE 5-02/TMS 402-02. Reported by the Masonry Standards Joint Committee, 2002.
  4. International Residential Code. Falls Church, VA: International Code Council, 2000.
  5. International Building Code. Falls Church, VA: International Code Council, 2000.
  6. Preventing Water Penetration in Below-Grade Concrete Masonry Walls, TEK 19-03A. Concrete Masonry & Hardscapes Association, 2001.
  7. Seismic Design Provisions for Masonry Structures, TEK 14-18B, Concrete Masonry & Hardscapes Association, 2009.
  8. Specifications for Masonry Structures, ACI 530.1-02/ASCE 6-99/TMS 602-02. Reported by the Masonry Standards Joint Committee, 2002.
  9. Standard Building Code. Birmingham, AL: Southern Building Code Congress International, Inc. (SBCCI), 1999.
  10. Standard Specification for Grout for Masonry, ASTM C 476-01. American Society for Testing and Materials, 2001.
  11. Standard Specification for Load-Bearing Concrete Masonry Units, ASTM C 90-01. American Society for Testing and Materials, 2001.
  12. Standard Specification for Mortar for Unit Masonry, ASTM C 270-00. American Society for Testing and Materials, 2000.
  13. Uniform Building Code. Whittier, CA: International Conference of Building Officials (ICBO), 1997.

Preventing Water Penetration in Below-Grade Concrete Masonry Walls

INTRODUCTION

Concrete masonry has traditionally been the material of choice for foundation wall construction. State-of-the-art waterproofing, dampproofing, and drainage systems applied to concrete masonry provide excellent protection from water penetration, ensuring protection for building contents and comfort for occupants.

Protecting below-grade walls from water entry involves installing a barrier to water and water vapor. Below grade moisture tends to migrate from the damp soil to the drier area inside the basement. An impervious barrier on the exterior wall surface can prevent moisture entry. The barrier is part of a comprehensive system to prevent water penetration, which includes proper wall construction and the installation of drains, gutters, and proper grading.

WATERPROOFING AND DAMPPROOFING

Building codes (refs. 1, 2) typically require that basement walls be dampproofed for conditions where hydrostatic pressure will not occur, and waterproofed where hydrostatic pressures may exist. Dampproofing is appropriate where groundwater drainage is good, through granular backfill into a subsoil drainage system.

Hydrostatic pressure may exist due to a high water table or due to poorly draining backfill, such as heavy clay soils. Materials used for waterproofing are generally elastic, allowing them to span small cracks and accommodate minor movements.

When choosing a system, consideration should be given to the degree of resistance to hydrostatic head of water, absorption characteristics, elasticity, stability in moist soil, resistance to mildew and algae, and impact, puncture and abrasion resistance.

WATERPROOF AND DAMPPROOF SYSTEMS

Waterproof and dampproof systems must be continuous to prevent water penetration. Similarly, the barrier is typically carried above the finished grade level to prevent water entry between the barrier and the foundation wall. Cracks exceeding ¼ in. (6 mm) should be repaired before applying a waterproof or dampproof barrier. Repair of hairline cracks is typically not required, as most barriers will either fill or span small openings. In addition, most waterproofing and dampproofing systems should be applied to clean, dry walls. In all cases, manufacturer’s directions should be carefully followed for proper installation.

Particular attention should be paid to wall penetrations and to re-entrant corners at garages, porches, and fireplaces. Because differential movement often occurs at these intersections, stretchable membranes are often used to span any potential cracks. Alternately, the main wall in some cases can be coated prior to constructing the cross wall provided that structural adequacy is maintained.

Coatings are sprayed, trowelled, or brushed onto below-grade walls, providing a continuous barrier to water entry. Coatings should be applied to clean, structurally sound walls. Walls should be brushed or washed to remove dirt, oil, efflorescence, or other materials which may reduce the bond between the coating and the wall.

Sheet membranes and panels are less dependent on workmanship and surface preparation than coatings. Many membrane systems are better able to remain intact in the event of settlement or other foundation wall movement. Seams, terminations, and penetrations must be properly sealed.

Prescriptive Systems

Both the International Building Code (IBC) (ref. 1) and the International Residential Code (IRC) (ref. 2) include prescriptive methods for waterproofing and dampproofing. Except where a damproofing material is approved for direct application to the masonry, masonry walls are required to have not less than in. (9.5 mm) portland cement parging applied to the exterior of the wall before applying damproofing. The following materials are specified in the IBC as acceptable waterproofing and dampproofing materials:

  • two-ply hot-mopped felts;
  • 6 mil (0.006 in.; 0.152 mm) or greater polyvinyl chloride;
  • 40 mil (0.040 in.; 1.02 mm) polymer-modified asphalt;
  • 6 mil (0.006 in.; 0.152 mm) polyethylene; or
  • other approved methods or materials capable of bridging nonstructural cracks.

In addition, the IRC includes the following materials for concrete and masonry foundation waterproofing:

  • 55 pound (25 kg) roll roofing;
  • 60 mil (1.5 mm) flexible polymer cement;
  • in. (3 mm) cement-based, fiber-reinforced, waterproofing coating; or
  • 60 mil (1.5 mm) solvent-free liquid-applied synthetic rubber.

Both the IBC and IRC list the following materials as acceptable for dampproofing only (note—any of the waterproofing materials are acceptable for dampproofing):

  • bituminous material;
  • 3 lb/yd² (16 N/m²) of acrylic modified cement;
  • in. (3.2 mm) coat of surface-bonding mortar complying with ASTM C887 (ref. 3); or
  • other approved methods or materials.

The following discusses details of some of the prescriptive code methods for waterproofing and dampproofing.

Rubberized Asphalt Systems

A wide variety of rubberized and other polymer-modified asphalt waterproofing systems are available. Most of these are applied as sheet membranes, although some are available as liquid coatings. These systems provide a continuous barrier to water with the ability to elastically span small holes or cracks.

Rubberized asphalt sheet membranes are applied over a primer, which is used to increase adhesion of the sheet. The membrane is adhesive on one side and protected by a polyethylene film on the other. Adjacent pieces of membrane must be lapped, and the top and bottom edges sealed with mastic to provide continuous protection from water entry. After the membrane is placed on the wall, the surface is rolled with sufficient pressure to ensure adequate adhesion.

Rubberized asphalt is also available in a form that can be melted at the jobsite, then spread to completely cover foundation walls. Liquid coatings can be applied by airless spray, roller, or brush. Both the liquid-applied and sheets are covered with a protection board, which protects from construction traffic and during backfilling.

Cementitious Coating Systems

Cement-based coatings are typically trowelled onto concrete masonry walls or brushed on using a coarse-fibered brush. The coatings sufficiently fill block pores, small cracks, and irregularities. Some cementitious coatings are modified with various polymers to increase elasticity and water penetration resistance.

Elastomeric Systems

Elastomeric materials are acrylic-based products which provide a flexible barrier to water penetration for below grade walls. Elastomerics are available as liquid coatings and as sheet membranes. The sheets are attached with adhesive, and may be reinforced with fabric to further increase tensile strength and resistance to tears and punctures. Liquid coatings can be applied by airless spray, roller, or brush.

Other Waterproofing and Dampproofing Systems

The systems listed above (and within the building codes) are only some of the materials and systems available; several others are discussed below. See Basement Manual—Design & Construction Using Concrete Masonry (ref. 4) for more detailed information.

Parging and Bituminous Coating Systems

Where drainage is good, a dampproof coating of parging with a permanent bituminous coating has proven to be satisfactory. A portland cement and sand mix (1:3.5 by volume), or Type M or S mortar may be used for the parge coat. The parge coat should be beveled at the top to form a wash, and thickened at the bottom to form a cove between the wall base and top of footing, as shown in Figure 1.

To further increase water penetration resistance, a bituminous coating is applied over the parging. Coal tar or asphalt based bitumens are available in solvent for hot application, or in emulsions for application at ambient temperatures. These coatings can be sprayed, brushed, or trowelled onto the finish coat of parging.

Bentonite Panel Systems

Bentonite is a mineral that swells to many times its original size when wet. Waterproofing panels incorporate dry bentonite encased in kraft paper or fabric. After installation, the bentonite swells up the first time it is exposed to water, expanding between the foundation wall and the backfill, and forming an impervious barrier. The swelling seals small cracks in the foundation wall or punctures in the panels themselves.

To prevent premature hydration bentonite panels must be protected from moisture until they are properly installed and the foundation wall has been backfilled.

Other Systems

There are several systems for which Acceptance Criteria, developed by the ICC Evaluation Service, exist. Cold, liquid-applied, below-grade exterior dampproofing and waterproofing materials should demonstrate compliance with ICC ES AC29 (ref. 5). For rigid, polyethylene, below-grade dampproofing and waterproofing materials, compliance should be shown to ICC-ES AC114 (ref. 6).

Some systems fulfill the requirements of both waterproofing/dampproofing and wall insulation. These systems, however, may not be specified directly in the building code or have an Acceptance Criteria. In these cases, materials should be evaluated both for general waterproofing (or dampproofing) characteristics (such as resistance to hydrostatic pressure, etc.) as well as for criteria specific to the material or system. The Acceptance Criteria listed above can be used as a baseline for a material, although not all requirements may apply to all materials. An engineering evaluation of the product testing results can demonstrate acceptable performance for use as dampproofing or waterproofing.

DRAINAGE

Draining water away from basement walls significantly reduces the pressure the basement wall must resist. This reduces both the potential for cracking and the possibility of water penetration into the basement if there is a failure in the waterproof or dampproof system.

Perforated pipe or drain tiles laid with open joints have proven to be effective at collecting and transporting water away from foundation walls. The invert of drain pipes should be below the top of the floor slab elevation, as shown in Figure 1. The backfill drain should be connected to solid piping to carry the water to natural drainage, a storm sewer, or a sump. For adequate drainage, drains should slope at least in. in 10 ft (10 mm in 3 m).

Drain tile and perforated pipes are typically laid in crushed stone to facilitate drainage. At least 2 in. (51 mm) of washed gravel or free-draining backfill (containing not more than 10% material finer than a No. 4 sieve) should be placed beneath perforated pipes. Drain tiles laid with open joints are more effective when laid on the undisturbed soil where the water begins to accumulate. At least 6 to 12 in. (152 to 305 mm) of the same stone should cover the drain and should extend 12 in. (305 mm) or more beyond the edge of the footing. To prevent migration of fine soils into the drains, filter fabrics are often placed over the gravel.

Drainage pipes may also be placed beneath the slab and connected to a sump. In some cases, pipes are cast in or placed on top of concrete footings at 6 to 8 ft (1.8 to 2.4 m) o.c. to help drain water from the exterior side of the foundation wall.

The backfill material itself also significantly affects water drainage around the wall. The backfill material should be well-draining soil free of large stones, construction debris, organic materials, and frozen earth. Saturated soils, especially saturated clays, should generally not be used for backfill, since wet materials significantly increase the hydrostatic pressure on foundation walls. The top 4 to 8 in. (102 to 203 mm) of backfill should be low permeability soil so rain water is absorbed into the backfill slowly.

The finished grade should be sloped away from the foundation at least 6 in. within 10 ft (152 mm in 3 m) from the building, as shown in Figure 2. If the ground naturally slopes toward the building, a shallow trench or swale can be installed to direct water runoff away from the building.

Finally, gutters and downspouts should be installed to minimize water accumulation near the foundation. Water exiting downspouts should be directed away from foundation walls using plastic drainage tubing or splash blocks. Roof overhangs, balconies, and porches also shield the soil from direct exposure to rainfall.

CONSTRUCTION

Methods of construction can also impact the watertightness of foundation walls. Properly tooled mortar joints help prevent cracks from forming, and contribute to the watertightness of the finished work. Concave-shaped mortar joints are most effective for resisting water entry. Tooling the mortar compresses the surface to make it more watertight, and also reduces leakage by filling small holes and other imperfections. On the exterior face of the wall, mortar joints may be struck flush if parging will be applied.

The drainage and waterproof or dampproof system should be inspected prior to backfilling to ensure they are properly placed. Any questionable workmanship or materials should be repaired at this point, because repair is difficult and expensive after backfilling.

Backfilling methods are important, since improper backfilling can damage foundation walls or the dampproof or waterproof system. Foundation walls should either be properly braced or should have the first floor in place prior to backfilling so the wall is supported against the soil load.

Final grade should be 6 to 12 in. (152 to 305 mm) below the top of the waterproof or dampproof membrane, and should slope away from the foundation wall. In no case should the backfill be placed higher than the design grade line.

These topics are covered in more detail in ref. 7.

LANDSCAPING

Landscaping directly adjacent to the building impacts the amount of water absorbed by the foundation backfill. Particular care should be taken when automatic sprinklers are installed adjacent to foundation walls. Whenever possible, large-rooting shrubs and trees should be placed 10 to 15 ft (3 to 4.6 m) away from foundation walls. Smaller shrubs should be kept at least 2 to 3 ft (0.6 to 0.9 m) from walls. Ground covers help prevent erosion and can extend to the foundation. These elements are illustrated in Figure 2.

Asphalt and concrete parking lots, sidewalks, building aprons, stoops and driveways prevent direct absorption of water into soil adjacent to the foundation, and should be installed to slope away from the building.

REFERENCES

  1. International Building Code. International Codes Council, 2012.
  2. International Residential Code for One- and Two-Family Dwellings. International Code Council, 2012.
  3. Standard Specification for Packaged, Dry, Combined Materials for Surface Bonding Mortar, ASTM C887-05(2010) . ASTM International, Inc., 2010.
  4. Basement Manual—Design & Construction Using Concrete Masonry, CMU-MAN-002-01, Concrete Masonry & Hardscapes Association, 2001.
  5. Acceptance Criteria for Cold, Liquid-Applied, Below-Grade, Exterior Damproofing and Waterproofing Materials, ICC ES AC29. International Code Council, 2011.
  6. Acceptance Criteria for Rigid, Polyethylene, Below-Grade, Damproofing and Wall Waterproofing Material, ICC-ES AC114. International Code Council, 2011.
  7. Concrete Masonry Basement Wall Construction, TEK 03-11, Concrete Masonry & Hardscapes Association, 2001.


Water Repellents for Concrete Masonry Walls

INTRODUCTION

Water repellents are used on exterior walls to provide resistance to wind-driven rain. In addition, water repellents can also reduce the potential for efflorescence and staining from environmental pollutants, and enhance the color or texture of a wall.

When applied in accordance with manufacturer’s recommendations, water repellents effectively control water penetration. Water repellents are generally recommended for use on single wythe concrete masonry walls exposed to the weather. The choice of water repellent will depend on the surface to be protected, the exposure conditions, and on aesthetics. A wide variety of water repellents is available, offering many choices of color, surface texture, glossiness, and application procedures.

WATER RESISTANCE

Water penetration resistance of concrete masonry walls is dependent on wall design, design for differential movement, workmanship, wall maintenance, and the application of water repellents. This TEK focuses on water repellent products for above grade walls. The other factors are discussed in CMUTEC-009-23, TEKs 19-04A and 19-05A (refs 3, 5, and 4).

The effectiveness of water repellents can be evaluated in several ways. In the laboratory, Standard Test Method for Water Penetration and Leakage Through Masonry, ASTM E 514 (ref. 9), is currently the only standard test method for water penetration. The test simulates 51/2 in. (140 mm) of rain per hour with a 62.5 mph (101 km/h) wind for a duration of 4 hours. This test is often used to evaluate water penetration before and after application of a water repellent, or to judge the relative performance of several water repellent systems.

TYPES OF WATER REPELLENTS

There are two general types of water repellents: surface treatment repellents and integral water repellents. Surface treatment repellents are applied to the weather-exposed side of the wall after the wall is constructed. In addition to water repellency, surface treatment repellents also improve the stain resistance of the wall, by preventing dirt and soot from penetrating the surface, causing deep stains.

When used on new construction, choose water repellents that are able to resist the alkalinity of the fresh mortar. As an alternative, an alkali-resistant fill coat can be applied to the wall first, or the wall can be allowed to weather for about six months until the alkalinity is reduced.

In general, surface treatment repellents should allow for vapor transmission to ensure that interior humidity within the wall and structure can escape. Treatments which are impermeable to water vapor tend to fail by blistering and peeling when moisture builds up behind the exterior surface.

When choosing a surface treatment repellent, manufacturer’s guidelines should be consulted regarding appropriate substrates and applications for a particular product.

Regardless of the type of surface treatment chosen, it should be applied to a sample panel or on an inconspicuous part of the building to determine the appearance, application method, application rate, and compatibility with the masonry surface. Surface treatment repellents will require reapplication after a period of years to ensure continuous water repellency.

Integral water repellents are added to the masonry materials before the wall is constructed. The water repellent admixture is incorporated into the concrete mix at the block plant. This way, each block has water repellent throughout the concrete in the unit. For mortar, the water repellent is added to the mix on the jobsite. It is critical when using integral water repellents that the repellent is incorporated into both the block and the mortar to ensure proper performance of the wall.

The following sections describe in more detail the characteristics of various generic surface treatment repellents and integral water repellents.

SURFACE TREATMENT REPELLENTS

Cementitious coatings:

Coatings such as stucco or surface bonding mortar can be used to increase the water resistance of a wall, as well as to significantly change the texture of the finished wall surface. Consideration should be given to differential movement which may transmit stress into the coating. Further information on stucco is found in TEK 09-03A (ref. 8).

Paints:

Paints are colored opaque coatings, used when color uniformity of the wall is important for aesthetic reasons. Paints are a mixture of pigment, which hides the surface, and resin, which binds the pigment together. The proportion of pigment to resin, and the type of resin will affect the fluidity, gloss, and durability of the paint.

The pigment volume concentration (PVC) compares the amount of pigment in a paint to the amount of binder. As the PVC increases, the paint has more pigment and less binder. High PVC coatings are used where limited penetration is desired, such as for fill coats on porous materials. High PVC paints generally brush on easier, have greater hiding power, and usually cost less than low PVC paints. Low PVC paints are generally more flexible, durable, washable, and are glossier.

Fill Coats:

Fill coats, also called primer-sealers or fillers, are sometimes used to smooth out surface irregularities or fill small voids before application of a finish coat. Common fill coats include latex coatings and portland cement. In addition, acrylic latex or polyvinyl acetate is sometimes combined with portland cement for use as a fill coat. Fill coats should be scrubbed vigorously into the masonry surface using a relatively short stiff fiber brush.

Cement-Based Paints:

Cement-based paints contain portland cement as the binder, which creates a strong bond to the masonry and is not subject to deterioration from alkalis. Cement-based paints effectively fill small voids so that large amounts of water are repelled. Durability is excellent.

Cement-based paints are sold either premixed, or in dry form and mixed with water just before use. They should be applied to a damp surface using a stiff brush, and kept damp for 48 to 72 hours, until the cement cures. If the cement-based paint is modified with latex, however, wet curing is not necessary. White and light colors tend to be the most satisfactory.

Latex Paints:

Latex paints are water-based, with any one of several binder types. They are inherently resistant to alkalis, have good hiding characteristics, and are durable and breathable, making them a good choice for concrete masonry walls. Butadiene-styrene paints and polyvinyl acetate emulsion paint are both categorized as latex paints. Latex paints can be applied to either damp or dry surfaces, and dry quickly, usually within 1 to 1 ½ hours. They are generally inexpensive and easy to apply by brush, roller, or spray.

Alkyd Paints:

Alkyd paints are durable, flexible, have good gloss retention, are low in cost, but have low alkali resistance. They should be sprayed on, since they tend to be difficult to brush apply. They dry quickly once applied.

Clear Surface Treatment Repellents:

Clear treatments are used to add water resistance to a wall without altering the appearance. These treatments are classified by the resin type, such as silicone or acrylic.

Clear treatments can be classified as either films or penetrant repellents. Penetrant repellents are absorbed into the face of the masonry, lining the pores. They adhere by forming a chemical bond with the masonry. Penetrant repellents do not bridge cracks or voids, so these should be repaired prior to applying the treatment. Silanes and siloxanes are penetrant repellents. Films, such as acrylics, form a continuous surface over the masonry, bridging very small cracks and voids. Because of this, films can also reduce the vapor transmission of a concrete masonry wall. Films tend to add a glossier finish to the wall surface, and may intensify the substrate color.

Silicones: Silicones can be further subdivided into silicone resins, silanes, and siloxanes. These treatments change the contact angle between the water and the pores in the face of the masonry, so that the masonry repels water rather than absorbing it. Silicones have been found to reduce the occurrence of efflorescence on concrete masonry walls.

Silicone resins: These are the most widely used silicone-based water repellents for masonry. They can penetrate the surface of masonry very easily, providing excellent water repellency. Silicone resins should be applied to air dry surfaces, and are usually fully dry after 4 to 5 hours.

Silanes: Like silicone resins, silanes have good penetration characteristics. Although volatility of silane has been a concern, the absorption of silane by masonry generally occurs at a much faster rate than evaporation of the silane. Silanes, unlike silicone resins, can be applied to slightly damp surfaces.

Siloxanes: Siloxanes have the benefits of silanes, i.e., good penetration and ability for application on damp surfaces. Siloxanes are effective on a wider variety of surfaces than silanes, and dry relatively quickly. Costs are comparable to silanes, and are slightly higher than silicone resins.

Acrylics: Acrylics form an elastic film over the surface of masonry to provide an effective barrier to water. Acrylics dry quickly and have excellent chalk resistance. Acrylics should be applied to air-dry masonry surfaces. Costs tend to comparable to silicone resins.

OTHER TREATMENTS

Epoxy, Rubber, and Oil-Based Paints:

These paints form impervious moisture barriers on concrete masonry surfaces. This makes for an excellent water barrier, but does not allow the wall to breathe. As such, these paints are generally not considered water repellents. These treatments are better limited to interior walls, since they can blister and peel when used on exterior walls.

Oil-based paints adhere well to masonry, but are not particularly resistant to alkalis, abrasion, or chemicals. Rubber and epoxy paints offer high resistance to chemicals and corrosive gases, and are generally used in industrial applications.

APPLICATION OF SURFACE TREATMENT REPELLENTS

This section contains some general guidelines for application of surface treatments. In all cases, refer to manufacturers’ literature for final recommendations and procedures. Surface treatments should typically be applied to clean, dry walls. Wall surfaces should be cleaned in accordance with manufacturer’s instructions to ensure good adhesion and penetration. The wall should be allowed to dry for 3 to 5 days between cleaning or rain and application of the repellent. All cracks and large voids should be repaired prior to applying the repellent. If caulk is used in the repair, the caulk should be compatible with the surface treatment repellent and fully cured before treatment application.

Weather can have a significant effect on the application and curing of water repellents. It is usually recommended that the repellent be applied when temperatures are expected to remain above 40°F (4 °C) during the two to four days after application. There should be little or no wind during sprayon applications, to avoid an uneven coating and drift of the treatment onto other materials. Adjacent landscaping should be protected during application, and, depending on the surface treatment, it may also be necessary to protect other building materials, such as aluminum or glass.

Most manufacturers recommend applying clear surface treatments using a saturating flood coat, with a 6 to 8 in. (152 to 203 mm) rundown below the contact point of the spray. It is sometimes recommended that a second coat be applied when the first is still wet. Coverage rates vary from 75 to 200 ft²/gallon (1841 to 4908 m²/m³) depending on the surface treatment repellent used and the type and condition of the masonry.

When applying a water repellent over a previously treated wall, ensure that the new treatment is compatible with the old. With some surface treatments, masonry should be uncoated for proper adhesion. In these cases, the old treatment can be allowed to weather off, or, if time does not permit this, a pressurized wash followed by high pressure water rinse can remove previous surface treatments from masonry.

The durability of a coating is a function of the type of coating, the application procedure, the rate of application, the surface preparation, and the exposure conditions. For this reason, it is difficult to predict how the various surface treatment repellents will perform under field conditions.

INTEGRAL WATER REPELLENTS

Integral water repellents are usually polymeric products incorporated into the masonry products prior to construction. Because integral water repellents are evenly distributed throughout the wall, they do not change the finished appearance. In addition, integral water repellents are effective at reducing efflorescence, since water migration throughout the block is reduced.

As stated earlier, it is essential that an integral water repellent admixture be incorporated into the mortar at the jobsite, as well as into the block and any other masonry wall components, such as precast lintels. The same brand of water repellent admixture should be used in the mortar as was used in the block, to ensure compatibility and bond.

Questions often arise regarding the effect of integral water repellents on mortar bond strength, due to the decreased water absorption. Research has shown that bond strength is primarily influenced by the mechanical interlock of mortar to the small voids in the block.

When walls containing integral water repellents are grouted, the grout produces a hydrostatic pressure which forces water into the surrounding masonry unit, allowing proper curing of the grout.

Generally, the use of other admixtures in conjunction with integral water repellents is not recommended. Some other admixtures, especially accelerators, have been shown to reduce the effectiveness of integral water repellents.

Some integral water repellents are soluble when immersed in water for long periods of time. Conditions which allow standing water on any part of the wall should be avoided. For this reason, mortar joints should be tooled, rather than raked. In addition, walls incorporating integral water repellents should not be cleaned with a high-pressure water wash.

REFERENCES

  1. Clark, E. J., Campbell, P. G., and Frohnsdorff, G., Waterproofing Materials for Masonry. National Bureau of Standards Technical Note 883. U. S. Department of Commerce, 1975.
  2. Clear Water Repellents for Above Grade Masonry, Sealant, Waterproofing, and Restoration Institute, 1990.
  3. Crack Control Strategies for Concrete Masonry Construction, CMU-TEC-009-23, Concrete Masonry & Hardscapes Association, 2023.
  4. Flashing Strategies for Concrete Masonry Walls, TEK 1904A, Concrete Masonry & Hardscapes Association, 2008.
  5. Flashing Details for Concrete Masonry Walls, TEK 19-05A, Concrete Masonry & Hardscapes Association, 2008.
  6. Fornoville, L., Water Repellent Treatment of Masonry, Proceedings of the Fourth Canadian Masonry Symposium, University of New Brunswick, Canada, 1986.
  7. McGettigan, E., Application Mechanisms of Silane Waterproofers, Concrete International, October 1990.
  8. Plaster and Stucco For Concrete Masonry, TEK 09-03A. Concrete Masonry & Hardscapes Association, 2002.
  9. Standard Test Method for Water Penetration and Leakage Through Masonry, ASTM E 514-05a. ASTM International, 2005.